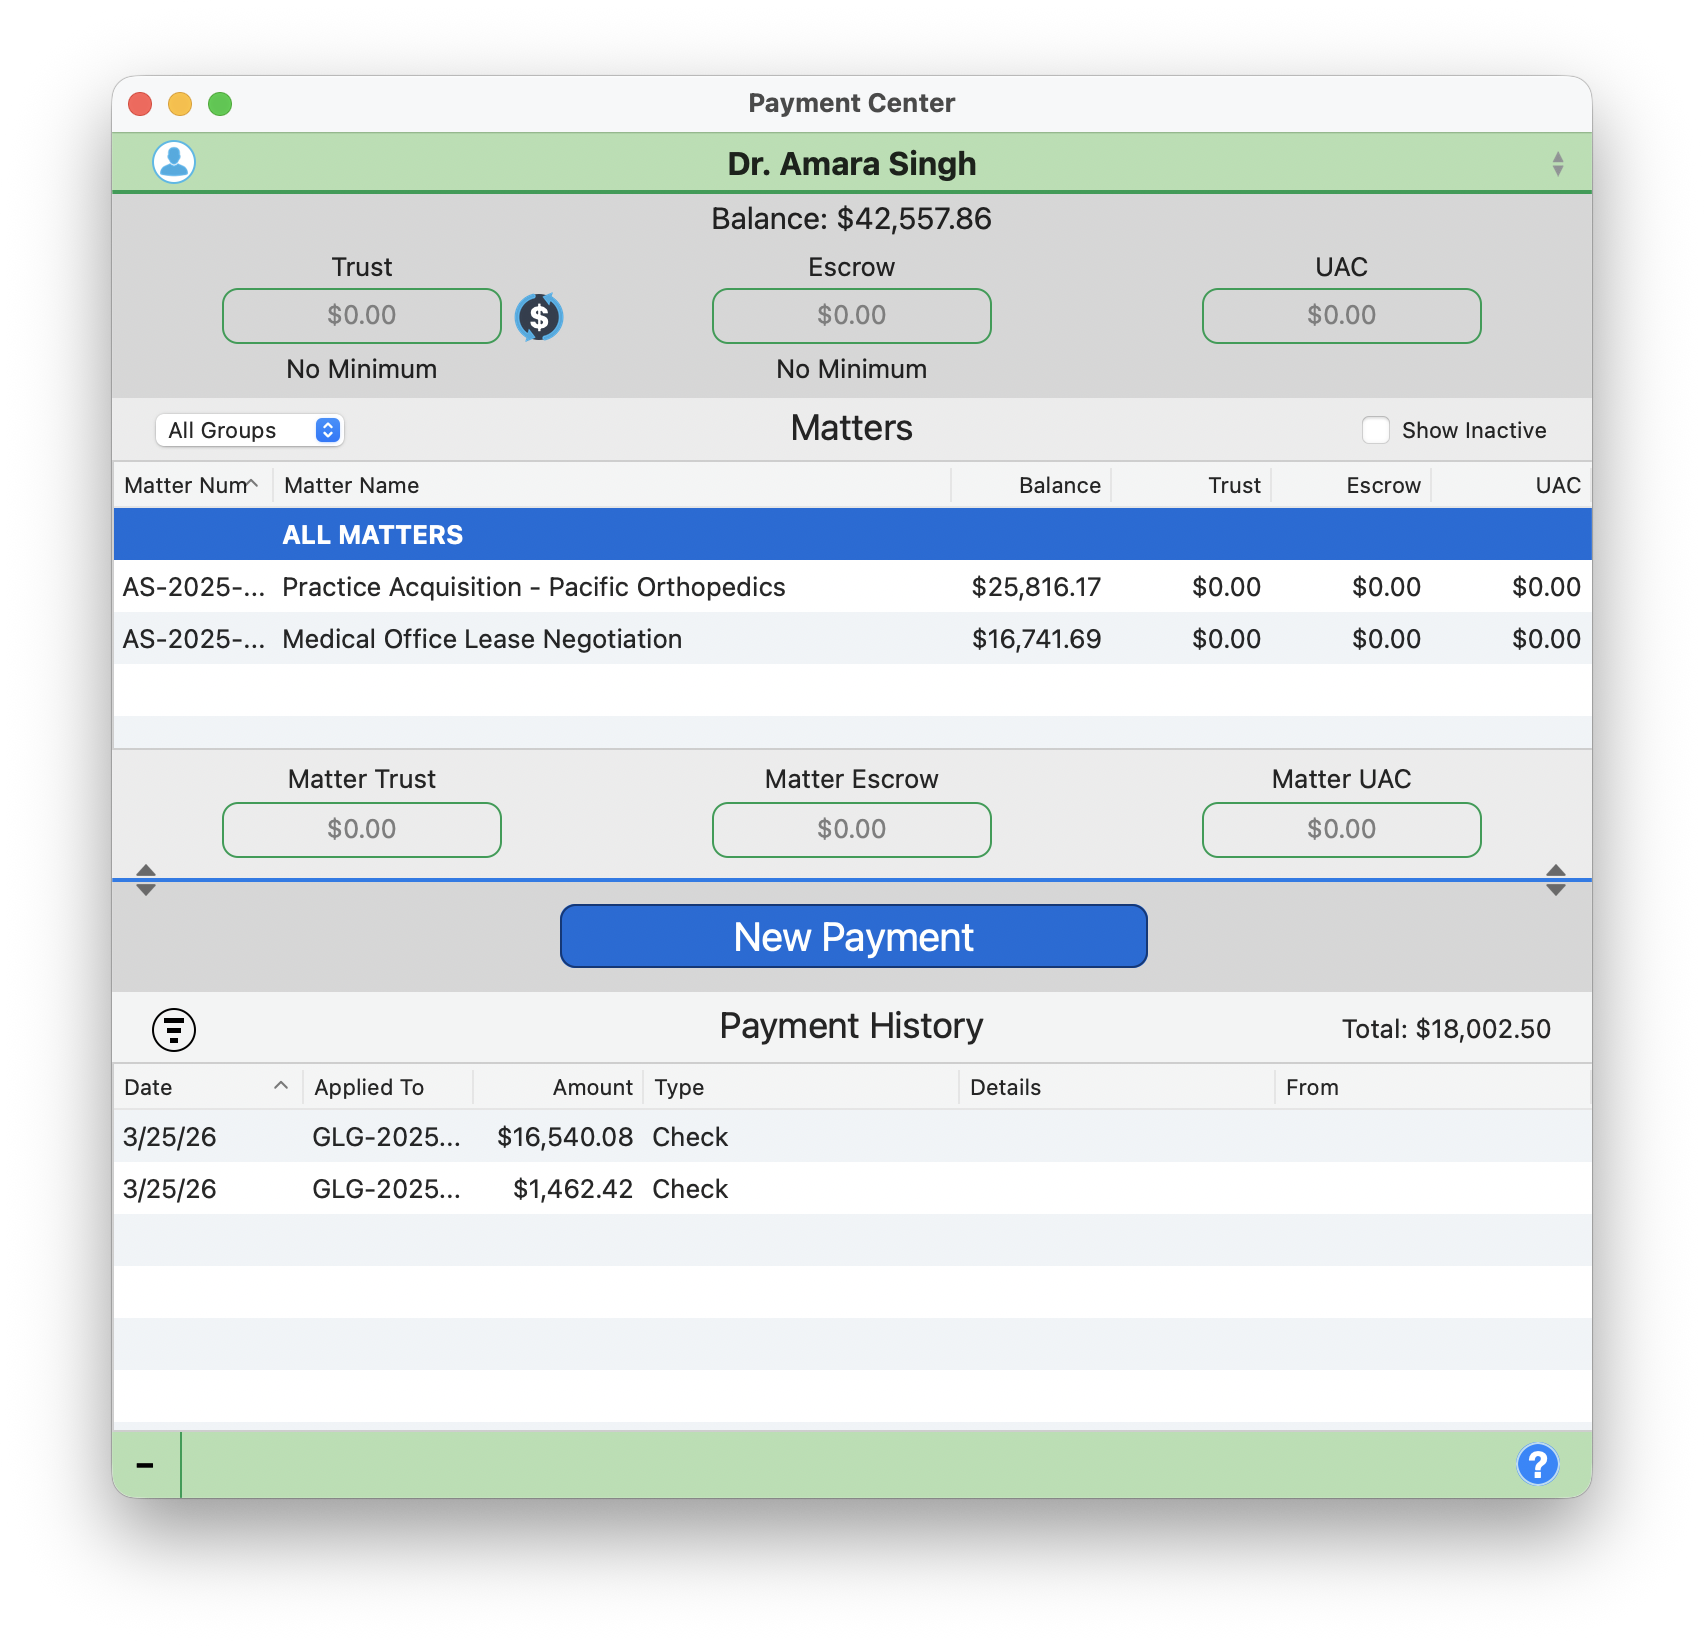
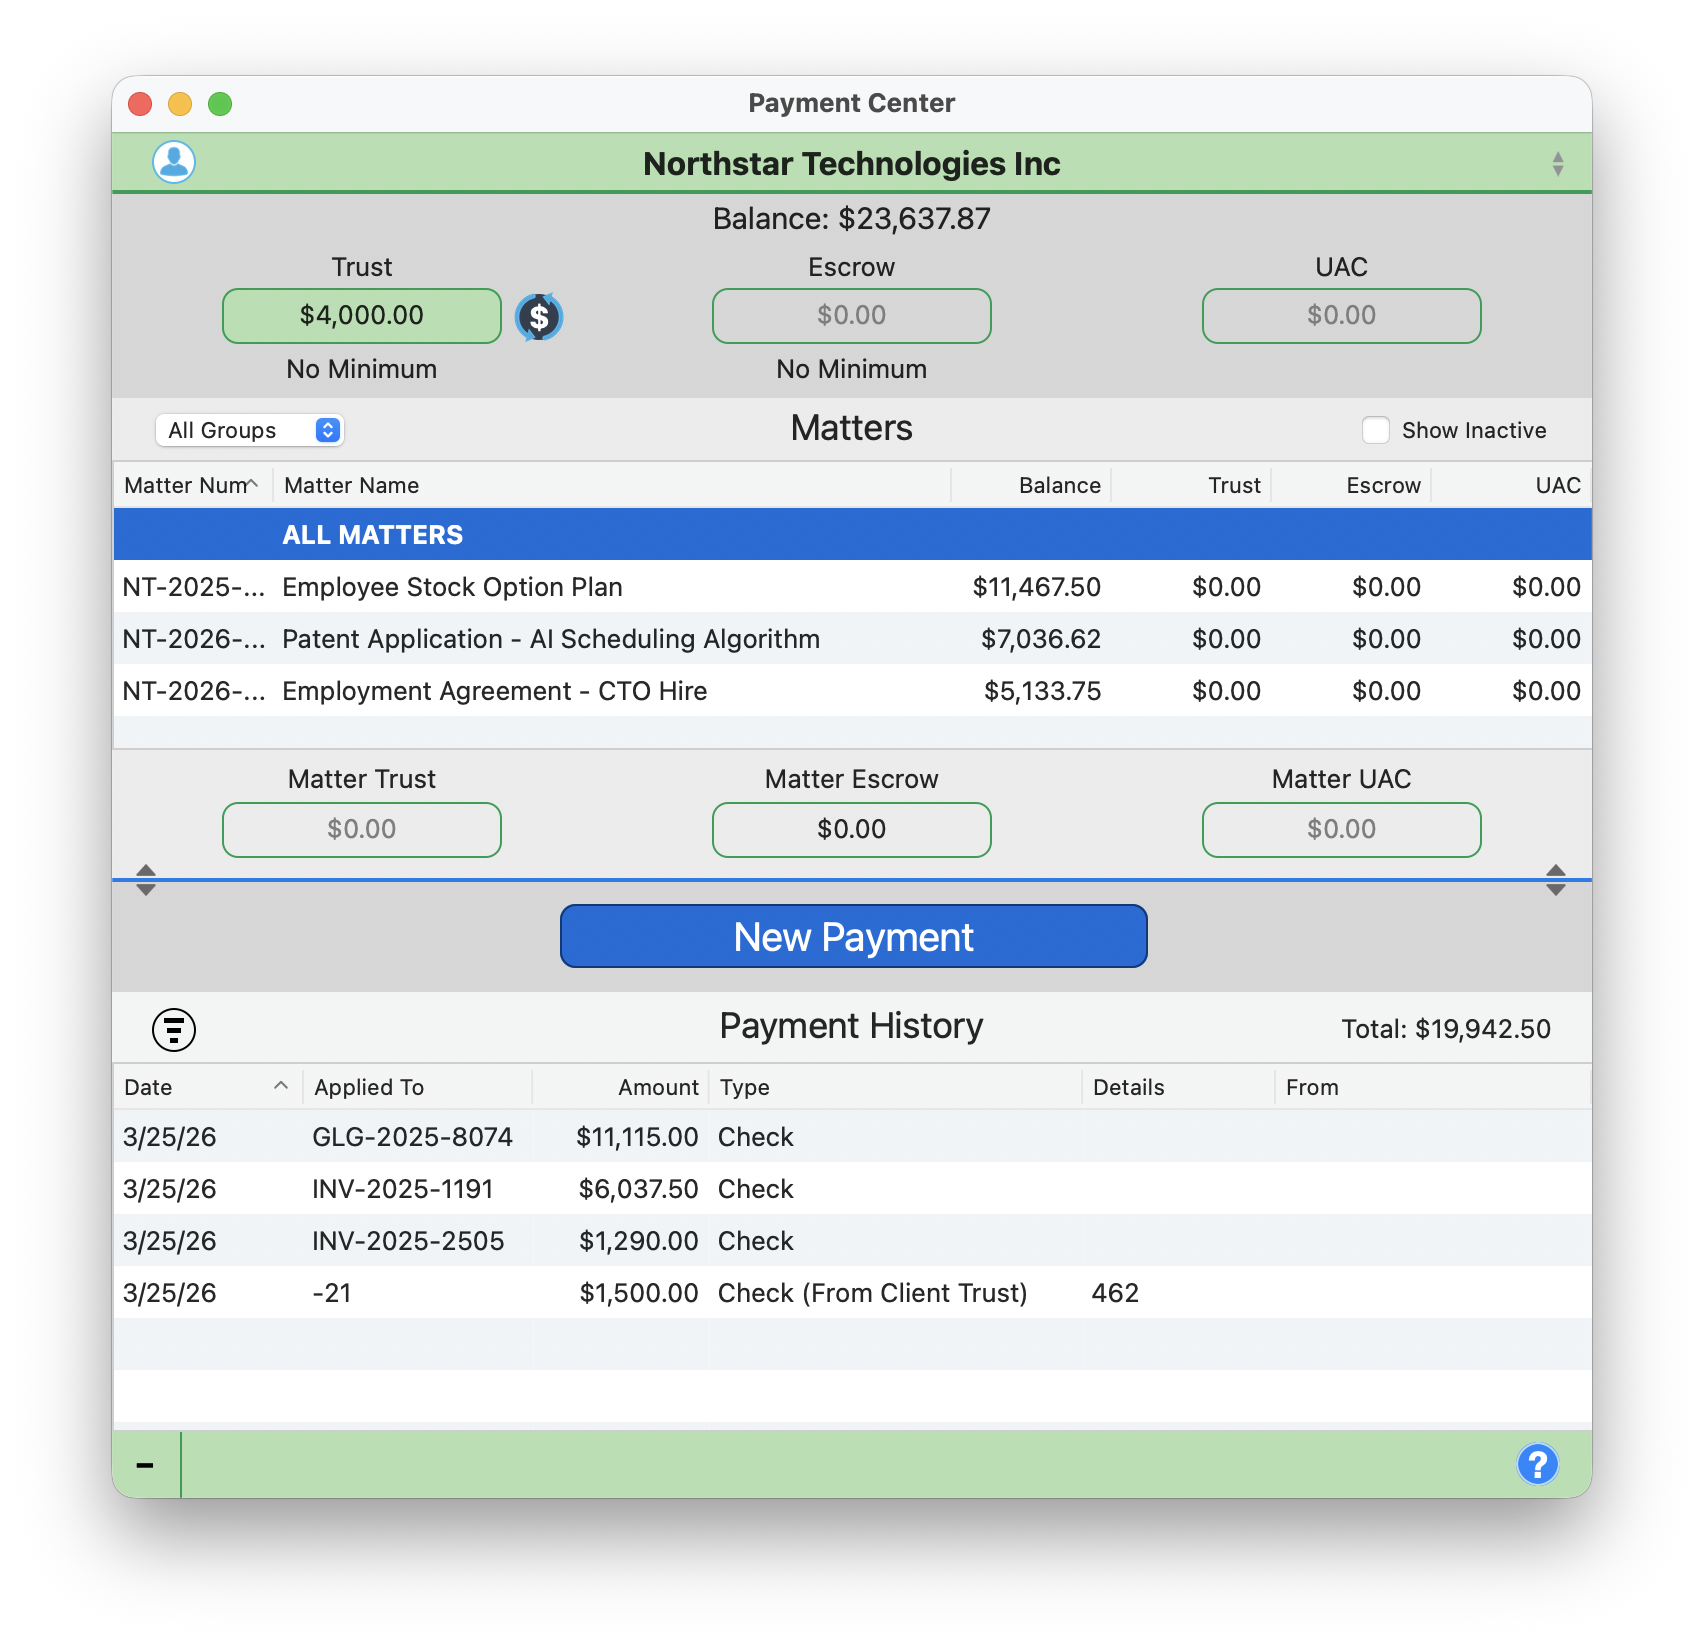
The Payment Center Window
Payment Center is your single view for everything related to incoming money. Open it from the Launchbar or press the keyboard shortcut to jump straight in.
At the top, the green client selector bar shows the currently selected client. Use the up/down arrows to cycle between clients quickly without leaving the window.
Balance Summary
Directly below the client name, you will see the total outstanding Balance for this client. Next to it, individual account boxes display the client's Trust, Escrow, and UAC (Unearned Advance Client) balances. Each account box shows its minimum requirement when one is set, or displays "No Minimum" otherwise.
Matters Table
The matters table lists every matter for the selected client. Each row shows the Matter Number, Matter Name, Balance, Trust, Escrow, and UAC columns. Below the table, subtotal boxes display the combined Matter Trust, Matter Escrow, and Matter UAC totals across all listed matters.
Use the "All Groups" filter dropdown to view matters by group when a client has many. Check the "Show Inactive" checkbox to include closed or inactive matters in the table.
New Payment and Payment History
The big blue New Payment button at the top right opens the payment panel (covered in the next section). At the bottom, the Payment History section shows a full transaction log with columns for Date, Applied To, Amount, Type, Details, and From.
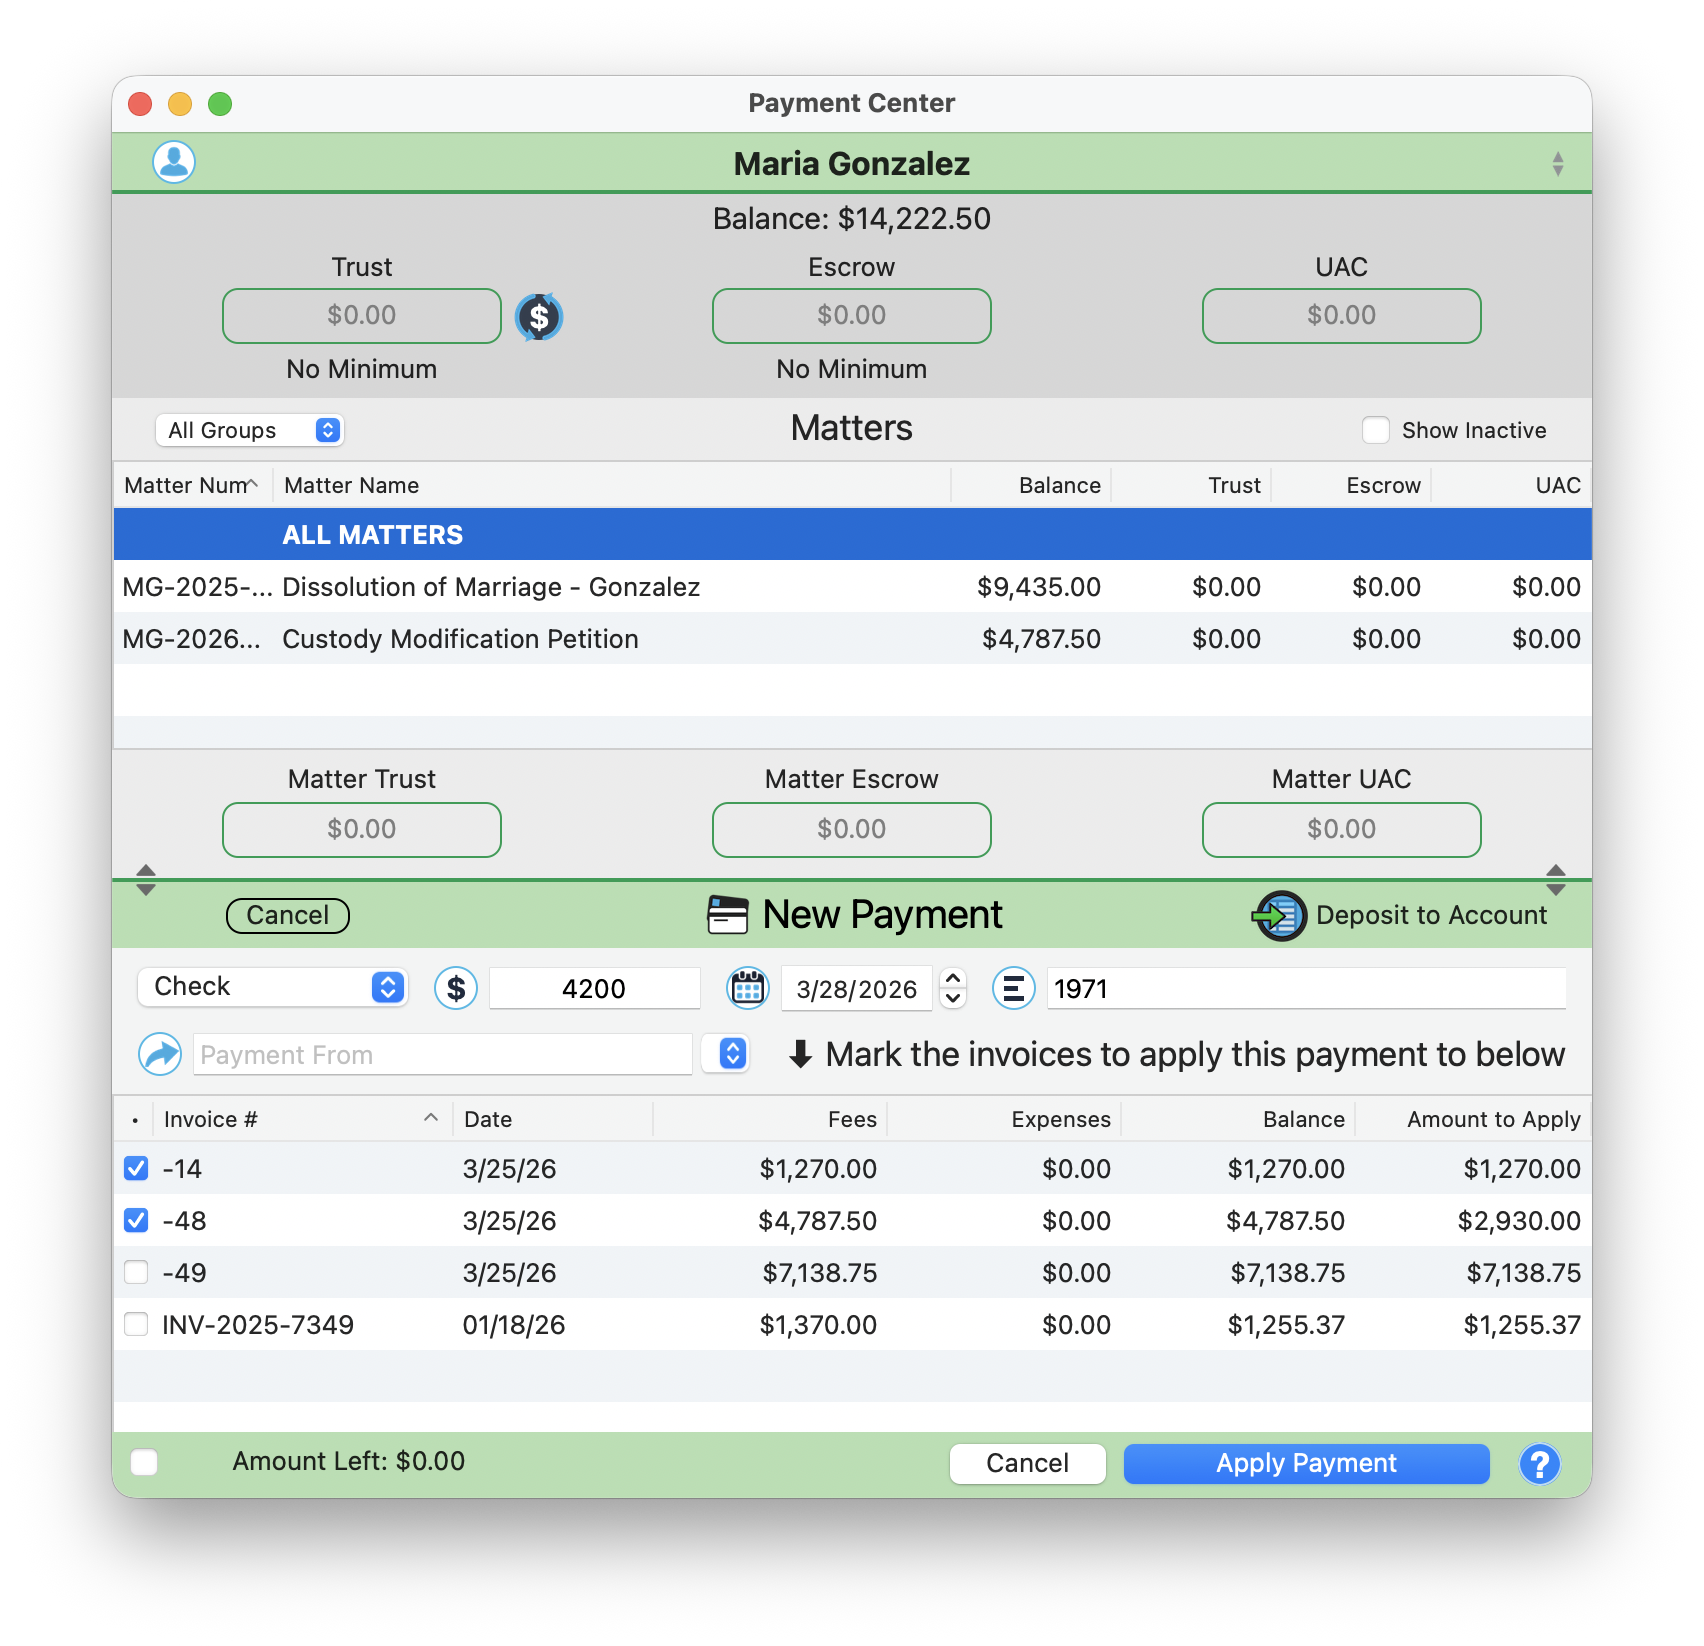
Applying Payments to Invoices
When a client sends a payment, click the blue New Payment button to open the payment panel on the right side of the screen.
Step by Step
- Select a Payment Type from the dropdown: Check, Credit Card, ACH, Wire, or Cash.
- Enter the Amount, Date, and Reference number (e.g., check number).
- Fill in the "Payment From" field with the payer's name.
- Below the payment details, all open invoices for this client appear with checkboxes. Each row shows the Invoice number, Date, Fees, Expenses, Balance, and Amount to Apply.
- Check off the invoice(s) you want to apply the payment to. The "Amount to Apply" column auto-fills based on the invoice balance.
- If the payment covers multiple invoices, check more than one. The system distributes funds across each selected invoice.
- Watch the "Amount Left" tracker at the bottom. It updates in real time as you check invoices, showing how much of the payment remains unapplied.
- When Amount Left reaches $0.00, click "Apply Payment" to finalize.
You can also partially apply a payment. If the amount does not cover the full invoice balance, the "Amount to Apply" field can be edited to a lesser amount, leaving the remainder on the invoice.
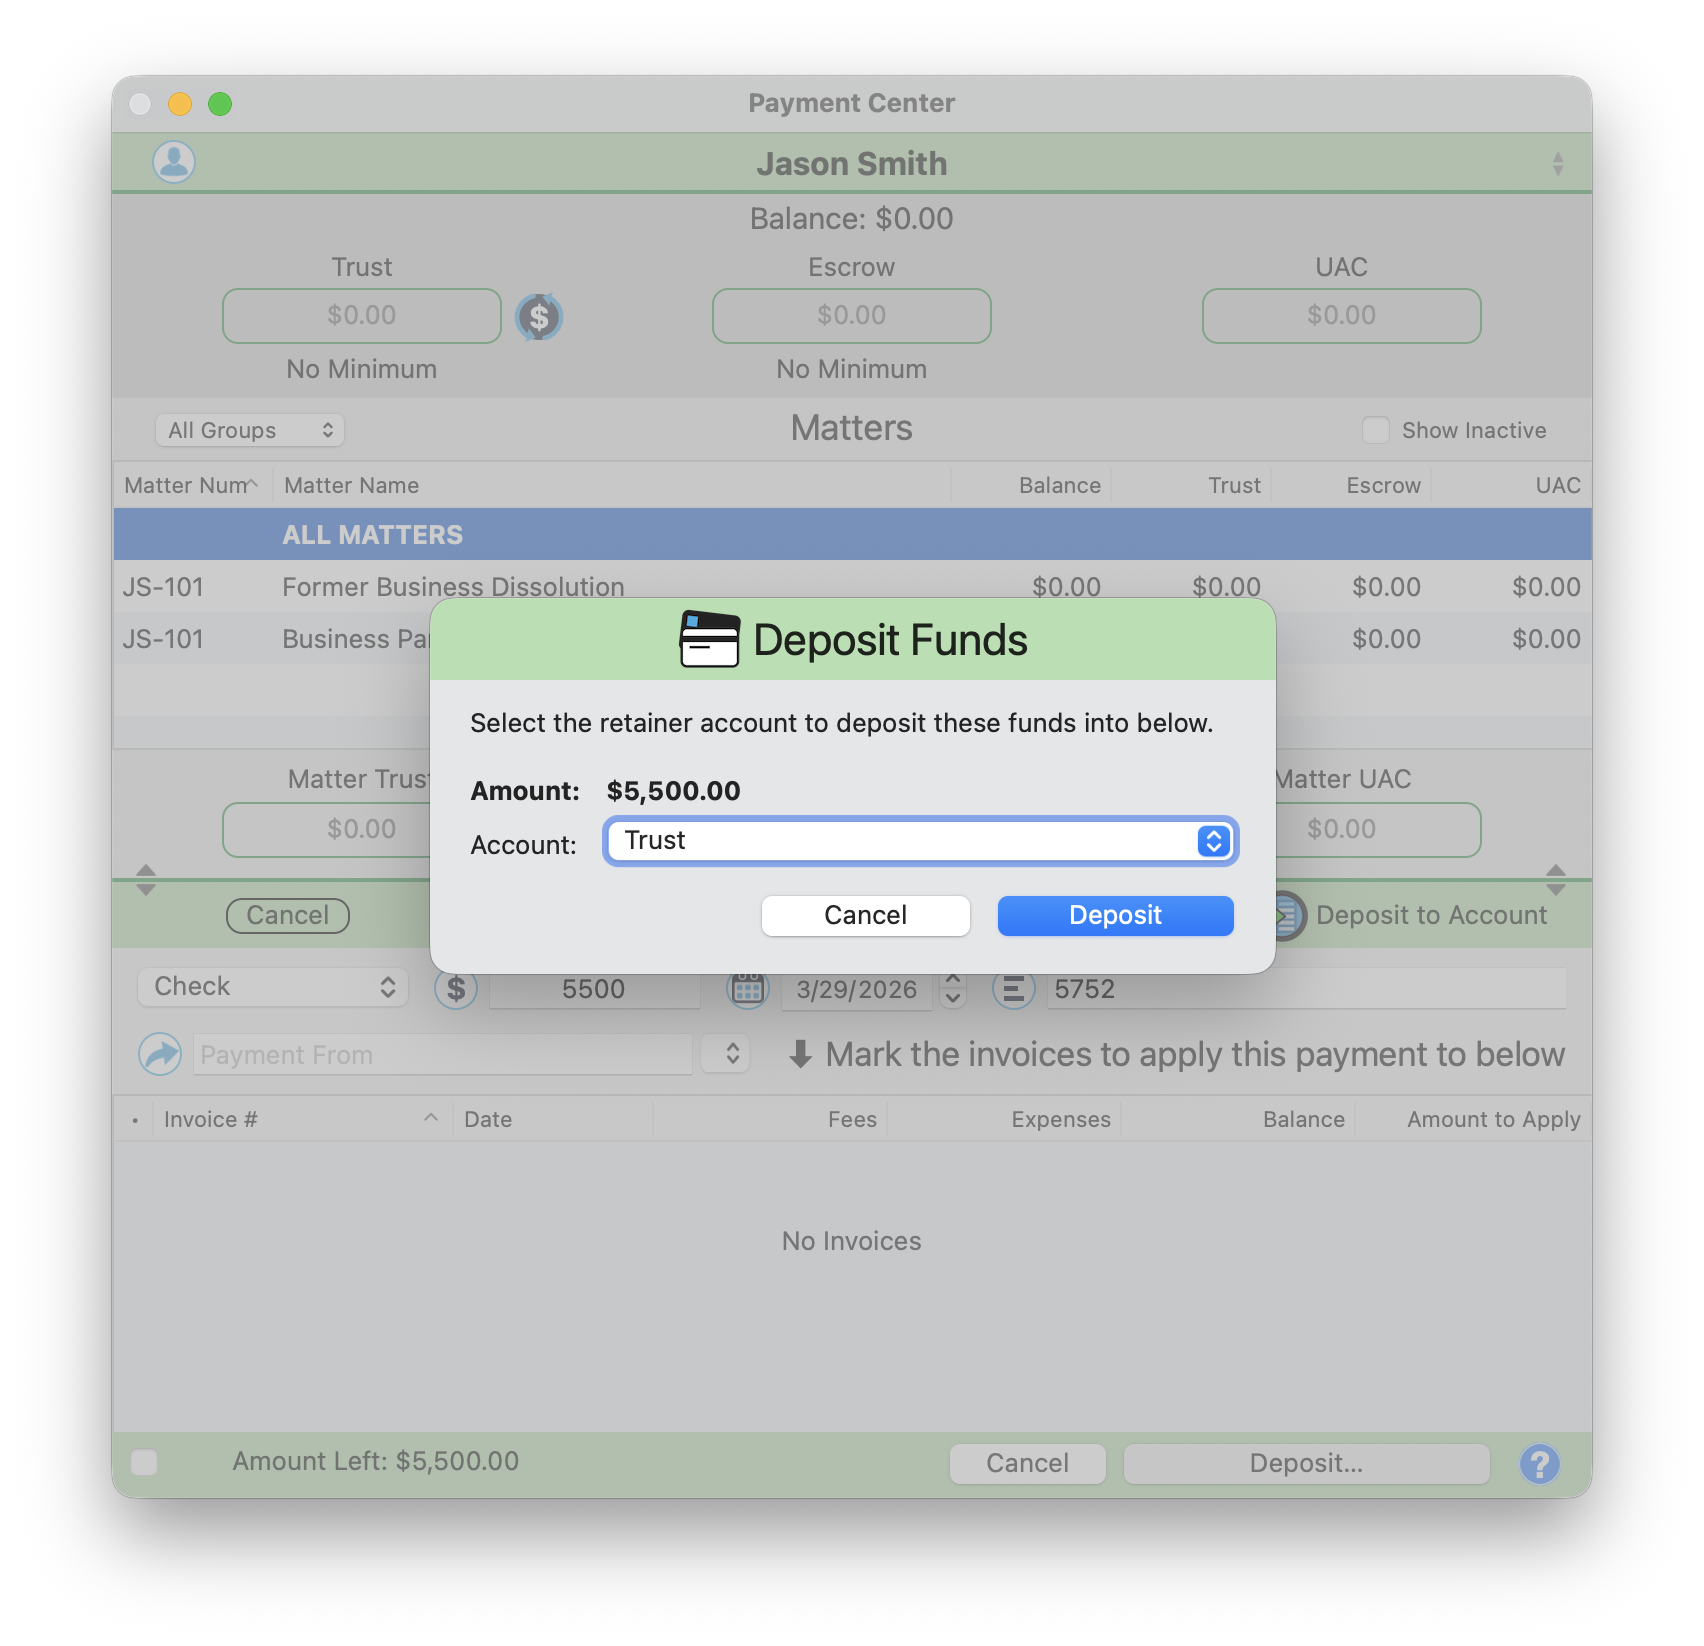
Depositing Funds to Trust, Escrow, or UAC
Sometimes a client payment is not meant for a specific invoice. Instead, the funds go into a retainer account (Trust, Escrow, or UAC). The Payment Center handles this seamlessly.
How to Deposit Retainer Funds
- Click New Payment and enter the payment details as usual: type, amount, date, and reference number.
- Do not check any invoices. Leave them all unchecked. (You can also check some invoices but leave remaining funds unapplied.)
- When funds remain unapplied, click the "Deposit..." button at the bottom of the payment panel.
- The Deposit Funds dialog appears, asking: "Select the retainer account to deposit these funds into below."
- Choose Trust, Escrow, or UAC from the Account dropdown.
- Click Deposit.
The funds appear in the client's retainer account immediately. You can verify the deposit by checking the Trust, Escrow, or UAC balance box at the top of the Payment Center.
Paying Invoices from Trust
When it is time to pay an invoice using funds already held in trust, the Payment Center lets you draw directly from the client's trust deposits.
Applying Trust Funds to an Invoice
- Click New Payment.
- Change the Payment Type dropdown to "From Trust".
- The system displays available trust deposits for this client (e.g., "Check 462 $4,000.00"). Select the deposit to draw from.
- Enter the amount to apply.
- The toggle at the bottom defaults to "Apply to Invoice". Leave it on this setting.
- Check off the invoices you want to pay from trust.
- Click "Apply Payment" to move funds from the trust account to operating and mark the selected invoices as paid.
This creates a complete audit trail: the trust withdrawal and the invoice payment are linked together in a single transaction. The trust balance updates immediately in the Payment Center.
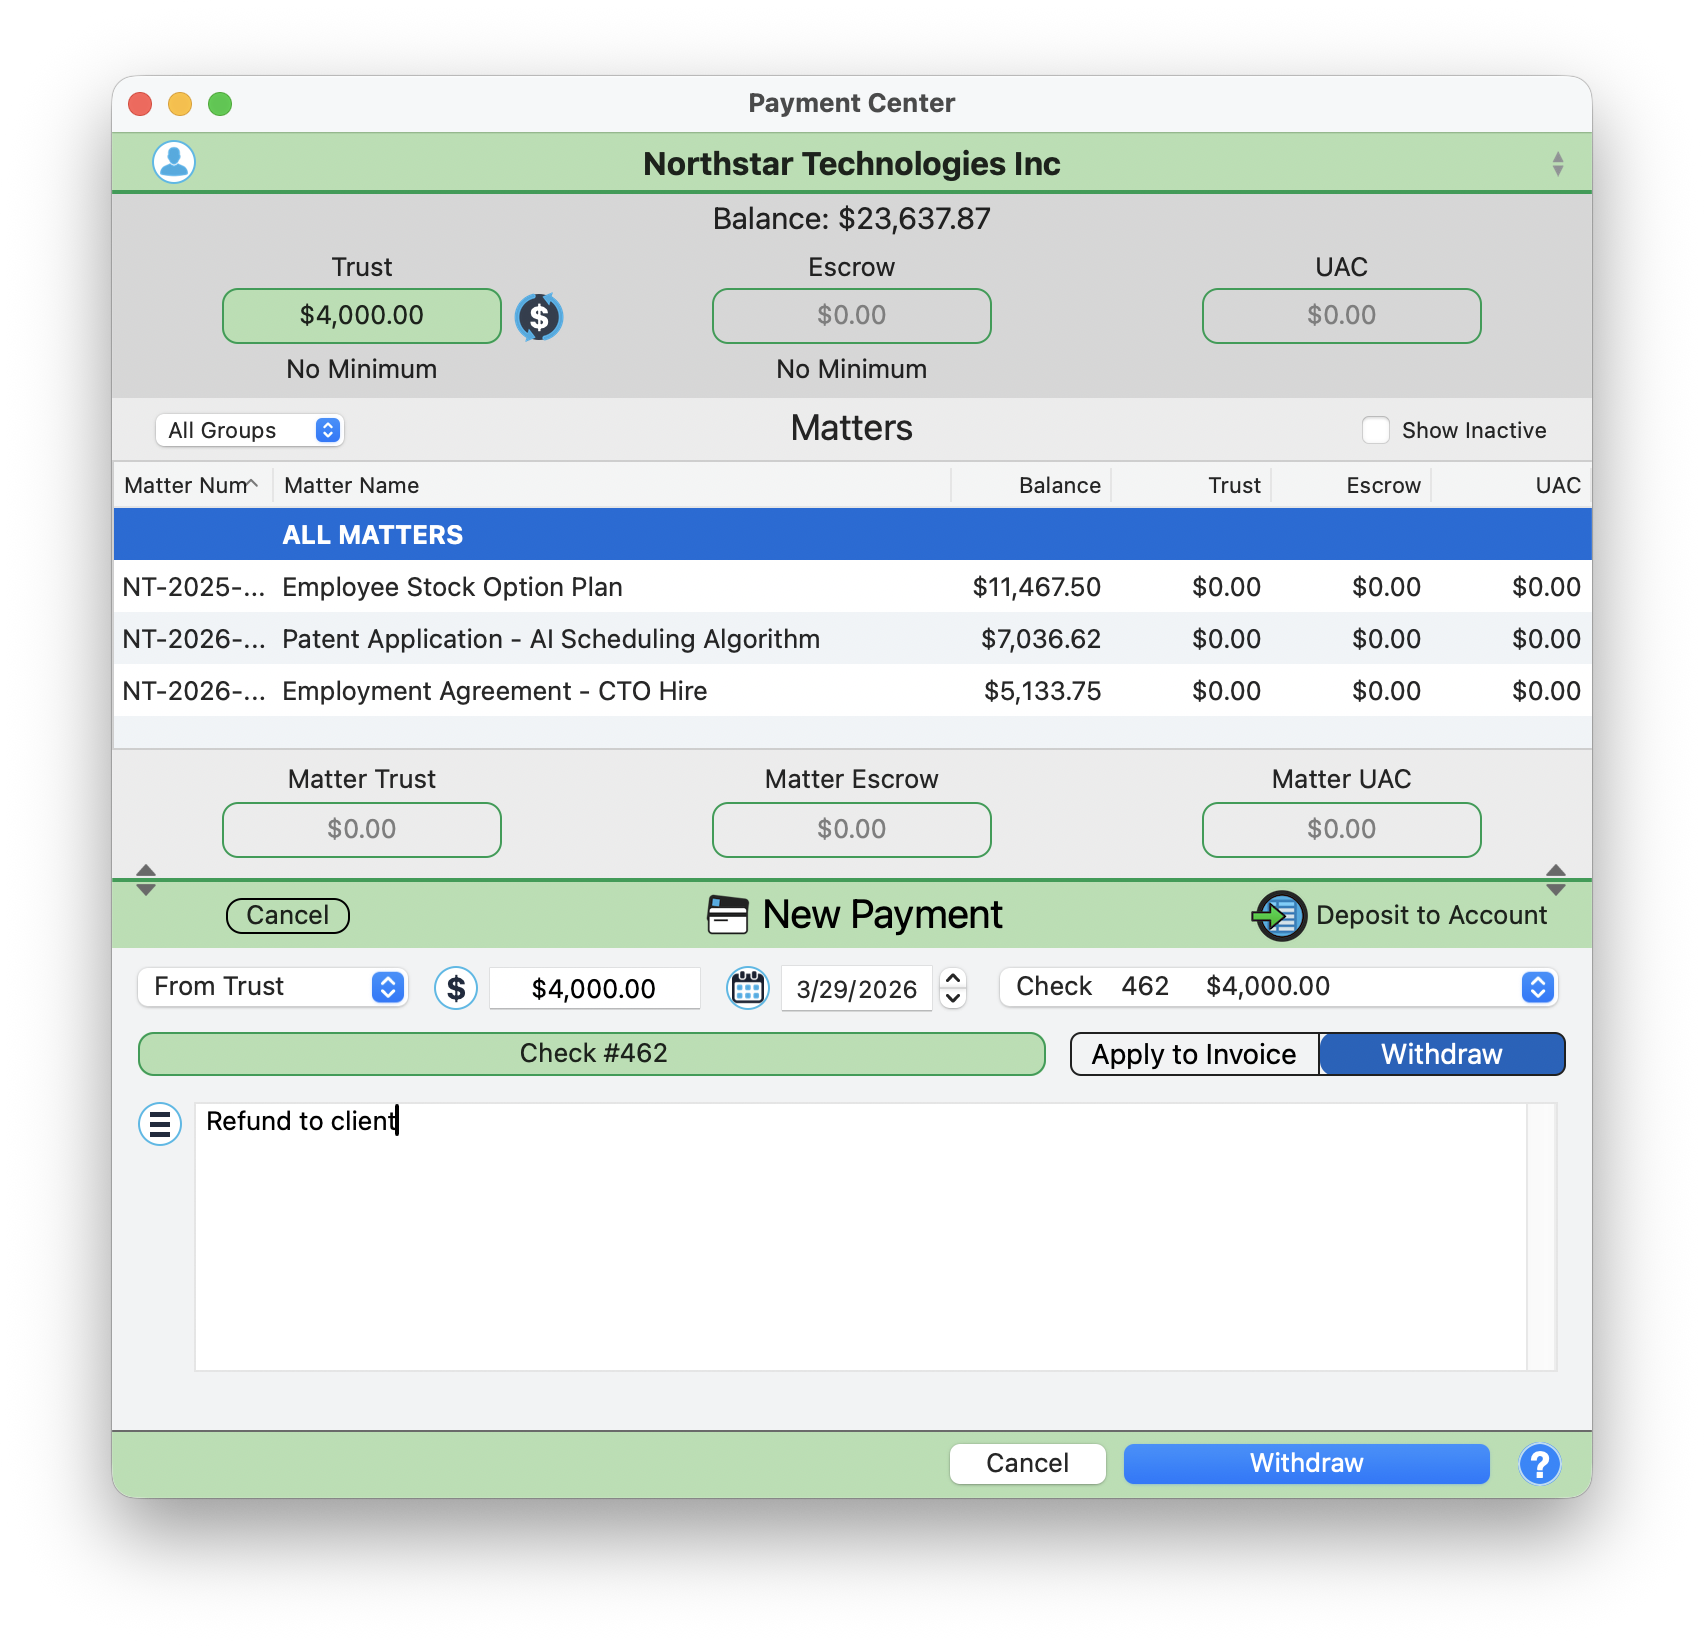
Withdrawing and Refunding Trust Funds
Need to return unused retainer funds to a client or withdraw trust money without applying it to an invoice? The Payment Center supports that too.
How to Withdraw Trust Funds
- Click New Payment and set Payment Type to "From Trust".
- Select the trust deposit to draw from (e.g., "Check 462 $4,000.00").
- Enter the withdrawal amount and date.
- Switch the toggle from "Apply to Invoice" to "Withdraw". The Withdraw option highlights in blue when selected.
- Add a note in the Notes field describing the reason (e.g., "Refund to client").
- Click "Withdraw" to complete the transaction.
Use this workflow for client refunds, closing out matters, or returning unused retainer balances. The funds are removed from the trust account and recorded in the ledger.
Payment History and Trust Ledger
Every transaction you record in the Payment Center is tracked in the Payment History section at the bottom of the window. This is your complete log of all incoming payments for the selected client.
Payment History
The Payment History table includes columns for Date, Applied To (the invoice number), Amount, Type, Details, and From. Trust payments appear with the type "Check (From Client Trust)" along with the deposit reference number, making it easy to trace funds back to their source.
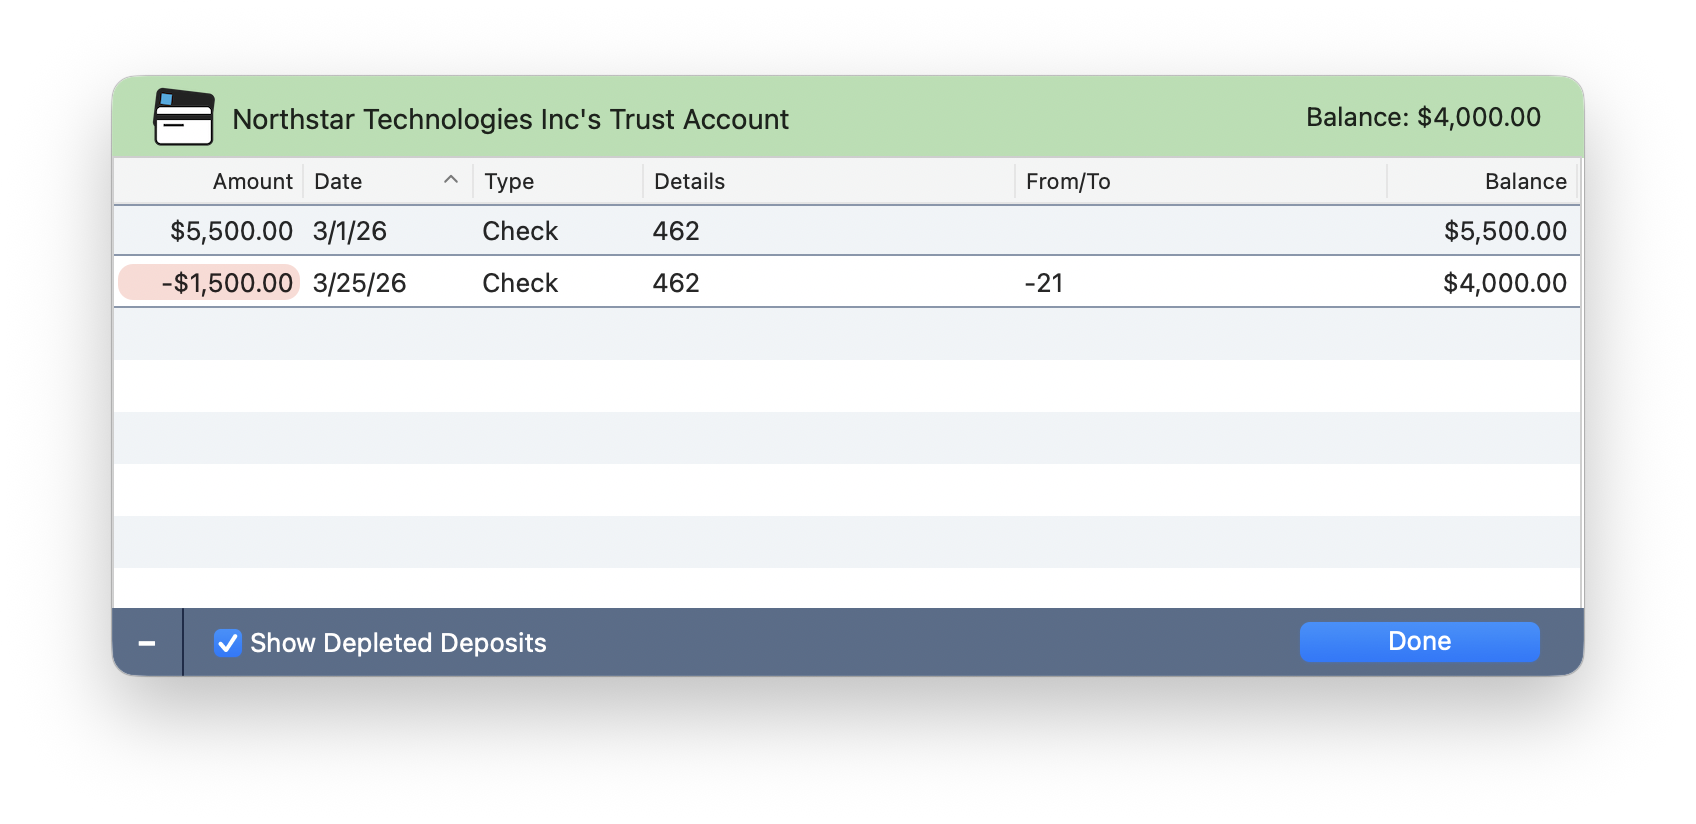
Trust Account Ledger
For a detailed view of any retainer account, click the $ icon on the Trust, Escrow, or UAC account box at the top of the Payment Center. This opens the account ledger window.
The Trust Account Ledger displays every deposit and withdrawal with columns for Amount, Date, Type, Details, From/To, and a running Balance. Withdrawals are highlighted in pink with negative amounts, so they stand out at a glance.
Check the "Show Depleted Deposits" checkbox at the bottom to include deposits that have been fully used up. This is useful for auditing historical trust activity.
Pro Tips
Pro Tip: Always Enter Reference Numbers
Always enter reference numbers (check numbers, transaction IDs) when recording payments. Future-you will thank present-you during reconciliation.
Pro Tip: Filter Matters by Group
Use the "All Groups" dropdown to filter matters when a client has many. Focus on the active cases instead of scrolling through the full list.