TimeNet Law is not a billing tool that stops at invoices. It is a complete financial command center for your firm. The Accounting module lets you manage operating accounts, record every transaction, reconcile against bank statements, and keep your financial picture directly connected to your billing data. No separate spreadsheet. No third-party bookkeeping app. Everything lives in one place.
The Accounts Window
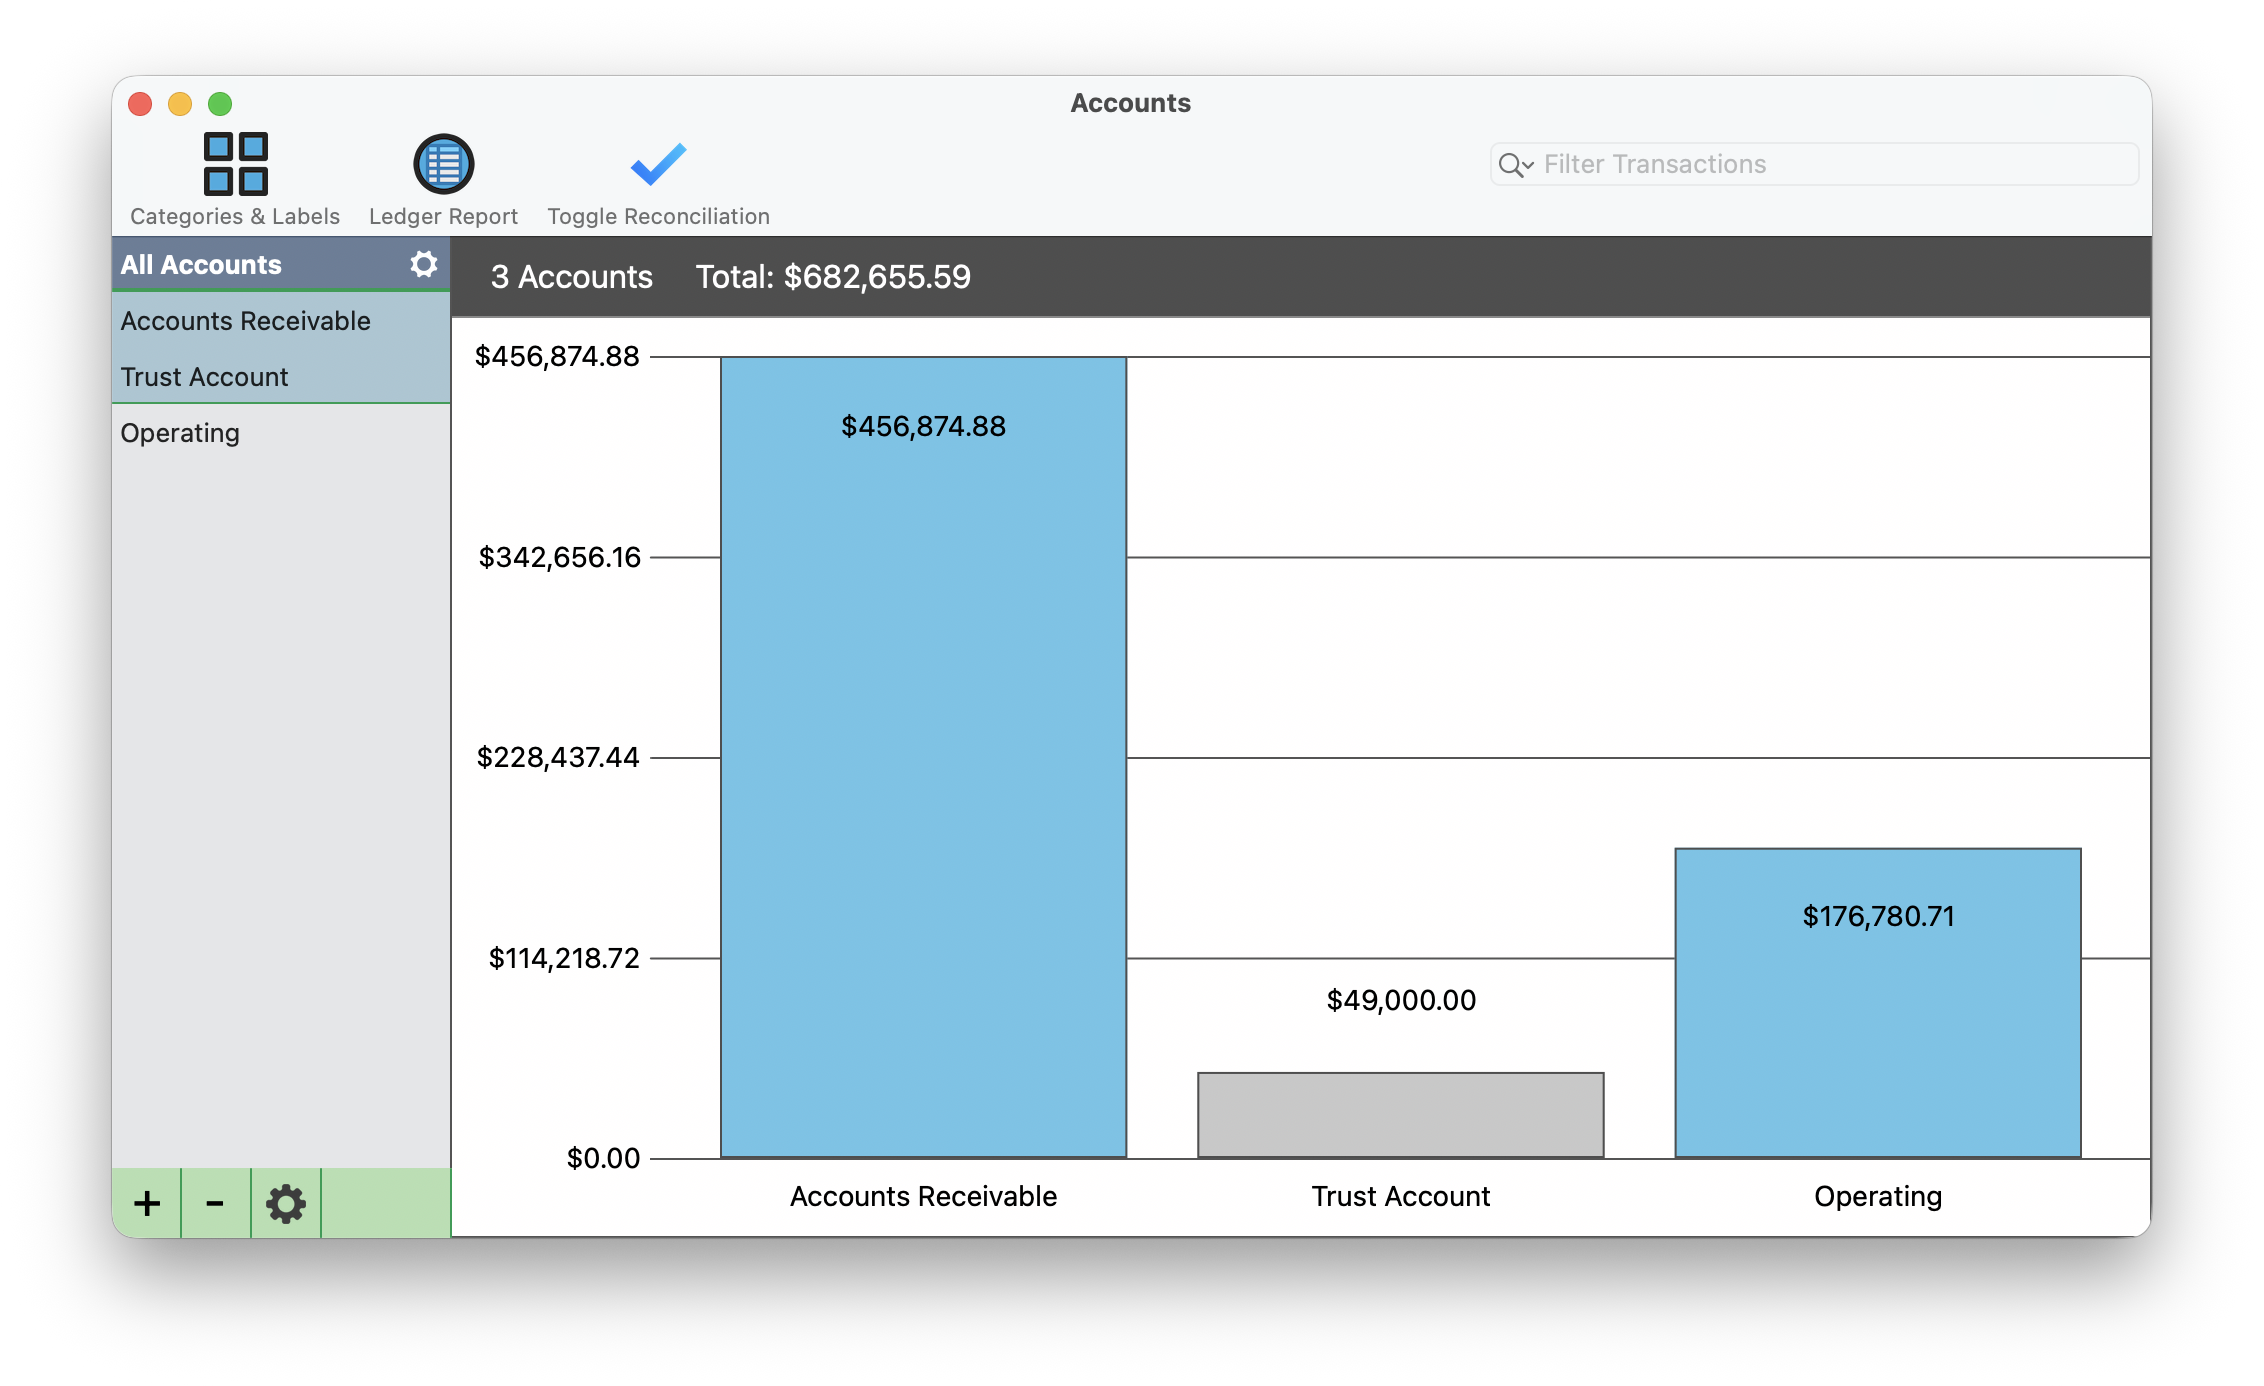
Open the Accounting module from Window → Accounting. The main window displays the All Accounts view, giving you a complete snapshot of your firm's financial position.
At the top of the window, a bar chart shows every account with its current balance. In the screenshot above, A/R holds $456,874.88, Trust holds $49,000.00, and Operating holds $176,780.71, for a total of $682,655.59 across all accounts.
The window is organized into several areas:
- Bar chart: Visual summary of all account balances at a glance. Each bar is labeled with its account name and dollar amount.
- Sidebar (left): Lists every account. Click any account name to drill into its full ledger view.
- Toolbar: Three key buttons at the top. Categories & Labels lets you organize transactions by type. Ledger Report generates filtered reports. Toggle Reconciliation enters reconciliation mode for matching against bank statements.
- Filter Transactions: Search bar at the top right for finding specific entries across all accounts.
- Bottom controls: The +/- buttons at the bottom left add or remove accounts. The gear icon opens account settings for the selected account.
Setting Up Accounts
Before you start tracking transactions, you need at least one account configured. TimeNet Law supports both automatic accounts (linked to billing activity) and manual accounts (for firm overhead and other banking).
Create a new account
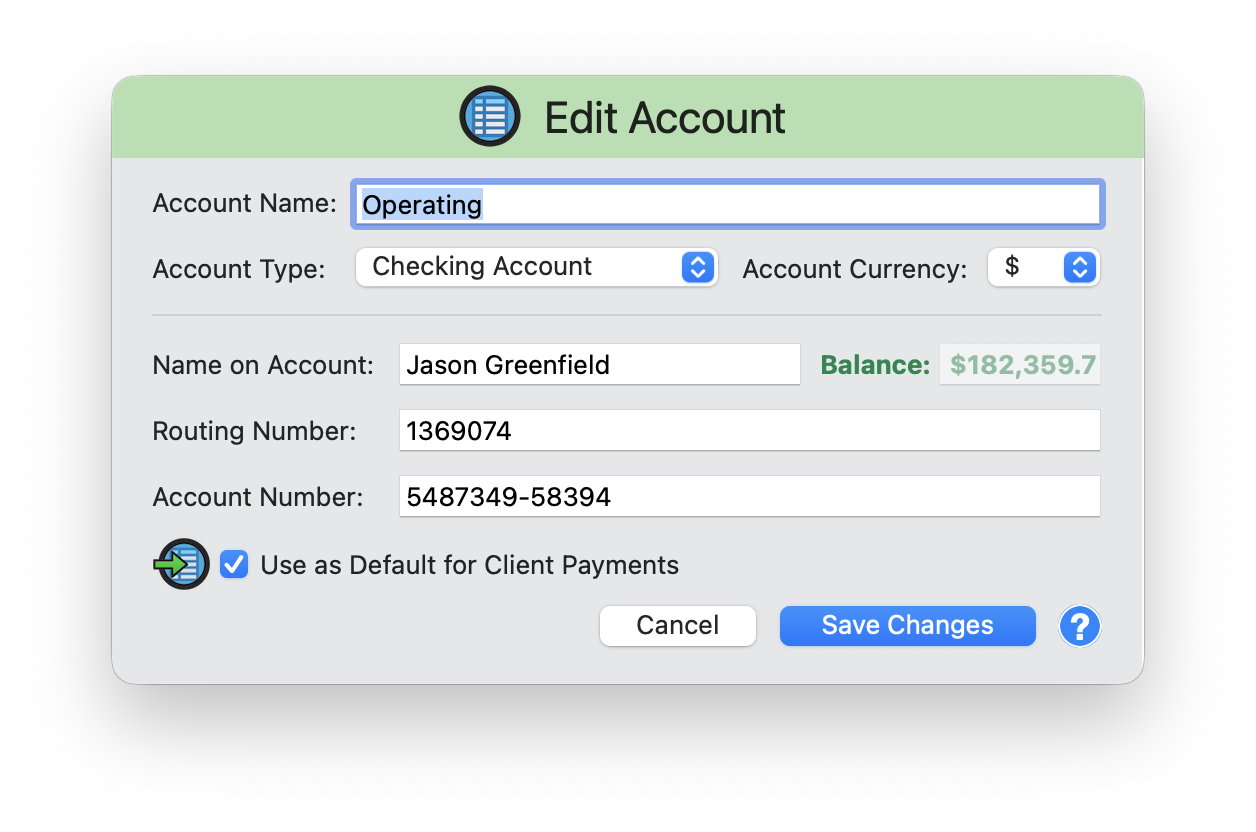
Click the + button at the bottom left of the Accounts window. The Edit Account dialog opens.
Fill in account details
Enter the Account Name (e.g., "Operating"), select the Account Type from the dropdown (Checking Account, Savings, etc.), and choose the Account Currency. Enter the Name on Account, and optionally fill in your Routing Number and Account Number for reference.
Set the starting balance
The balance field shows your account's starting amount in green. This is the baseline from which all transactions will be calculated.
Link to client payments (optional)
Check the "Use as Default for Client Payments" checkbox if you want payments applied in the Payment Center to auto-record as deposits in this account. This is the bridge between billing and accounting.
Save
Click Save Changes. The account appears in your sidebar and bar chart with the starting balance.
To edit an existing account later, select it in the sidebar and click the gear icon at the bottom of the Accounts window. The same Edit Account dialog opens with all your saved details.
Automatic Accounts
TimeNet Law includes a set of built-in account types that automatically stay in sync with your billing activity: Trust, Accounts Receivable (A/R), Escrow, and Retainer.
These accounts are toggled on or off in your Preferences. When enabled, client payment activity in the Payment Center flows directly into the corresponding account ledger. For example, when a client pays an invoice through Payment Center, a deposit is automatically recorded in the A/R account. When you move funds from trust to operating, both the Trust and Operating ledgers update with matching entries.
Manual accounts, like Operating, savings, or credit lines, are for tracking firm overhead and non-client transactions. You create these yourself and enter transactions by hand. The key difference: automatic accounts update based on billing activity, while manual accounts rely on your input.
If you check "Use as Default for Client Payments" on your Operating account, payments applied in the Payment Center also auto-record as deposits there. This saves you from manually entering every client payment twice.
Recording Transactions
Every check, wire transfer, subscription payment, and office expense that flows through your firm's accounts can be recorded in the Accounting module.
Open the New Transaction dialog
Select an account in the sidebar, then click the + button at the bottom right of the window. This is the transaction + button (separate from the account + button at the bottom left).
Select a payee
Choose from the Payee dropdown or type a new payee name. Set the Date for the transaction.
Choose deposit or withdrawal
Select Deposit or Withdrawal from the dropdown, then enter the Amount. Deposits display in green. Withdrawals display in red.
Set payment type and reference
Choose the Type: Check, Electronic, Wire, or Other. If you select Check, a Check No field appears for the check number. Add optional Notes for a memo.
Categorize the transaction
Use the Category dropdown to classify the entry as A/R, Admin, Legal, Office, or a custom category. Categories power your ledger reports and financial breakdowns.
Bill to Client (optional)
Check the "Bill to Client" checkbox to associate this transaction with a specific client and matter. When checked, the Client and Matter dropdowns become active. This turns a firm expense into a billable client expense that appears on their next invoice.
Record
Click Record Transaction. The entry appears in the account's ledger with the running balance updated.

The Account Ledger
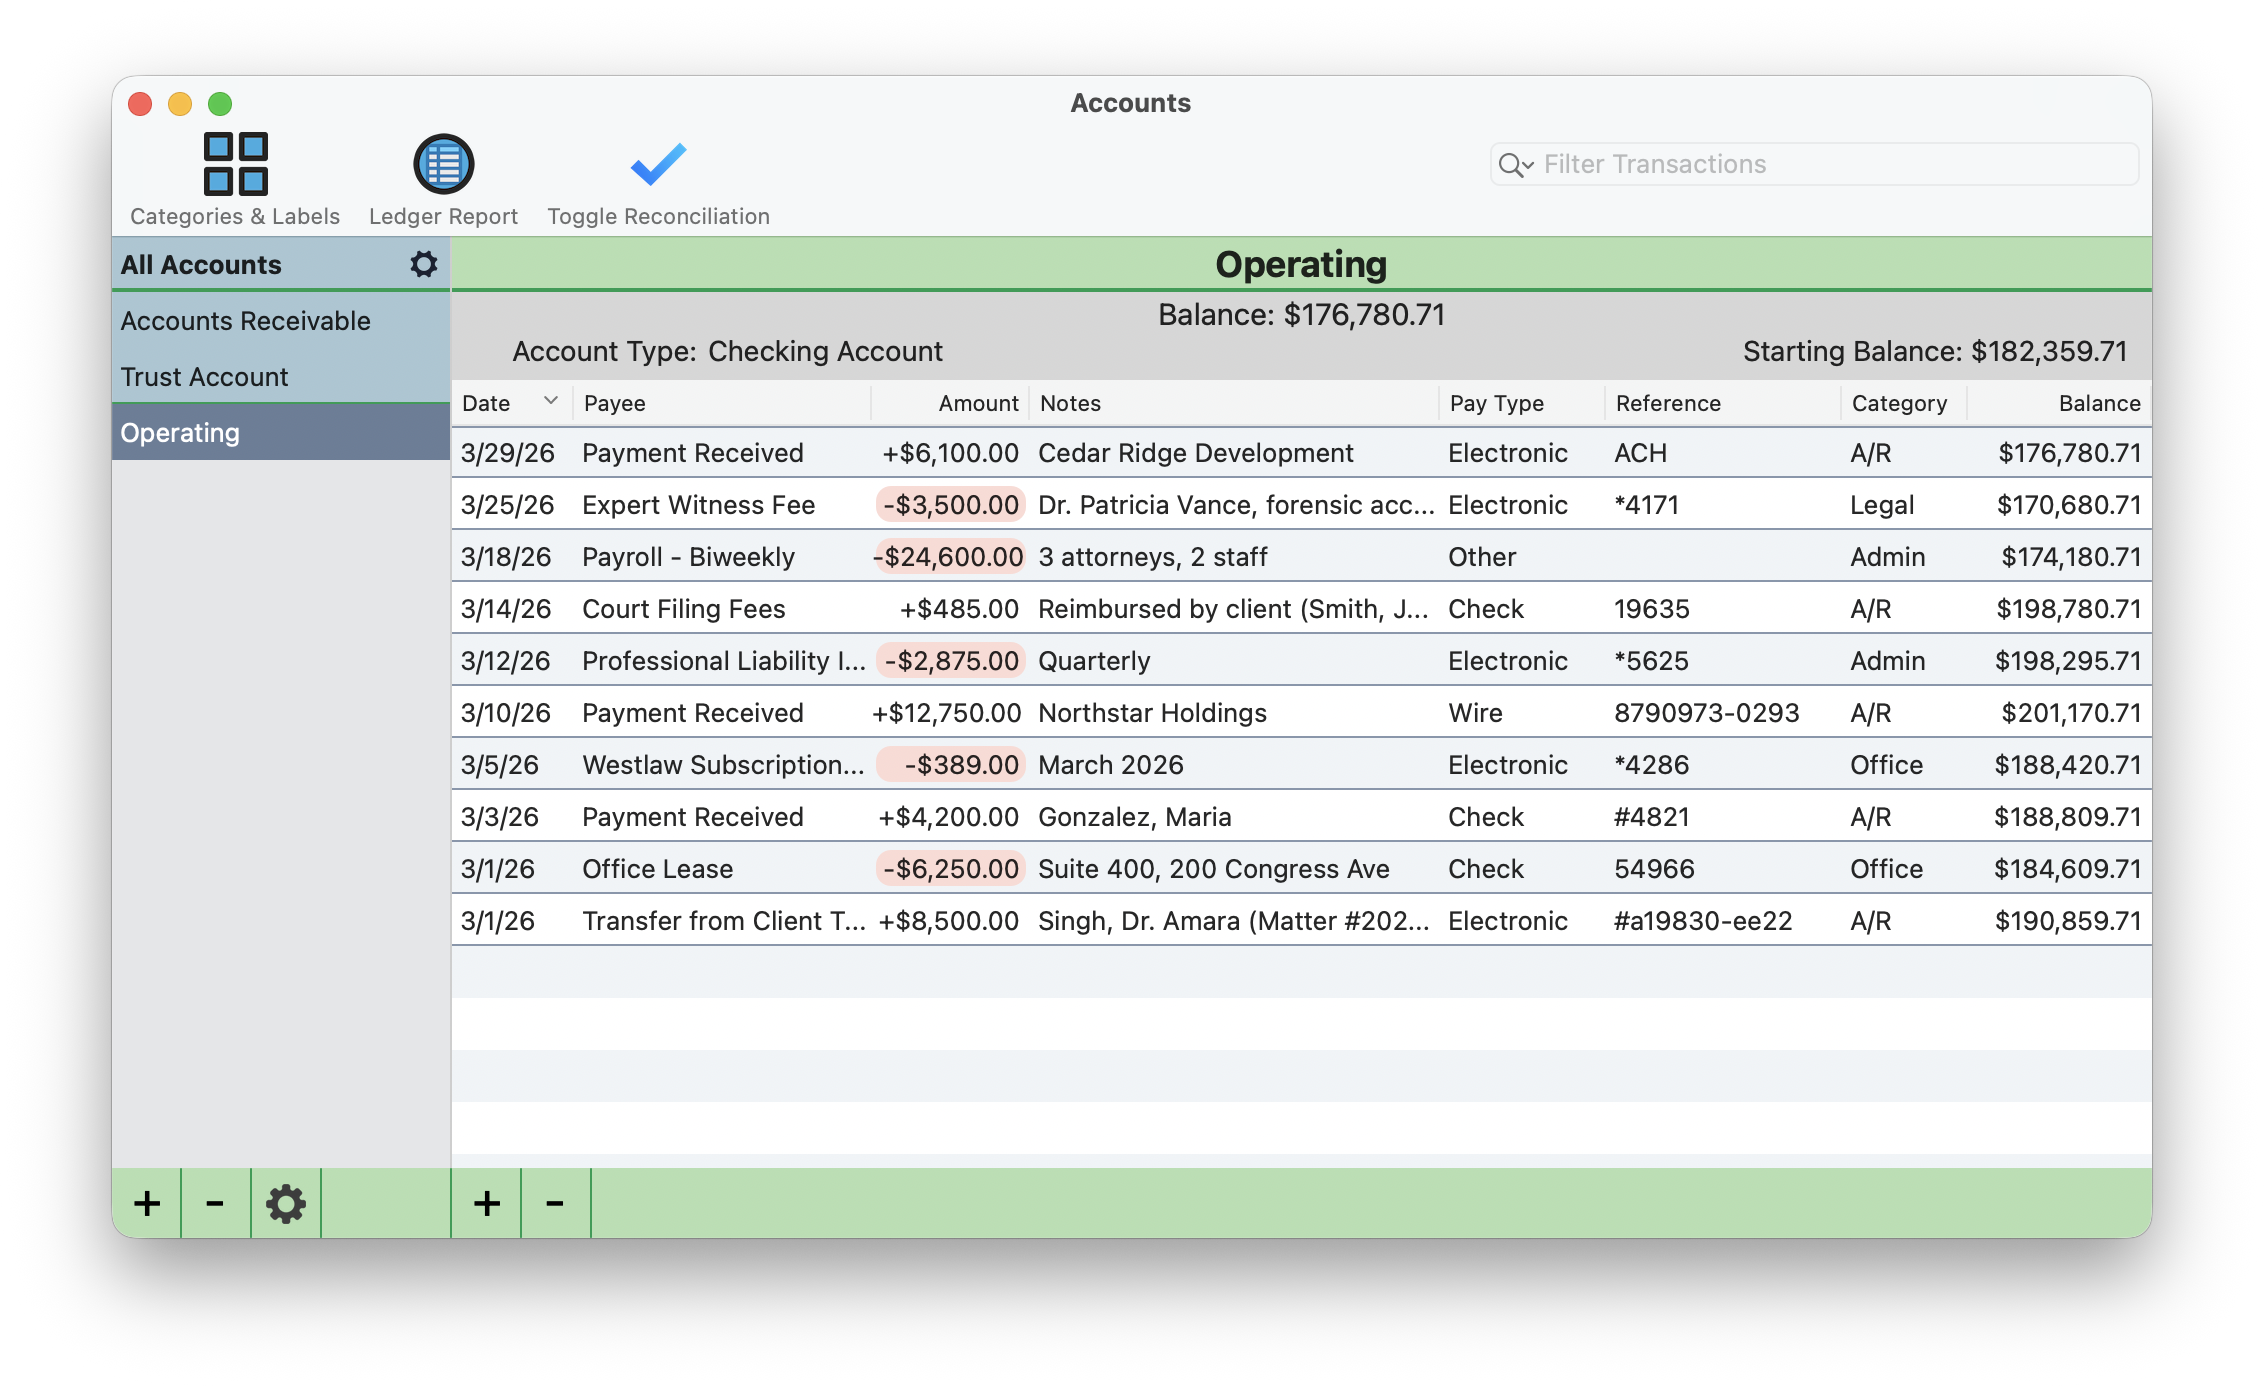
Click any account in the sidebar to open its full ledger view. The header displays the account name, current balance, account type, and starting balance. Below that, the transaction table lists every entry in the account.
The table columns are:
- Date: When the transaction was recorded
- Payee: Who the payment was to or received from
- Amount: Deposits appear as +$X,XXX.XX in green. Withdrawals appear as -$X,XXX.XX in red with a pink background highlight so they stand out visually.
- Notes: Any memo or description attached to the entry
- Pay Type: Check, Electronic, Wire, or Other
- Reference: Check number, wire confirmation, or other reference identifier
- Category: The classification assigned to the transaction (A/R, Admin, Legal, Office)
- Balance: The running account balance after each transaction
Use the Filter Transactions search bar at the top right to find specific entries by payee, amount, or category. For a deeper look at transaction ledger features, see the Transaction Ledgers tutorial.
Reconciliation
Monthly reconciliation is how you verify that your TimeNet Law records match your bank statement. This is the core month-end workflow: compare every entry in TimeNet Law against your bank's records, line by line.
Enter reconciliation mode
Click Toggle Reconciliation in the toolbar at the top of the Accounts window. Checkboxes appear next to every transaction in the ledger.
Work through your bank statement
Open your bank statement and compare it to the ledger. For each transaction that matches, check the box next to it in TimeNet Law. Work down the list from top to bottom.
Identify discrepancies
Any transaction that does not appear on your bank statement stays unchecked. Discrepancies and anomalies are highlighted so you can investigate missing entries, duplicate transactions, or incorrect amounts.
Complete the reconciliation
Once all matching transactions are checked off, the account is flagged as reconciled. Click Toggle Reconciliation again to exit reconciliation mode.
Reconcile monthly without fail. The longer you wait, the harder discrepancies are to track down. Set a recurring reminder for the first week of each month and work through each account while the statement is fresh.
Ledger Reports
The Ledger Report tool lets you generate filtered financial reports across your accounts. Click Ledger Report in the toolbar to open the report dialog.
Select accounts
Check or uncheck the accounts you want included. You can run a report on a single account or combine multiple accounts into one view.
Filter by category
Check the categories to include: A/R, Admin, Legal, Office, Uncategorized, or any custom categories you have created. Uncheck categories you want to exclude from the report.
Set the date range
Use the preset dropdown (This Month, Last Month, This Quarter, etc.) or enter custom start and end dates. For example, selecting "This Month" with a March date range filters to 3/1/26 through 3/31/26.
Choose the output format
Select Save as Report for a formatted document you can archive, or Export as CSV for a spreadsheet-compatible file you can open in Excel or Numbers. Pick a save folder and click Create Report.

How Accounting Ties to Billing
The Accounting module does not operate in isolation. It connects directly to your billing workflow, creating a unified financial system:
- Payment Center deposits: When you apply a client payment in the Payment Center, it auto-records as a deposit in whichever account has "Use as Default for Client Payments" checked. No manual double-entry.
- Trust transfers: Moving funds from Trust to Operating through the Payment Center creates paired entries in both ledgers. The Trust account shows the withdrawal, and the Operating account shows the deposit.
- Bill to Client: Checking "Bill to Client" on a transaction links a firm expense to a specific client and matter. That expense becomes billable and appears on the client's next invoice.
- One unified system: Billing, payments, trust, and accounting all share the same data. When you run a ledger report, it reflects the full picture: client payments, trust movements, firm expenses, and overhead, all in one place.
Ready to explore more?
Accounting Questions? Perry Can Help.
Screen share with the guy who built it. He'll get you sorted in minutes.