Most legal billing software gives you a logo field and maybe a color picker. Invoice Architect is a full design studio built into TimeNet Law. You get complete control over how your invoices look when they land in a client's inbox or mailbox.
Your invoice is the most frequent touchpoint between your firm and your clients' accounting departments. It should look polished, professional, and unmistakably yours. Invoice Architect makes that happen without a graphic designer or a third-party tool.
Getting Started
Invoice Architect lives inside TimeNet Law's Preferences window. To open it, go to Preferences and click the Invoice Architect tab. You will see it alongside the other seven Preferences tabs: Firm ID, People & Fees, Invoice Architect, Billing, App Settings, Shortcuts, Control Center, and QuickHelp.
Inside the Invoice Architect tab, a left sidebar gives you two sub-panels to choose from:
- Invoice Settings for file management, numbering, output format, and delivery options
- Theme & Text Design for the full visual design studio where you shape every element of your invoice
Start with Invoice Settings to get your basics locked in, then move to Theme & Text Design to make it look great.
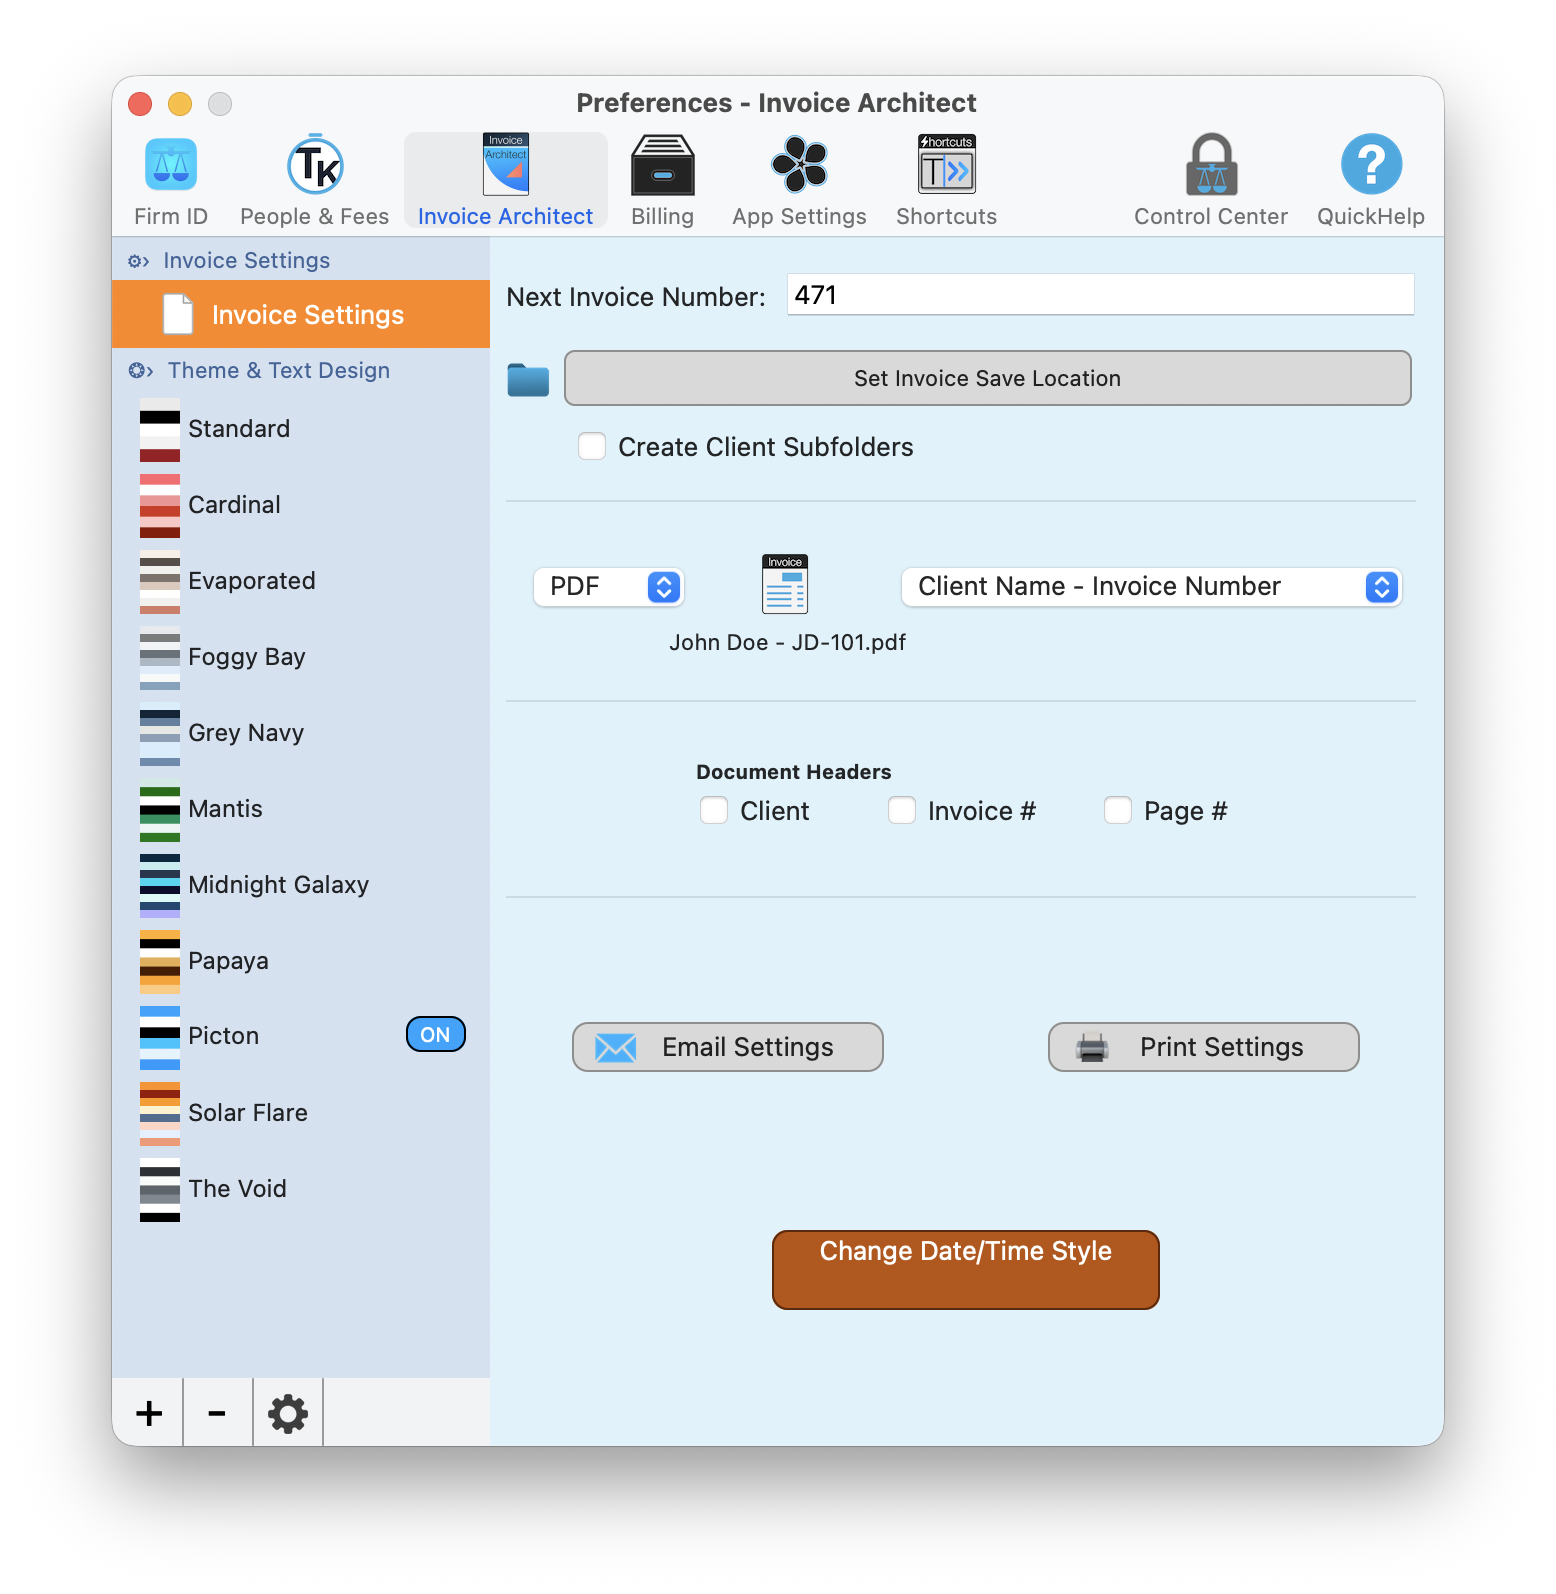
The Invoice Settings sub-panel inside Invoice Architect handles numbering, file output, and delivery configuration.
Invoice Settings
This is where you configure the practical side of invoice generation. Everything here affects how invoices are numbered, saved, and delivered.
Numbering and File Management
- Next Invoice Number is an editable field showing your current sequence (for example, 471). Change it any time if you need to align with an existing numbering system.
- Set Invoice Save Location lets you pick the folder where generated invoices are stored on your Mac.
- Create Client Subfolders is a checkbox that automatically organizes saved invoices into folders by client name. Highly recommended for keeping things tidy.
File Format and Naming
Choose your output format (PDF is the default) and set a naming convention for your invoice files. Options include patterns like "Client Name - Invoice Number," which produces files such as John Doe - JD-101.pdf. Pick the convention that makes the most sense for your filing system.
Document Headers
Toggle checkboxes to control which headers appear on your invoices: Client name, Invoice number, and Page number. These are independent of theme styling, so you can turn them on or off regardless of which theme you use.
Delivery and Date Settings
- Email Settings button opens configuration for email delivery of invoices
- Print Settings button opens your print output options
- Change Date/Time Style button (amber) lets you configure how dates appear on your invoices
Turn on "Create Client Subfolders" right away. Once you have a few hundred invoices, you will be glad they are sorted by client instead of sitting in one massive folder.
Theme & Text Design Overview
Select an Invoice Theme from the Theme & Text Design sub-panel in the left sidebar and you will enter the visual design studio. This is where Invoice Architect really shines.
Choosing a Theme
TimeNet Law ships with 11 built-in themes, each shown with a color swatch preview in the sidebar list:
- Standard
- Cardinal
- Evaporated
- Foggy Bay
- Grey Navy
- Mantis
- Midnight Galaxy
- Papaya
- Picton
- Solar Flare
- The Void
The active theme is marked with an "ON" badge. Click any theme to select it, and the Theme Designer canvas opens to the right.
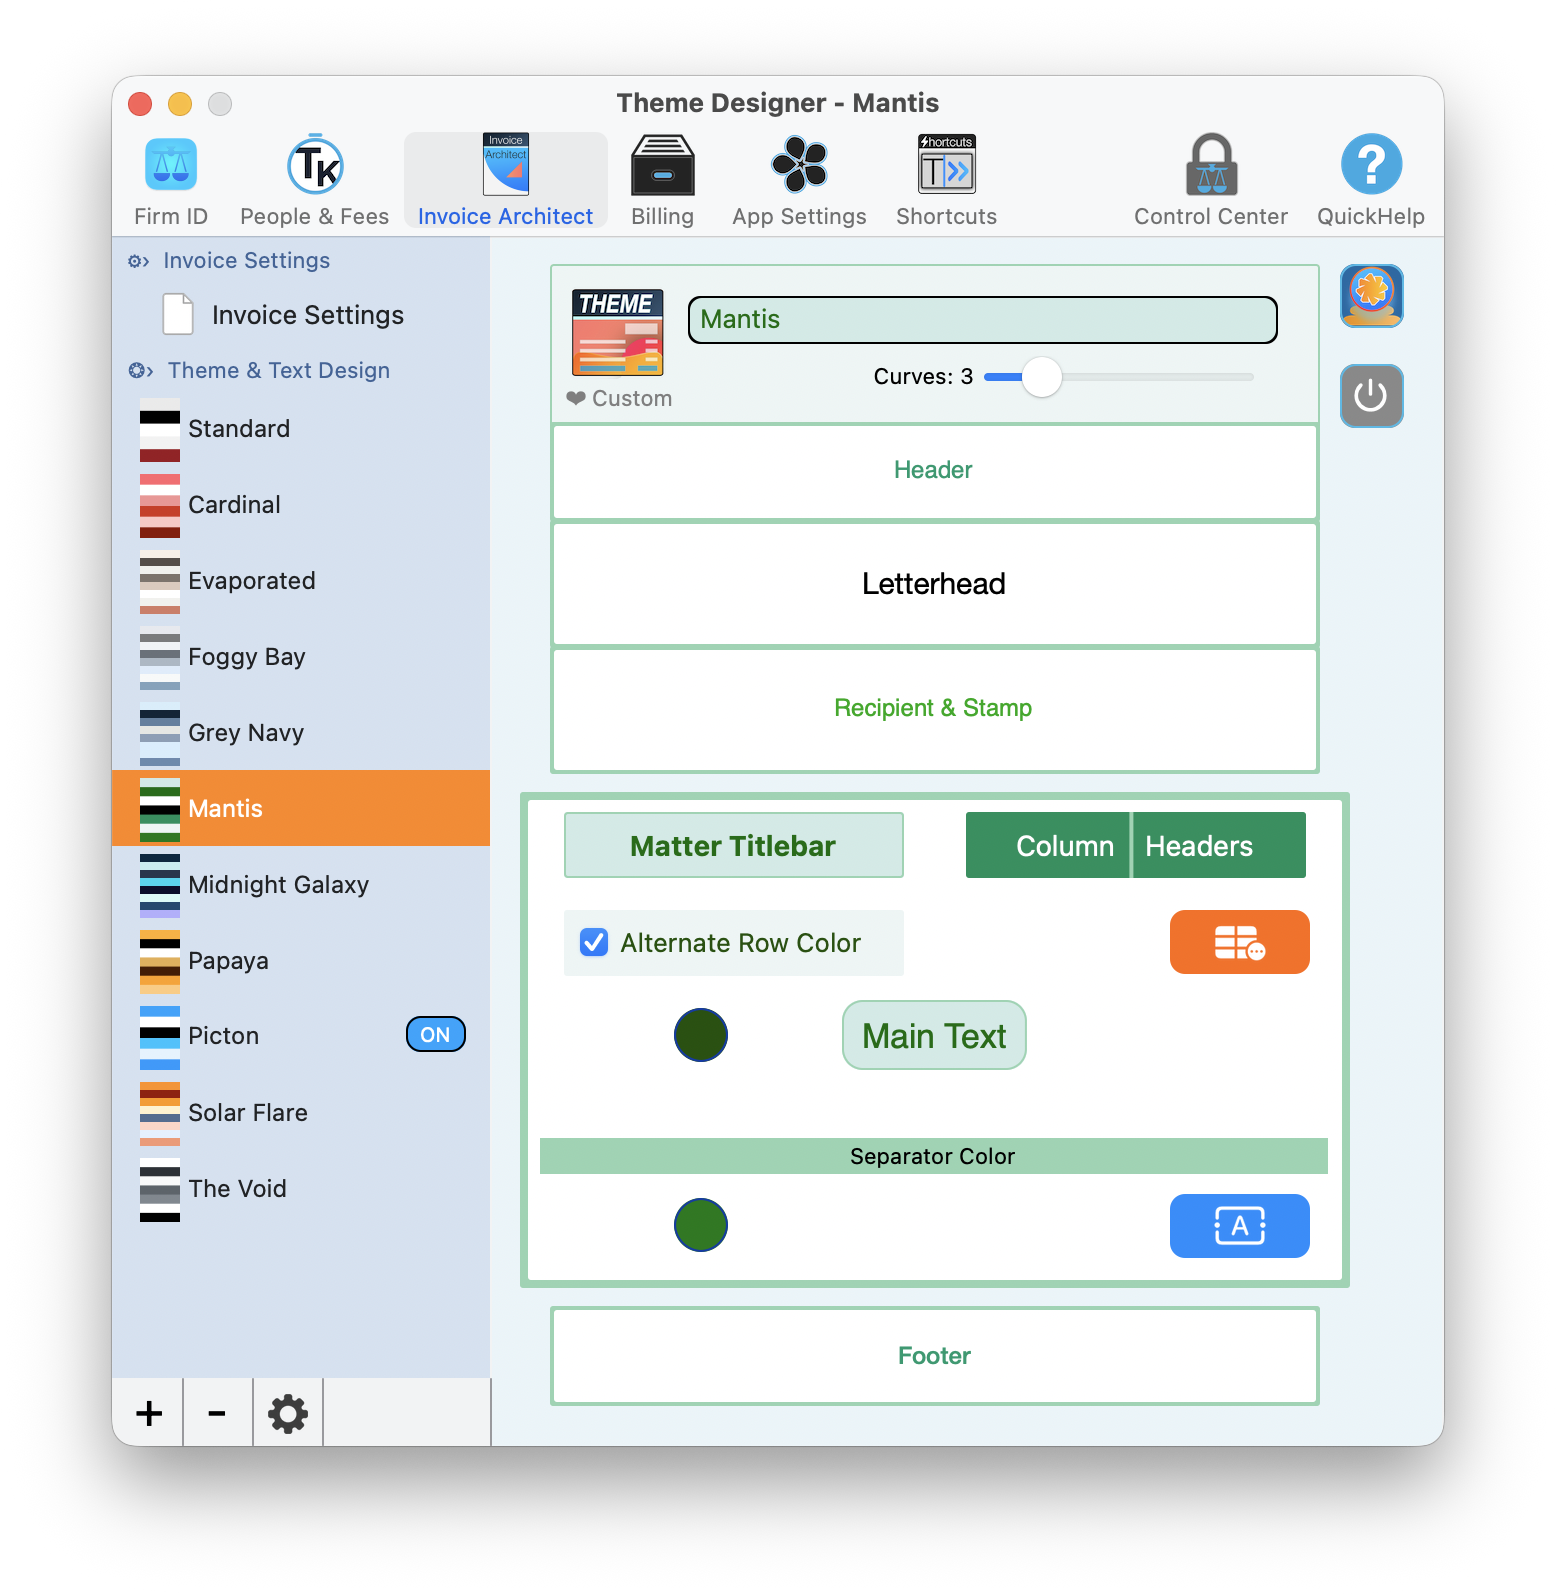
The Theme Designer Canvas
The canvas is your visual map of the invoice. It opens as "Theme Designer - [Theme Name]" and shows five layout zones. Hover over each of them to see settings for that section of the invoice you can customize:
- Header
- Letterhead
- Recipient & Stamp
- Main Body
- Footer
Hover over any zone and click the options to edit that section. At the top, you will find the theme name (editable), an indicator if the theme is built-in or customized, and a Curves slider that controls the border radius across the entire theme. The Invoice Live Preview toggle is in the upper right.
Turn on Invoice Live Preview to see the changes you make appear in a sample invoice to the right of the Invoice Architect window.
With Invoice Live Preview on, make any changes you like. They'll be reflected in the invoice preview. What you see is what your clients get.
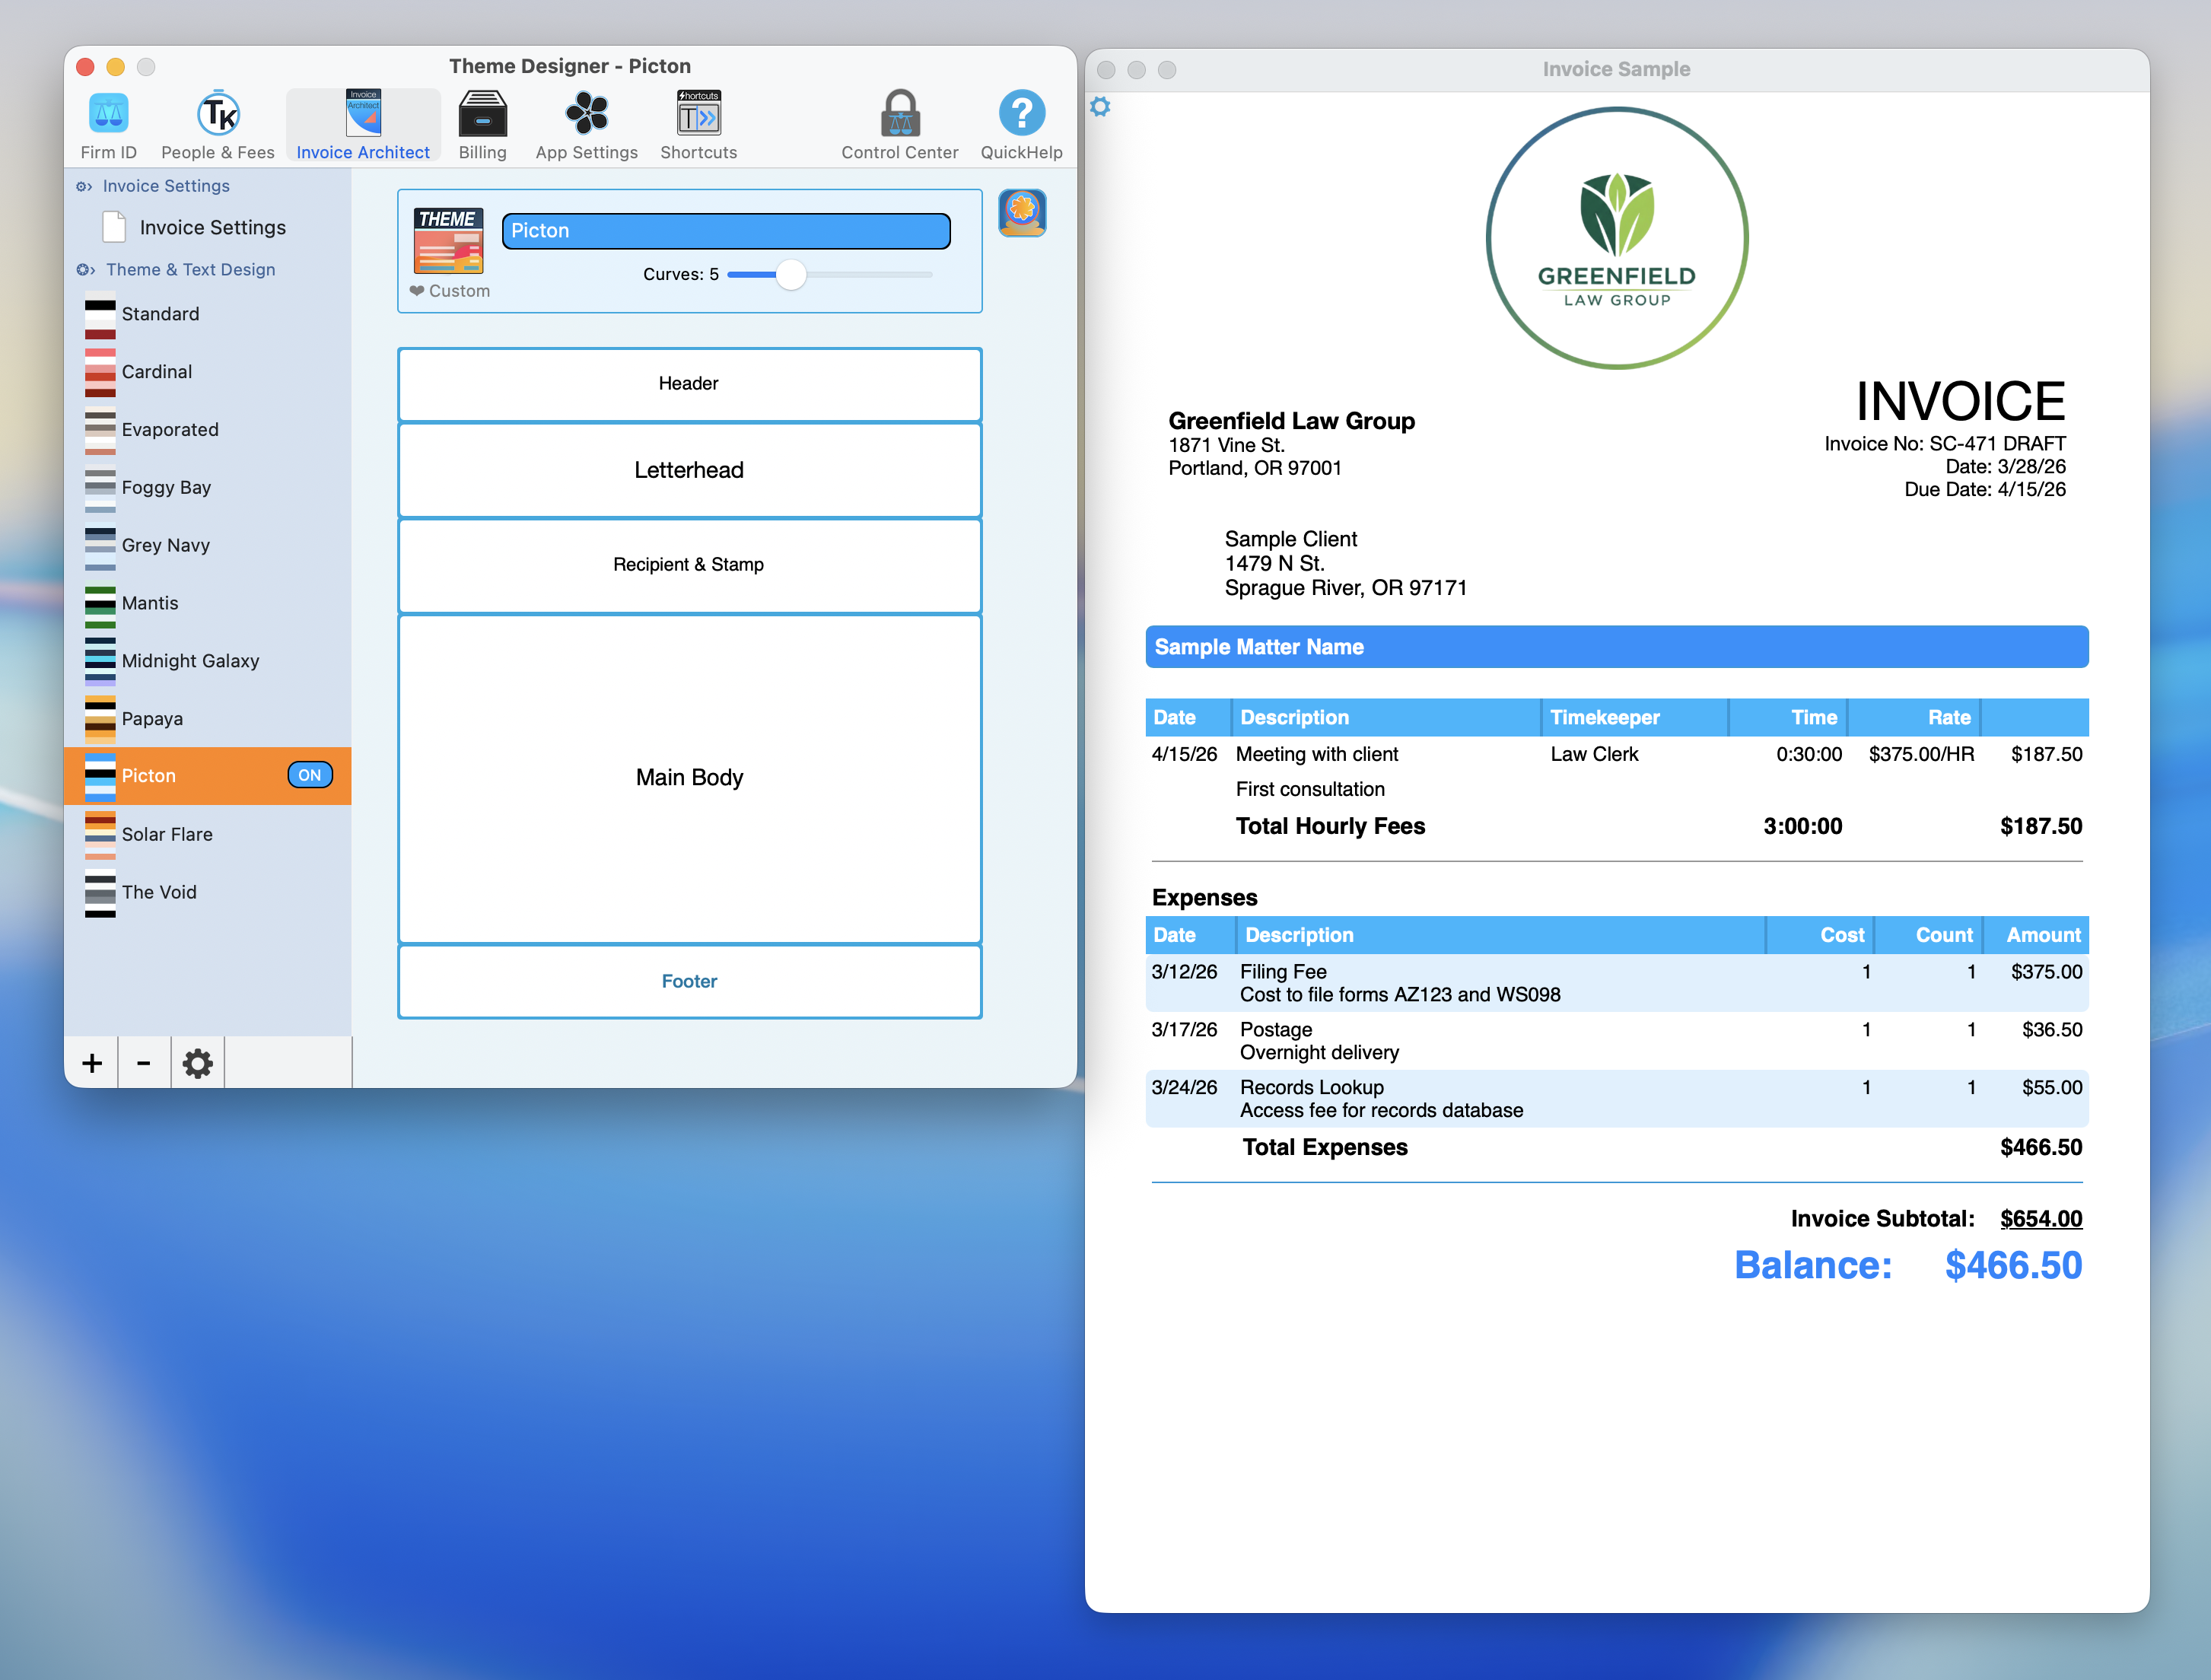
The Theme Designer canvas with five zones. Hover over any section to use its designer.
Designing Your Letterhead
Hover over Letterhead zone on the canvas. Click the color on the left to change your text color. Click the color on the right to change your background color. Click the designer icon on the far right to open the Invoice Letterhead Designer. This is where you customize the background style for the top portion of your invoice.
Solid or Pattern
A toggle at the top lets you choose between a Solid background color and a Pattern. Solid is clean and minimal. Pattern adds visual texture and personality.
TimeNet Law includes 14 built-in patterns:
- Stripes (Diagonal, Horizontal, Vertical)
- Diagonal Dashes
- Honeycomb
- Mountains
- Notebook
- Big Dots
- Little Dots
- Circular Waves
- Outward Waves
- Waterdrop
- Weave
- Zigzag
Gradient and Color Controls
A Gradient dial lets you set the angle (0 to 360 degrees, Linear) for a gradient overlay. You can also turn the gradient off entirely for a flat look. Additional controls include:
- Separator Color to set the line color between the letterhead and the invoice body
- Letterhead Background color picker for the base background color
- No Text Background Box toggle to remove the text background container for a cleaner look
Click Done when you are finished.
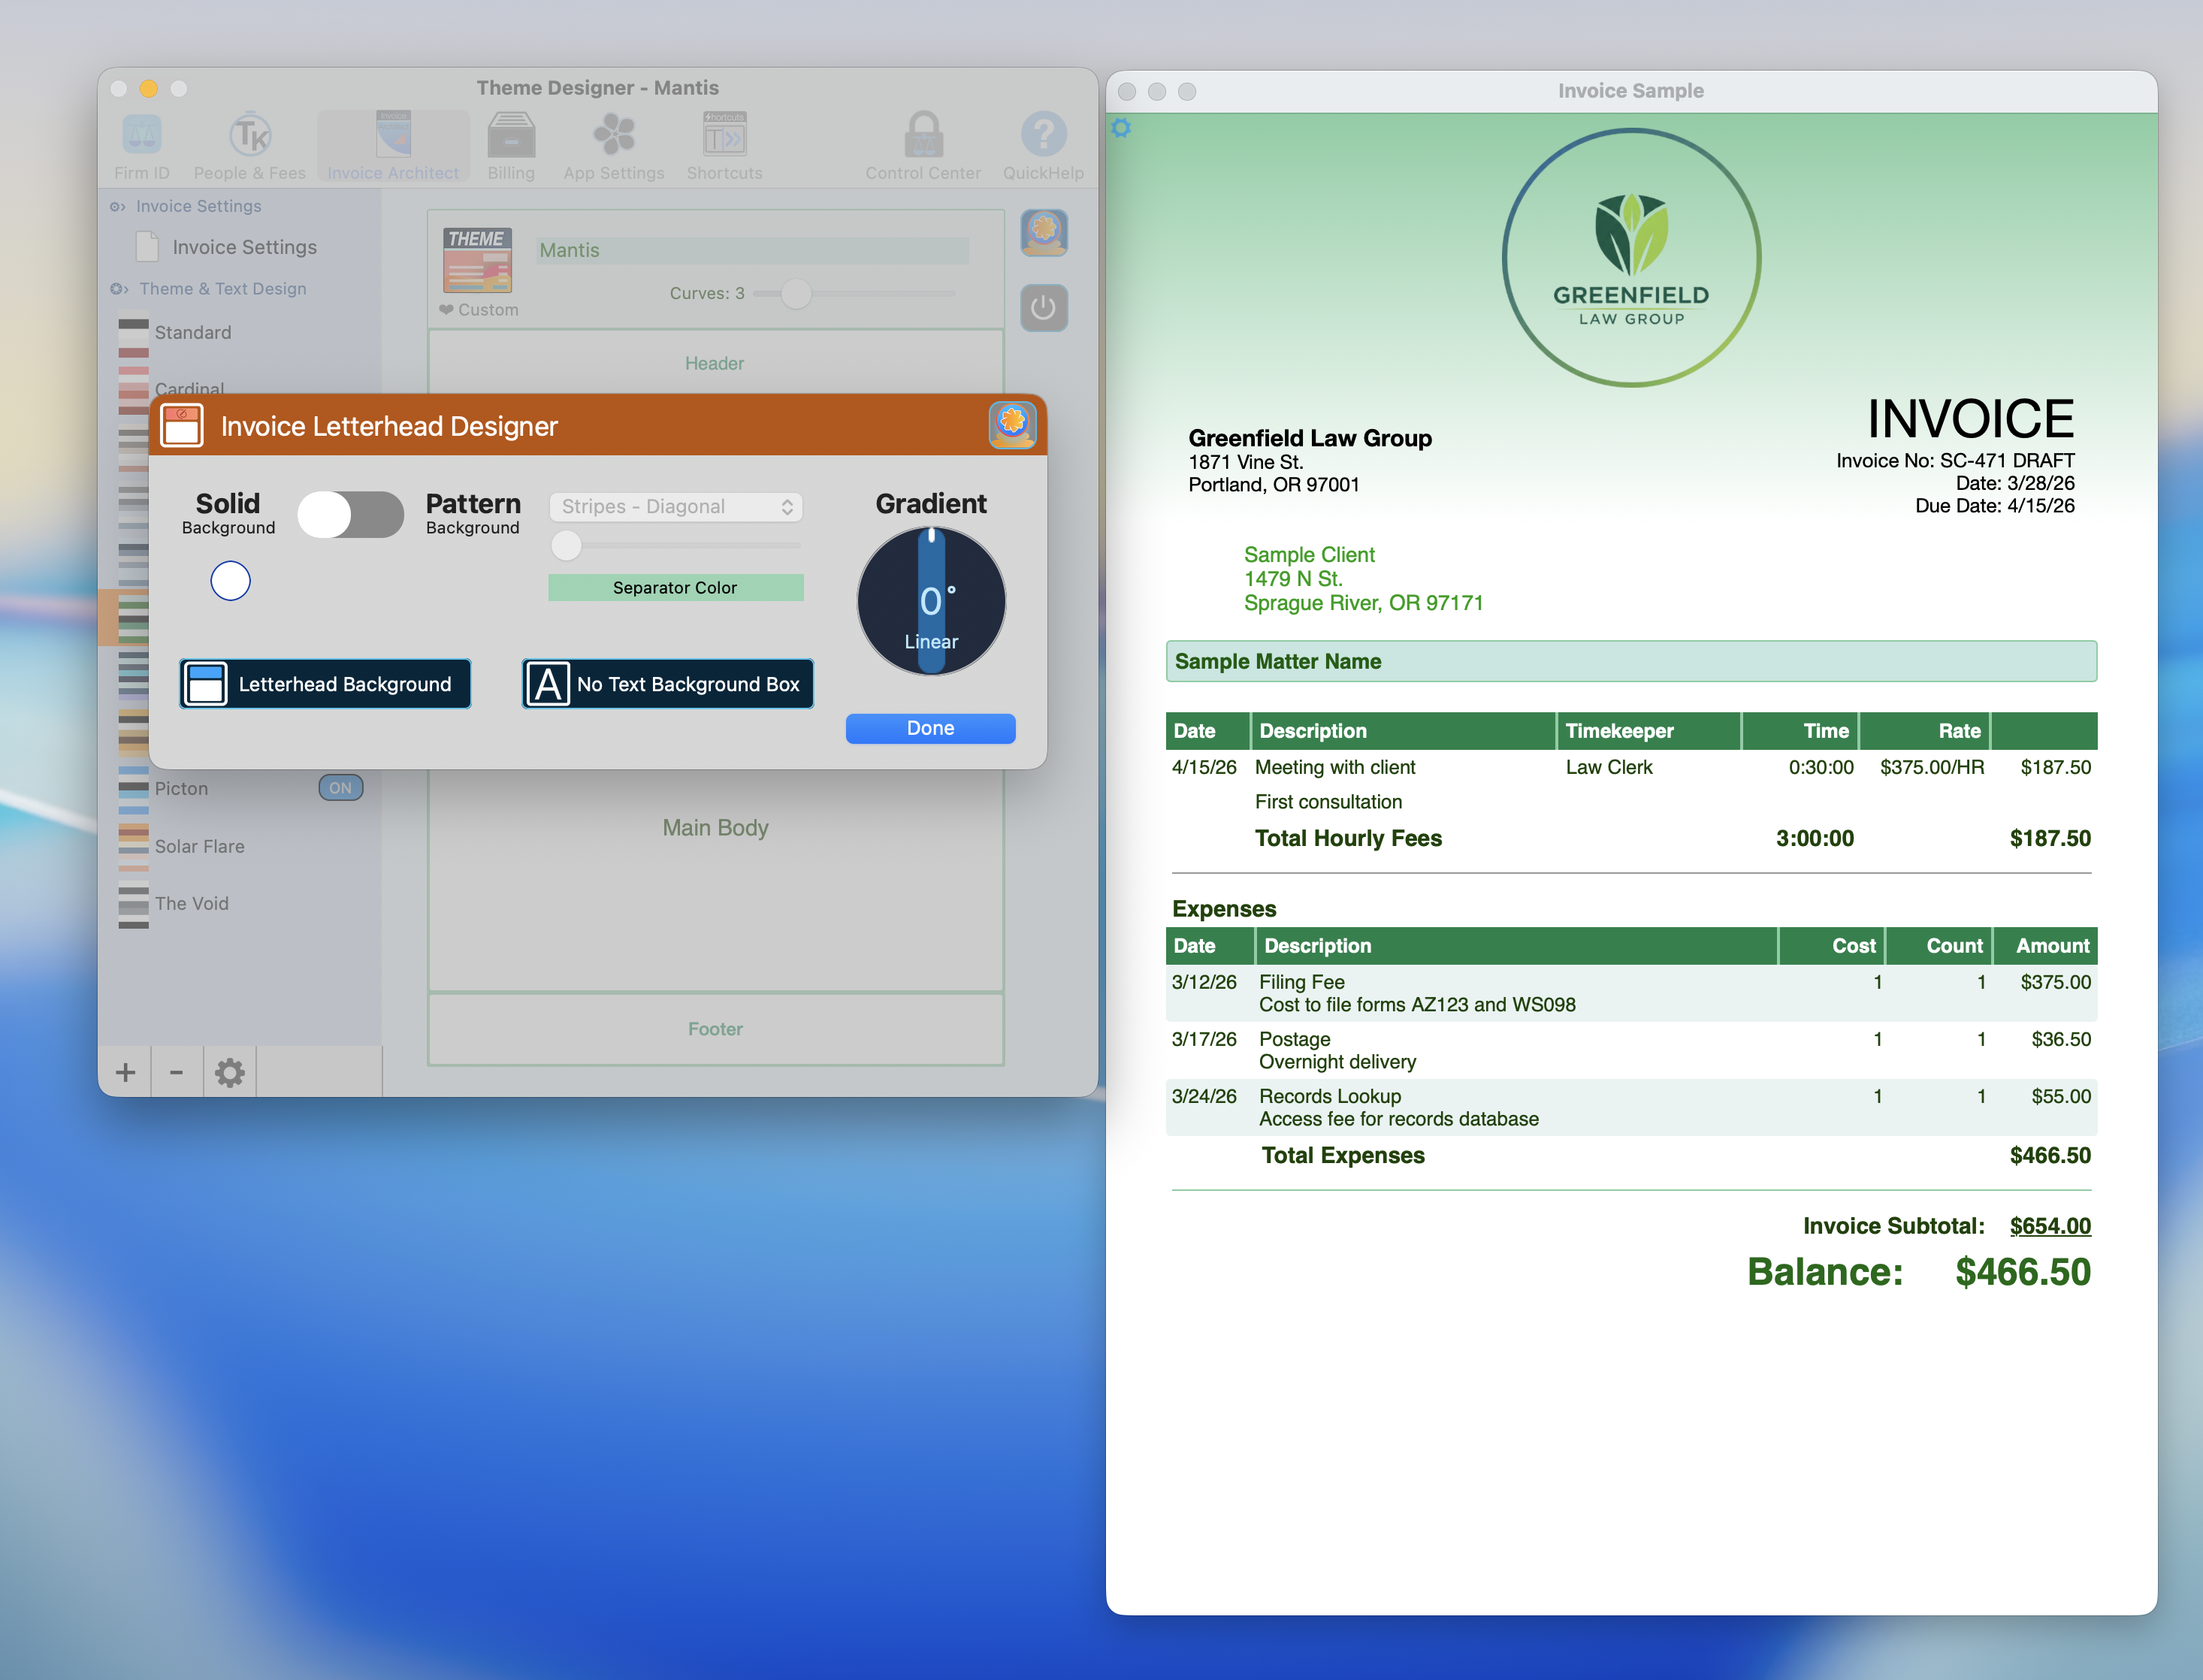
The Letterhead Designer with gradient, separator, and background color controls.
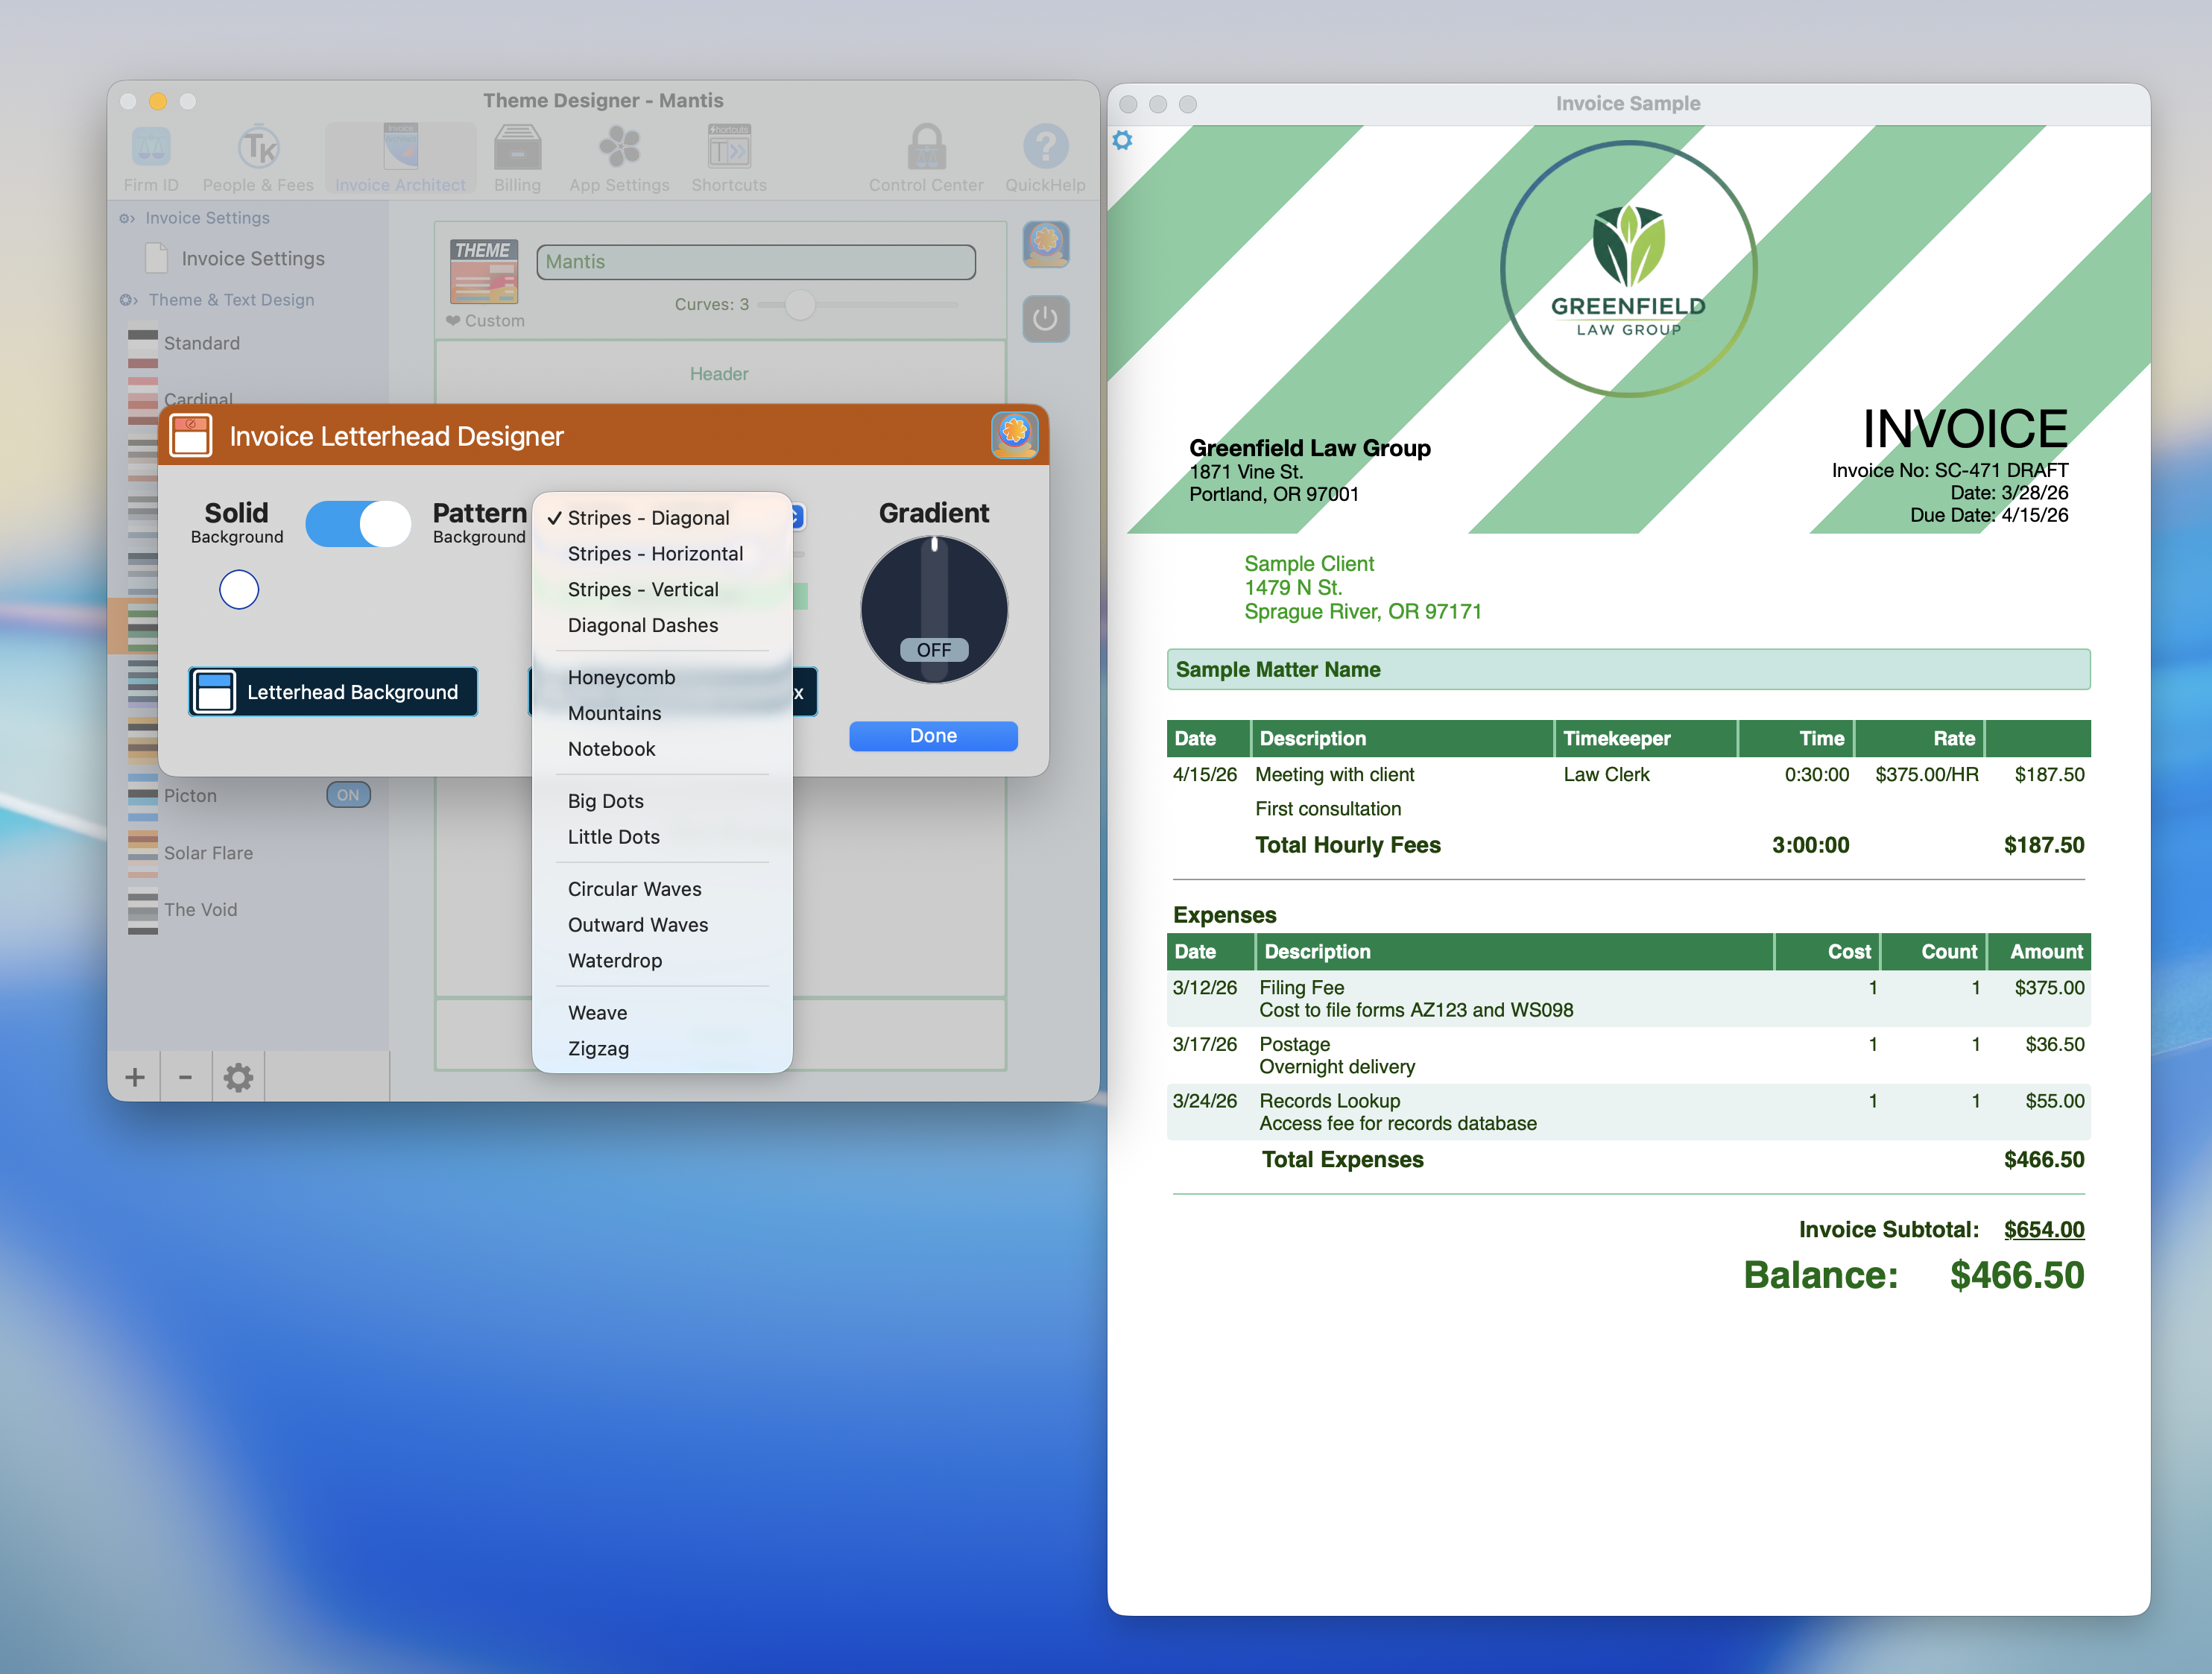
All 14 built-in letterhead patterns. From subtle dots to bold zigzags, pick the one that fits your firm.
Subtle patterns like Little Dots or Diagonal Dashes add visual interest without distracting from the invoice content. Save the bold patterns for firms that want to make a statement.
Header and Footer
Click the Header or Footer zone on the canvas to open their respective designers. Both work similarly and give you full typographic control.
Header Designer
The Header Designer opens as a popover with:
- Font family dropdown (for example, Helvetica Neue)
- Bold, Italic, and Underline formatting buttons
- Text alignment options for Left, Center, or Right
- Font size controlled by a slider and dropdown
- A rich text editing area where you compose your header content
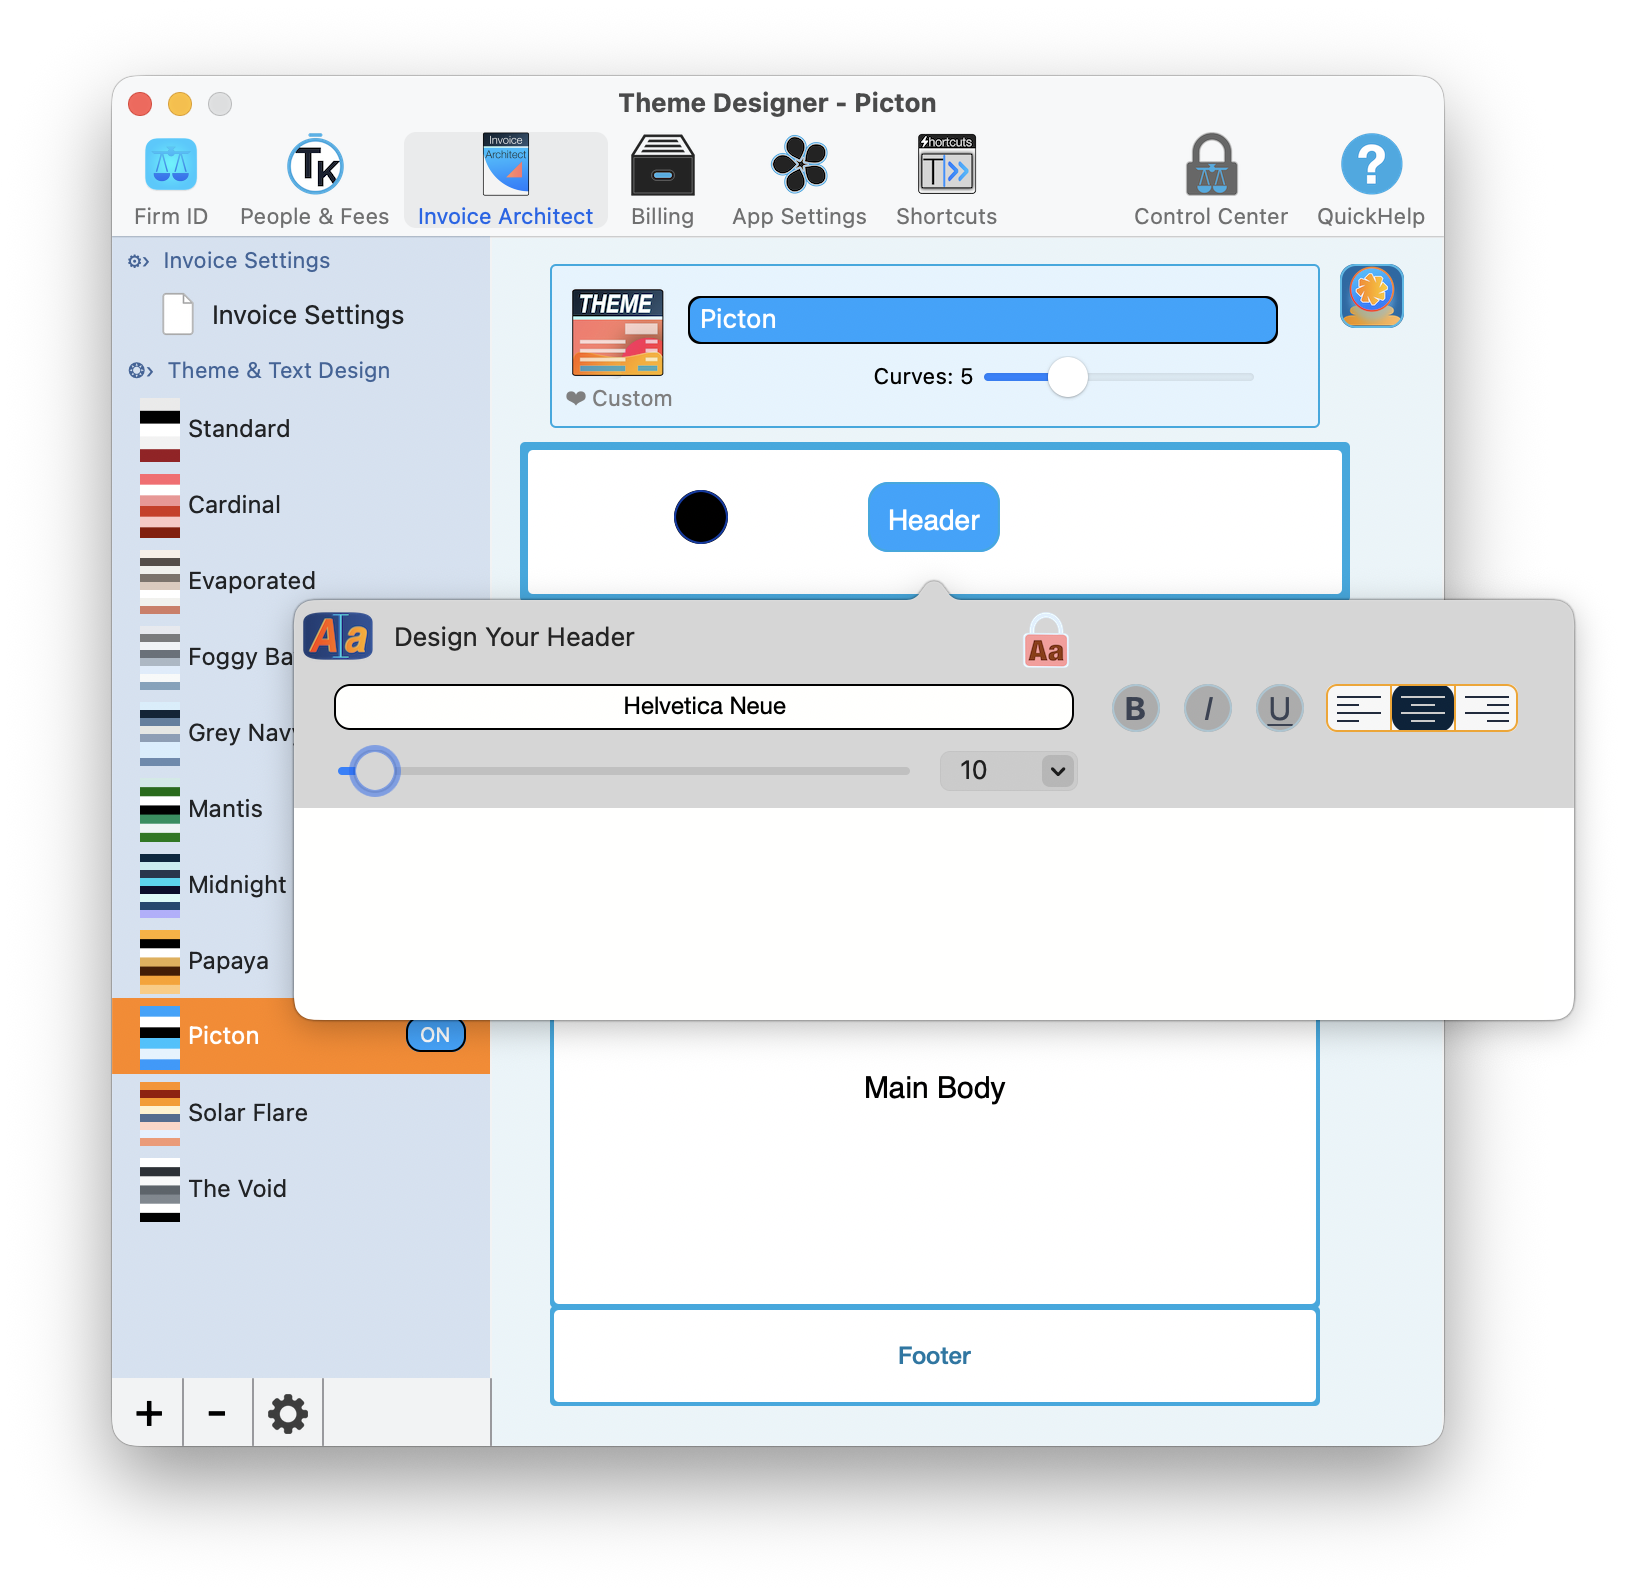
The Header Designer gives you full control over fonts, formatting, and alignment.
Footer Designer
The Footer Designer includes the same font, formatting, and alignment controls as the header, plus one critical extra: a "Show Footer On Every Page" checkbox. For multi-page invoices, turn this on so your payment instructions, disclaimers, or trust account notices appear on every page, not just the last one.
A settings gear icon in the footer designer provides additional configuration options.
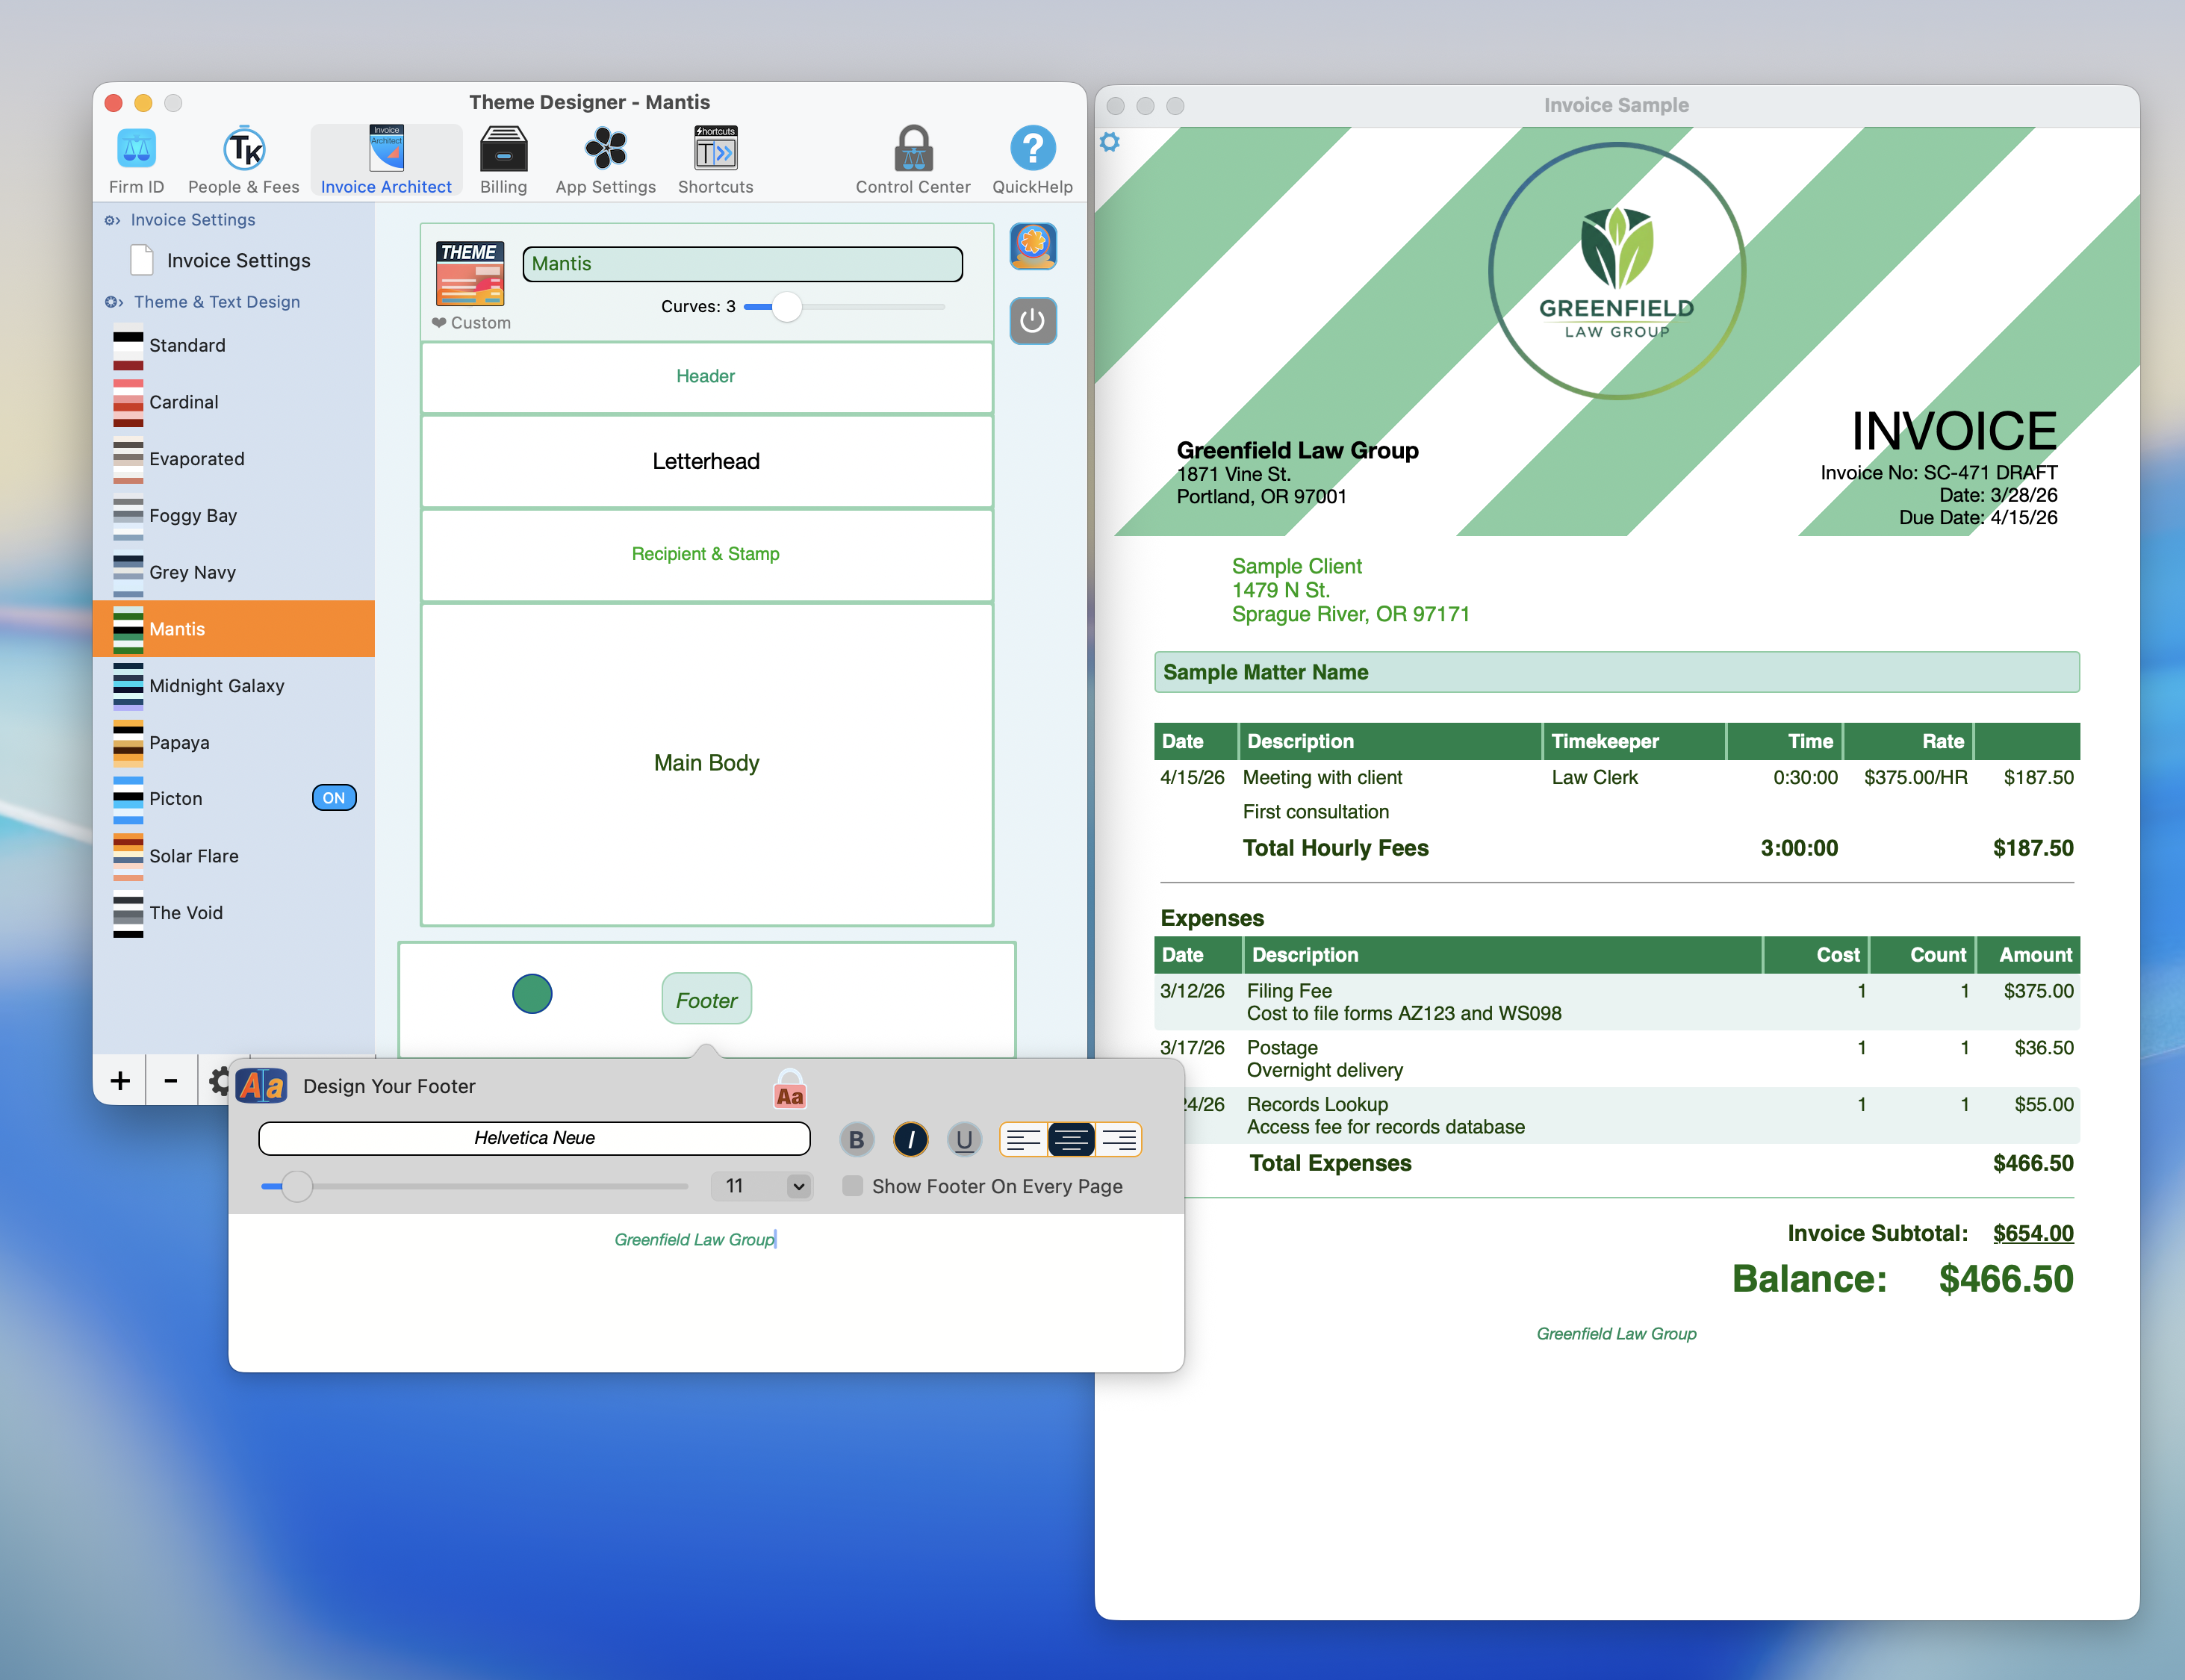
The Footer Designer. Do not forget to check "Show Footer On Every Page" for multi-page invoices.
Put your payment instructions and trust account notice in the footer and enable "Show Footer On Every Page." Clients should never have to flip to the last page to find out how to pay you.
Invoice Stamps
This is where TimeNet Law gets fun. Click the Recipient & Stamp zone on the canvas to open the Invoice Stamp Designer. Stamps are bold visual indicators that appear on your invoices to communicate status at a glance.
Three Stamp Types
You get three customizable stamps, each with editable text and its own color swatch:
- Overdue Stamp for past-due invoices
- Everyday Stamp showing "DUE: <bal>" with the actual balance amount (for example, "$1,647.31")
- Paid Stamp displaying "PAID IN FULL" or whatever you prefer
Give Your Stamps Some Organic Chaos
A Randomize Angle checkbox tilts each stamp slightly differently every time, so they look hand-stamped rather than machine-perfect.
Set Your Style
- Outline renders just the border of the stamp
- Full Color fills the entire stamp with color
Weathering
- Clean Look keeps stamps pristine and sharp
- Randomized Weathering adds an aged, distressed texture for a more organic feel
The Stamp Designer with three stamp types, angle randomization, style, and weathering controls.
Stamp Color Sets
Choose from eight curated color sets that apply coordinated colors across all three stamps:
- Cappuccino
- Firebrand
- Frozen
- Hey You Guys!
- Malibu
- Mellow Yellow
- Positive Outlook
- Shades of Grey
A Fine Tune button lets you make micro-adjustments to individual stamp colors if you want to go beyond the presets. Click Done to apply your changes.
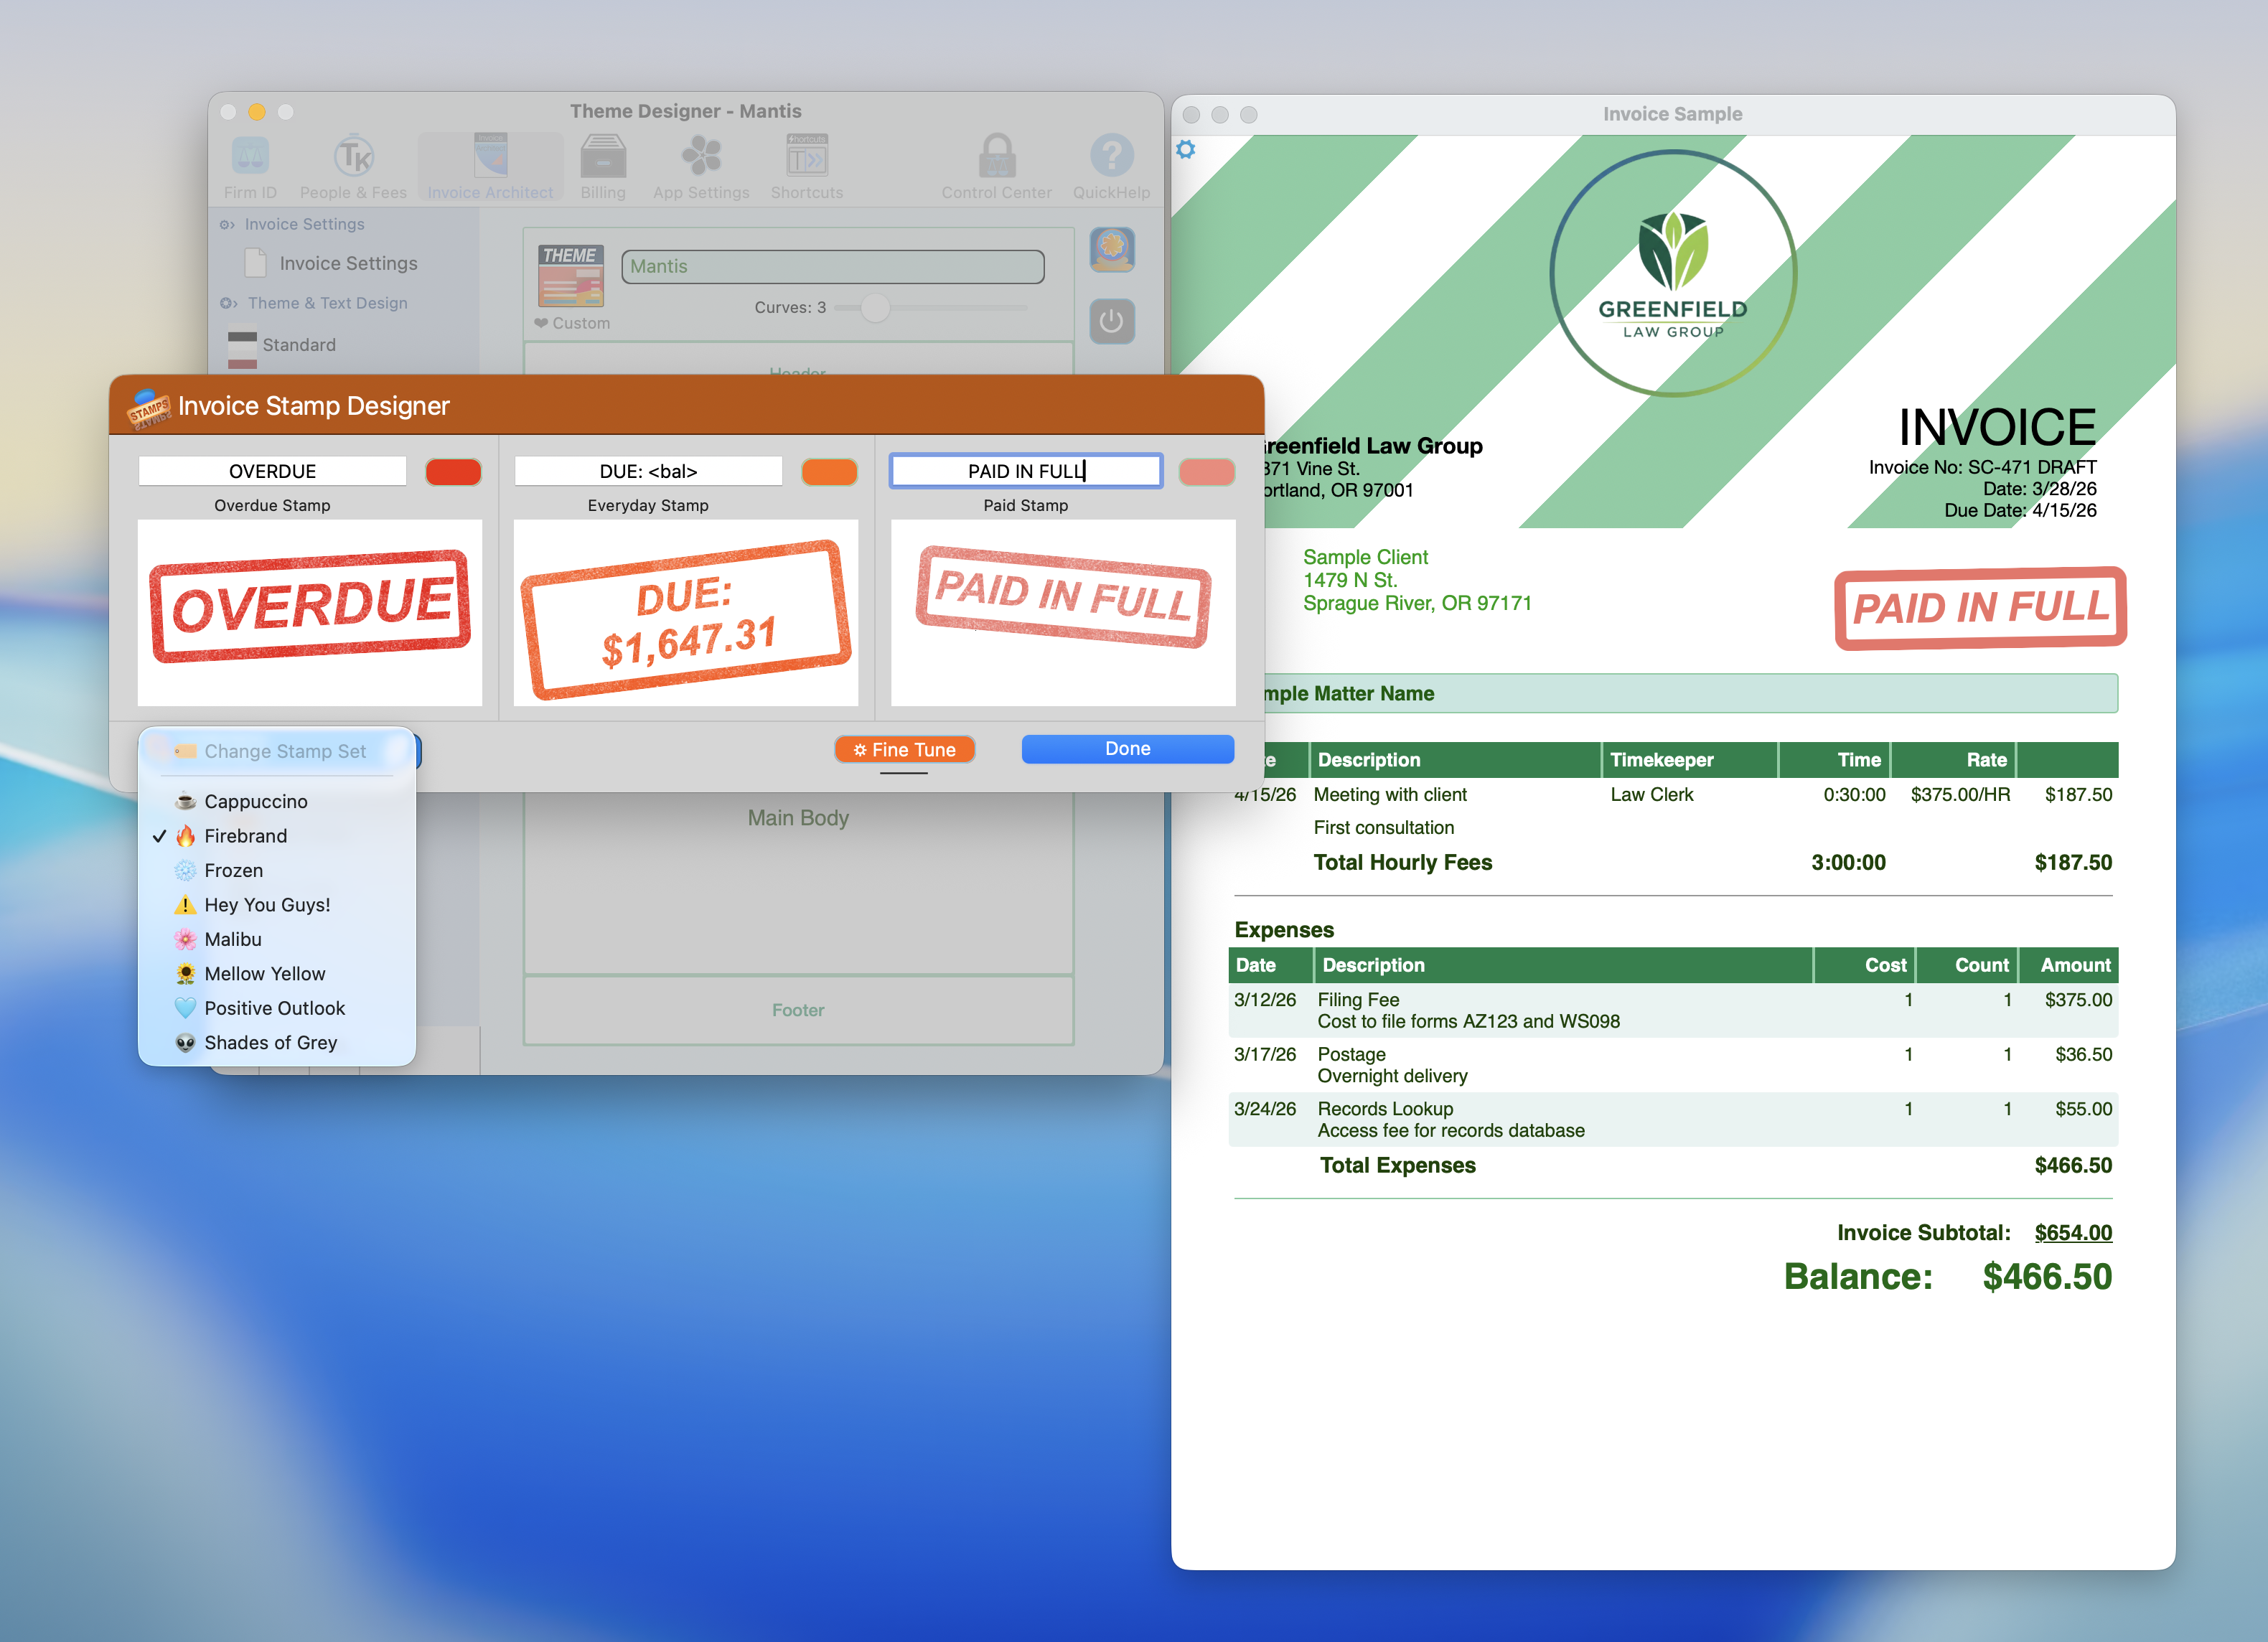
Eight curated stamp color sets. Pick a palette or fine-tune individual stamp colors.
Main Body and Columns
Click the Main Body zone on the canvas to customize how the core billing data looks on your invoices.
Body Design Controls
- Matter Titlebar shows text and background color selectors when you hover over it
- Column | Headers works the same way - text color on the left, background color on the right
- Alternate Row Color checkbox enables zebra-striped rows for easier reading across long line items, and click the colorbar to customize the alternating row color
- Column Customizer lets you show or hide columns and customize their text (see Customize Columns below)
- Main Text color selector on the left, font and size options under the Main Text button
- Separator Color for the lines between columns and sections
- Balance Color lets you customize the text color for the balance due line
- Label Editor lets you customize balance, payment and other lines, and change retainer account labels (see Invoice Labels and Accounts below)
Main Body design controls for titlebars, column headers, row striping, and separator colors.
Customize Columns
You decide exactly which columns appear on your invoices. For Hourly Fees, you can toggle each of these columns on or off:
- Date (always on)
- Description (always on)
- Timekeeper (toggleable)
- Timekeeper ID (toggleable)
- Time (toggleable)
- Rate (toggleable)
- Amount (toggleable)
For Payment History, you can toggle:
- Date (always on)
- Payment Type (toggleable)
- Payment Details (toggleable)
- Withdrawal Notes (toggleable)
If you do not bill by the hour, turn off the Rate and Time columns. If timekeepers are irrelevant to your clients, hide those too. Show only what matters.
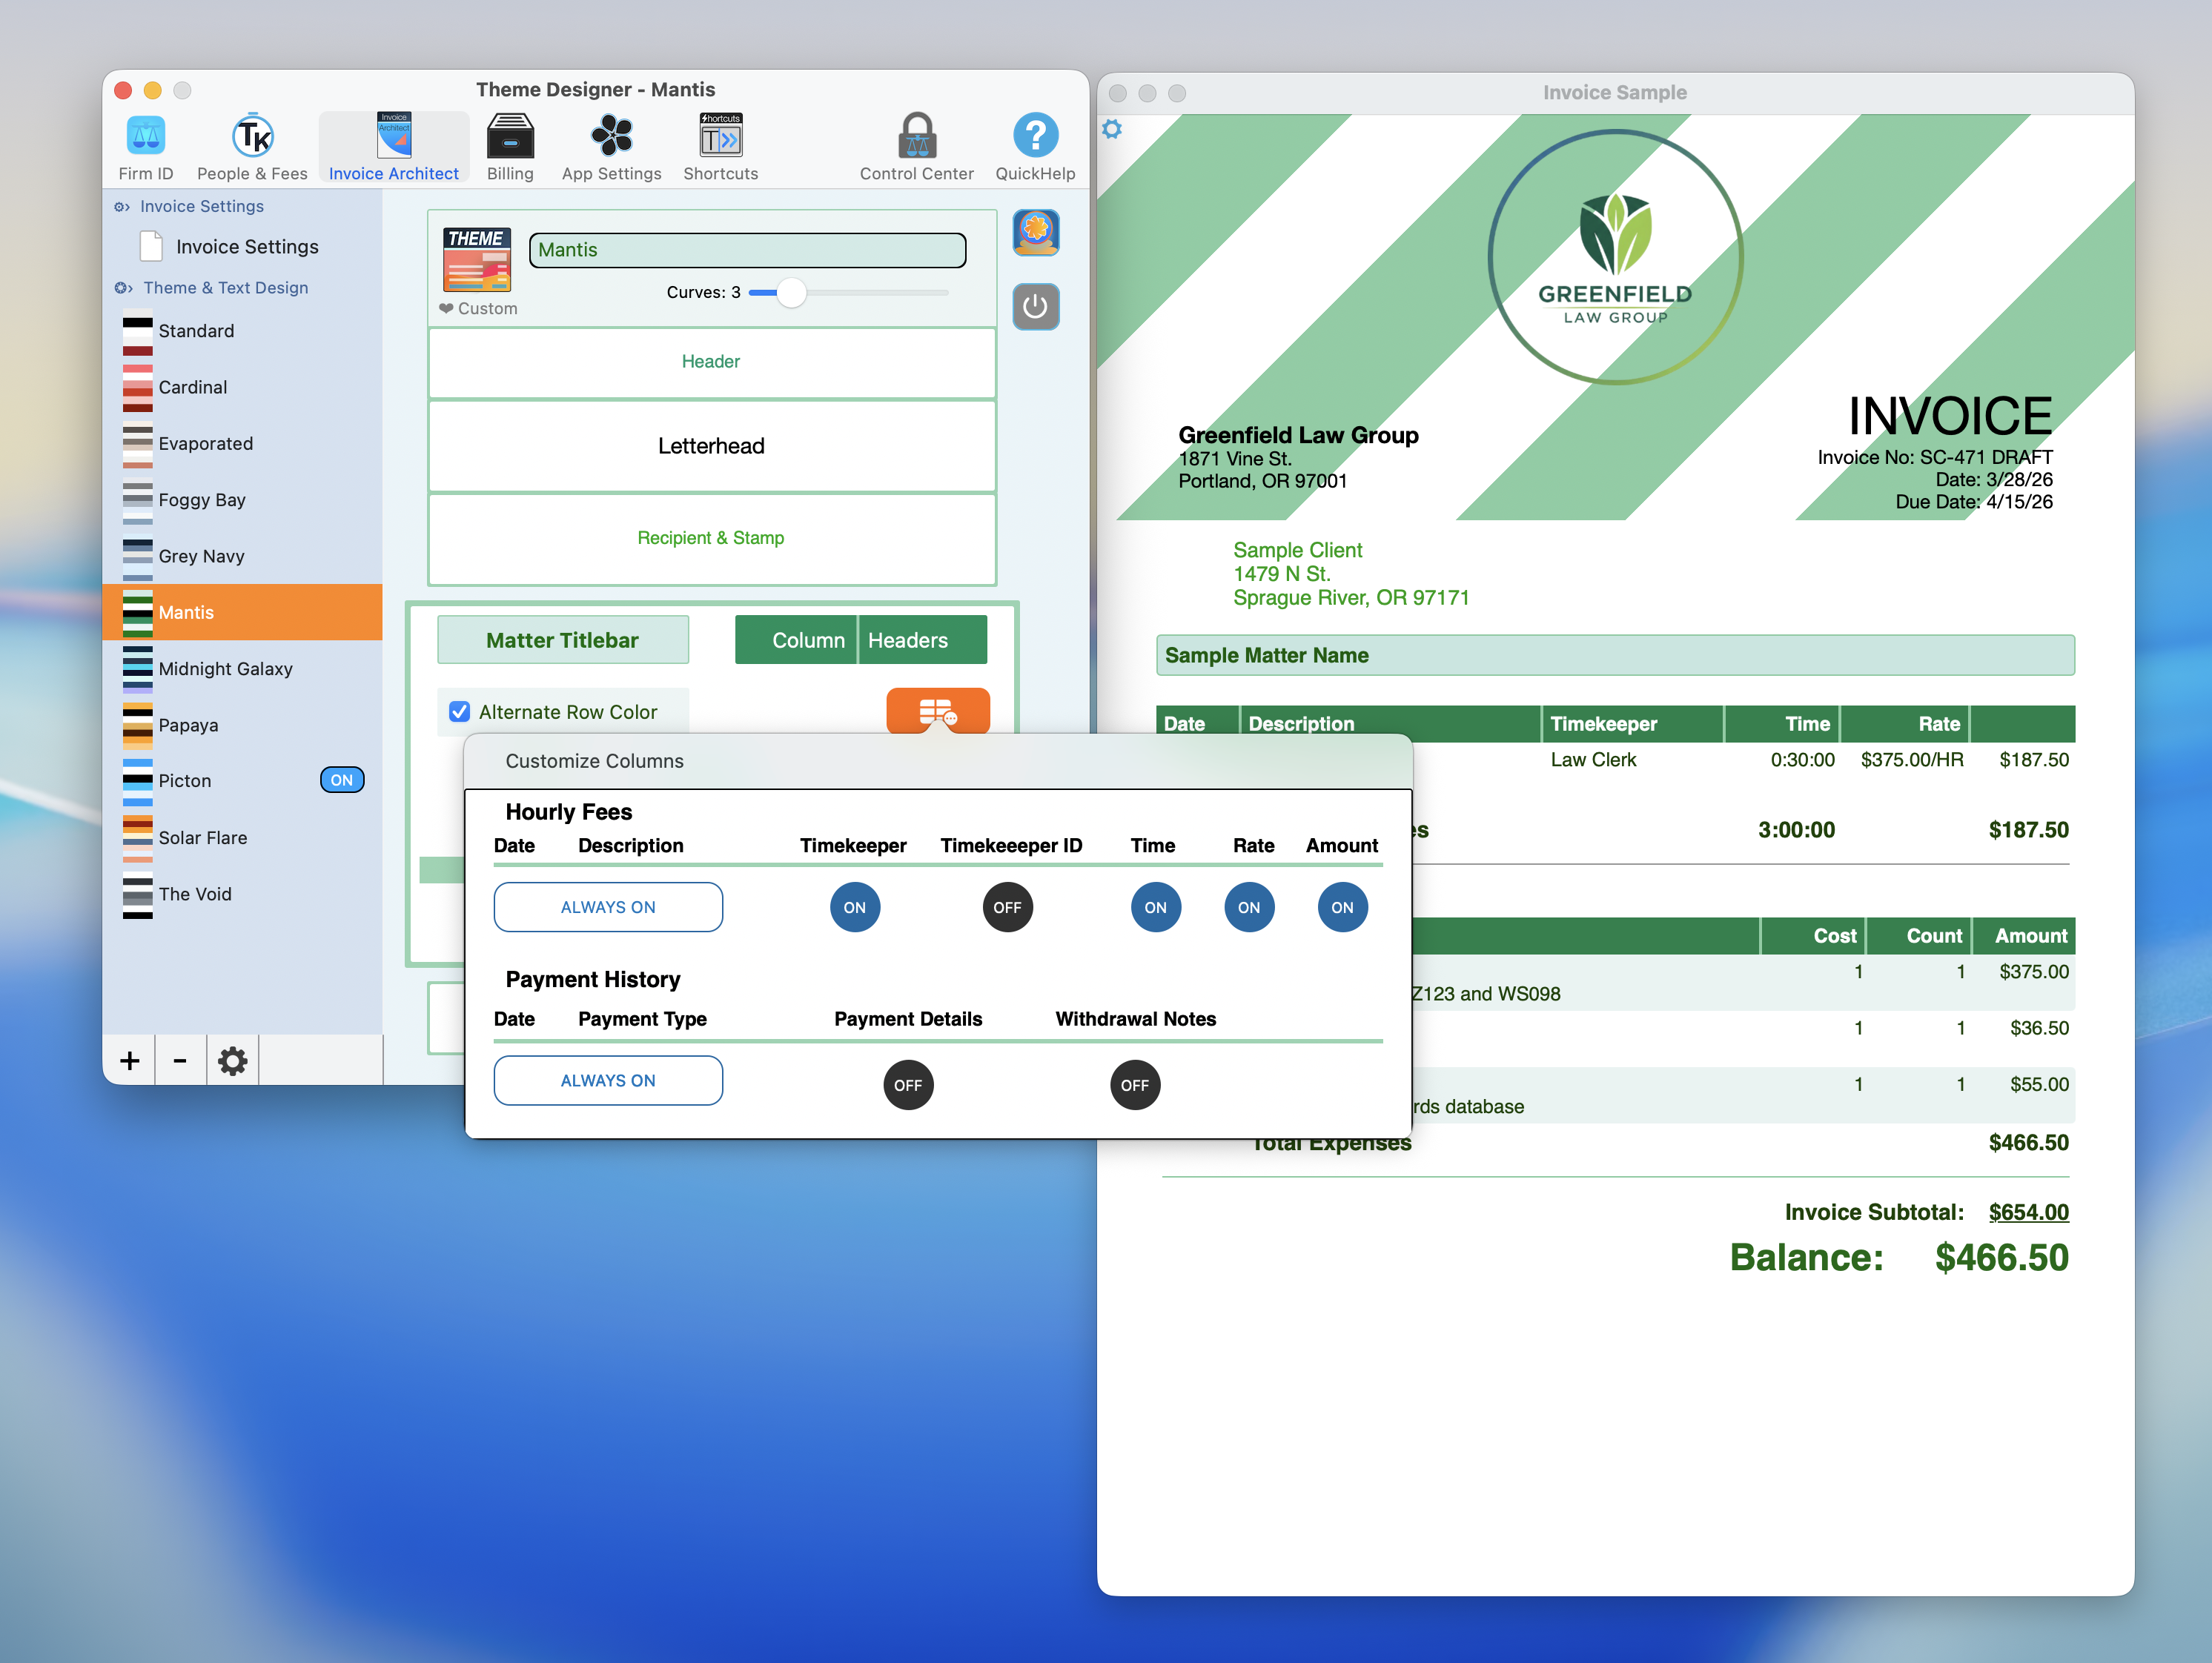
Toggle individual columns on or off for Hourly Fees and Payment History sections.
Turn on Alternate Row Color for invoices with lots of line items. Zebra-striped rows make it much easier for clients to track across columns without losing their place.
Invoice Labels and Accounts
Every firm has its own terminology. Invoice Labels let you control exactly how line items and account types are worded on your invoices.
Line Item Labels
Customize the text and format for:
- Non-Billable Hours displayed as "#.# Hours"
- Retainer Replenishment displayed as "+ $#,###.00"
- Late Fee displayed as "+ $##.00"
- Balance displayed as "$#,###.00" (shown in red)
Retainer Account Labels
Under "Show On Invoice As," you can rename each retainer-related account to match your firm's language:
- Trust Account
- Escrow Account
- Unapplied Credits
- Matter Trust Account
- Matter Escrow Account
- Matter Unapplied Credits
All fields are editable. If your firm calls it a "Client Retainer" instead of "Trust Account," just type it in.
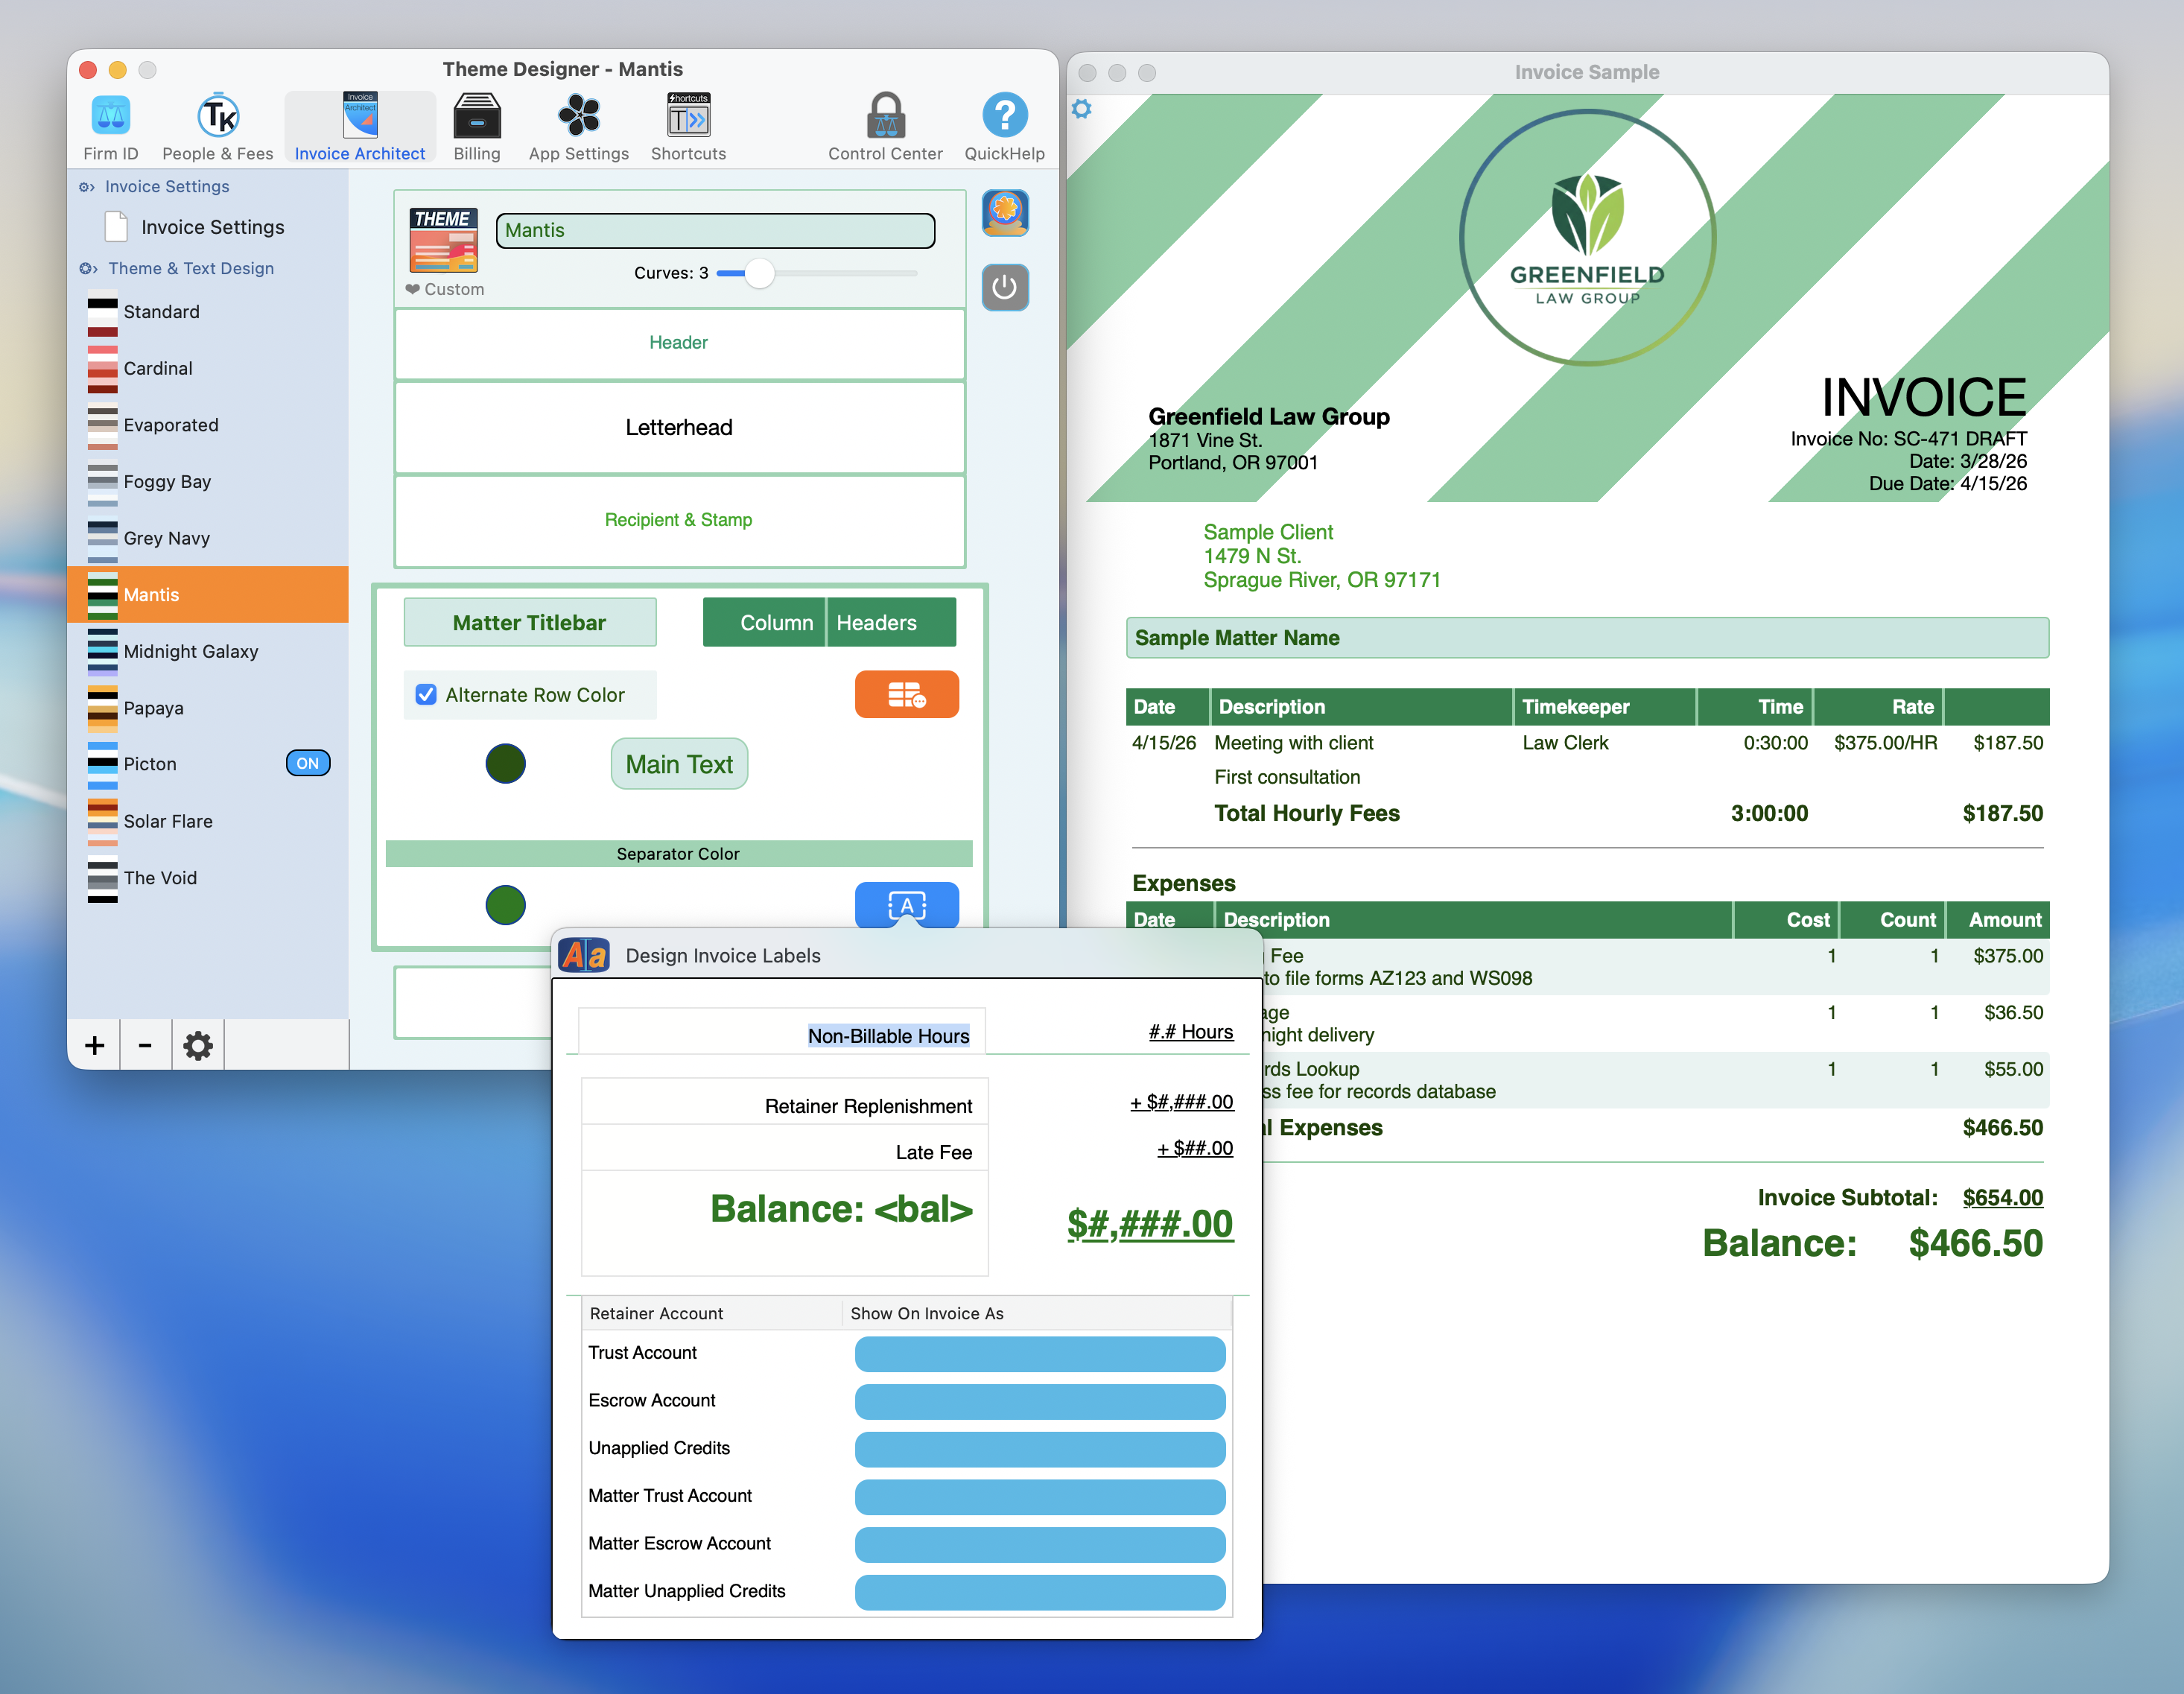
Customize every label and account name so your invoices speak your firm's language.
Custom Themes
The 11 built-in themes are a great starting point, but you can also create your own.
Creating and Managing Themes
At the bottom of the theme list in the left sidebar, you will find three controls:
- + button to create a new custom theme
- - button to remove a custom theme
- Gear icon for additional theme management options
When you create a new theme, it opens in the Theme Designer canvas where you can name it, adjust every zone, and save it. The theme name field is editable right at the top (marked with a "THEME" badge), and you can mark any theme with the heart icon to flag it as a custom favorite.
The Curves Slider
Every theme includes a Curves slider (for example, "Curves: 5") that controls the border radius throughout the entire invoice design. Slide it up for rounded, modern corners. Slide it down for sharp, traditional edges. This single control transforms the feel of the whole layout.
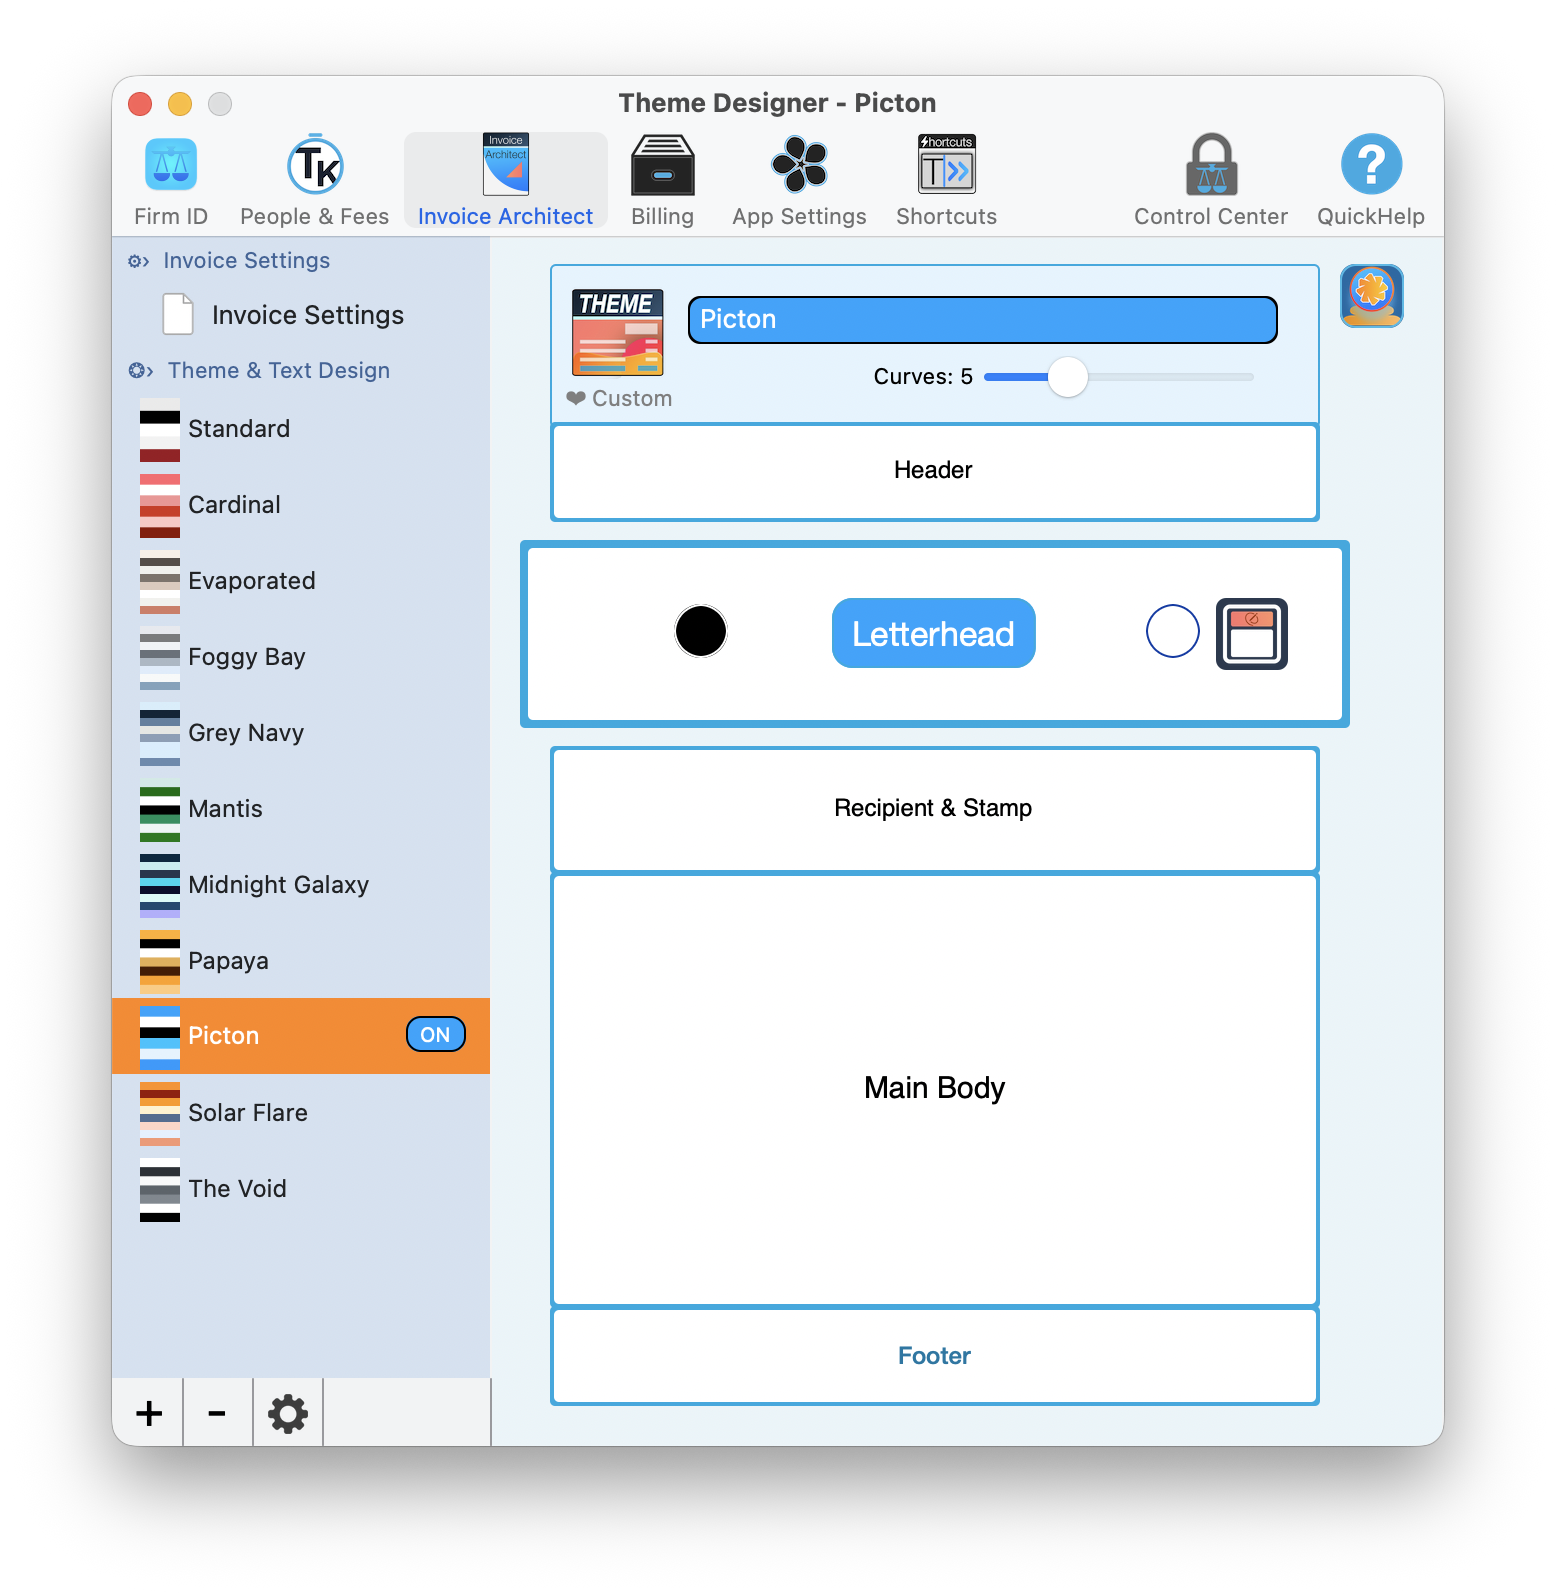
The Picton theme open in the Theme Designer. Note the Curves slider and editable theme name at the top.
Start by picking the built-in theme closest to what you want, then create a custom copy from there. It is much faster than building from scratch, and you always have the original to fall back on.
Live Preview and Firm ID
You should never send an invoice you have not previewed. TimeNet Law makes previewing easy from two places.
Live Preview from the Theme Designer
As you make changes in the Theme Designer, the Invoice Sample window updates alongside the canvas in real time. This shows your actual invoice layout with the current theme, colors, and typography applied. You can see exactly how letterhead patterns, stamp styles, and column configurations look together before committing to anything.
Firm ID Tab Connection
The Firm ID tab in Preferences connects directly to Invoice Architect. From Firm ID, you will find:
- A Theme selector dropdown for quick theme switching, plus a "THEME Designer" button that jumps you straight to the full designer
- A "LIVE Preview" button (pink ring) that opens a live invoice preview with your firm branding applied
- An invoice layout preview showing how your firm's information appears on the document
This means you can tweak your firm identity details on the Firm ID tab and instantly see how they look on the invoice without switching back and forth.
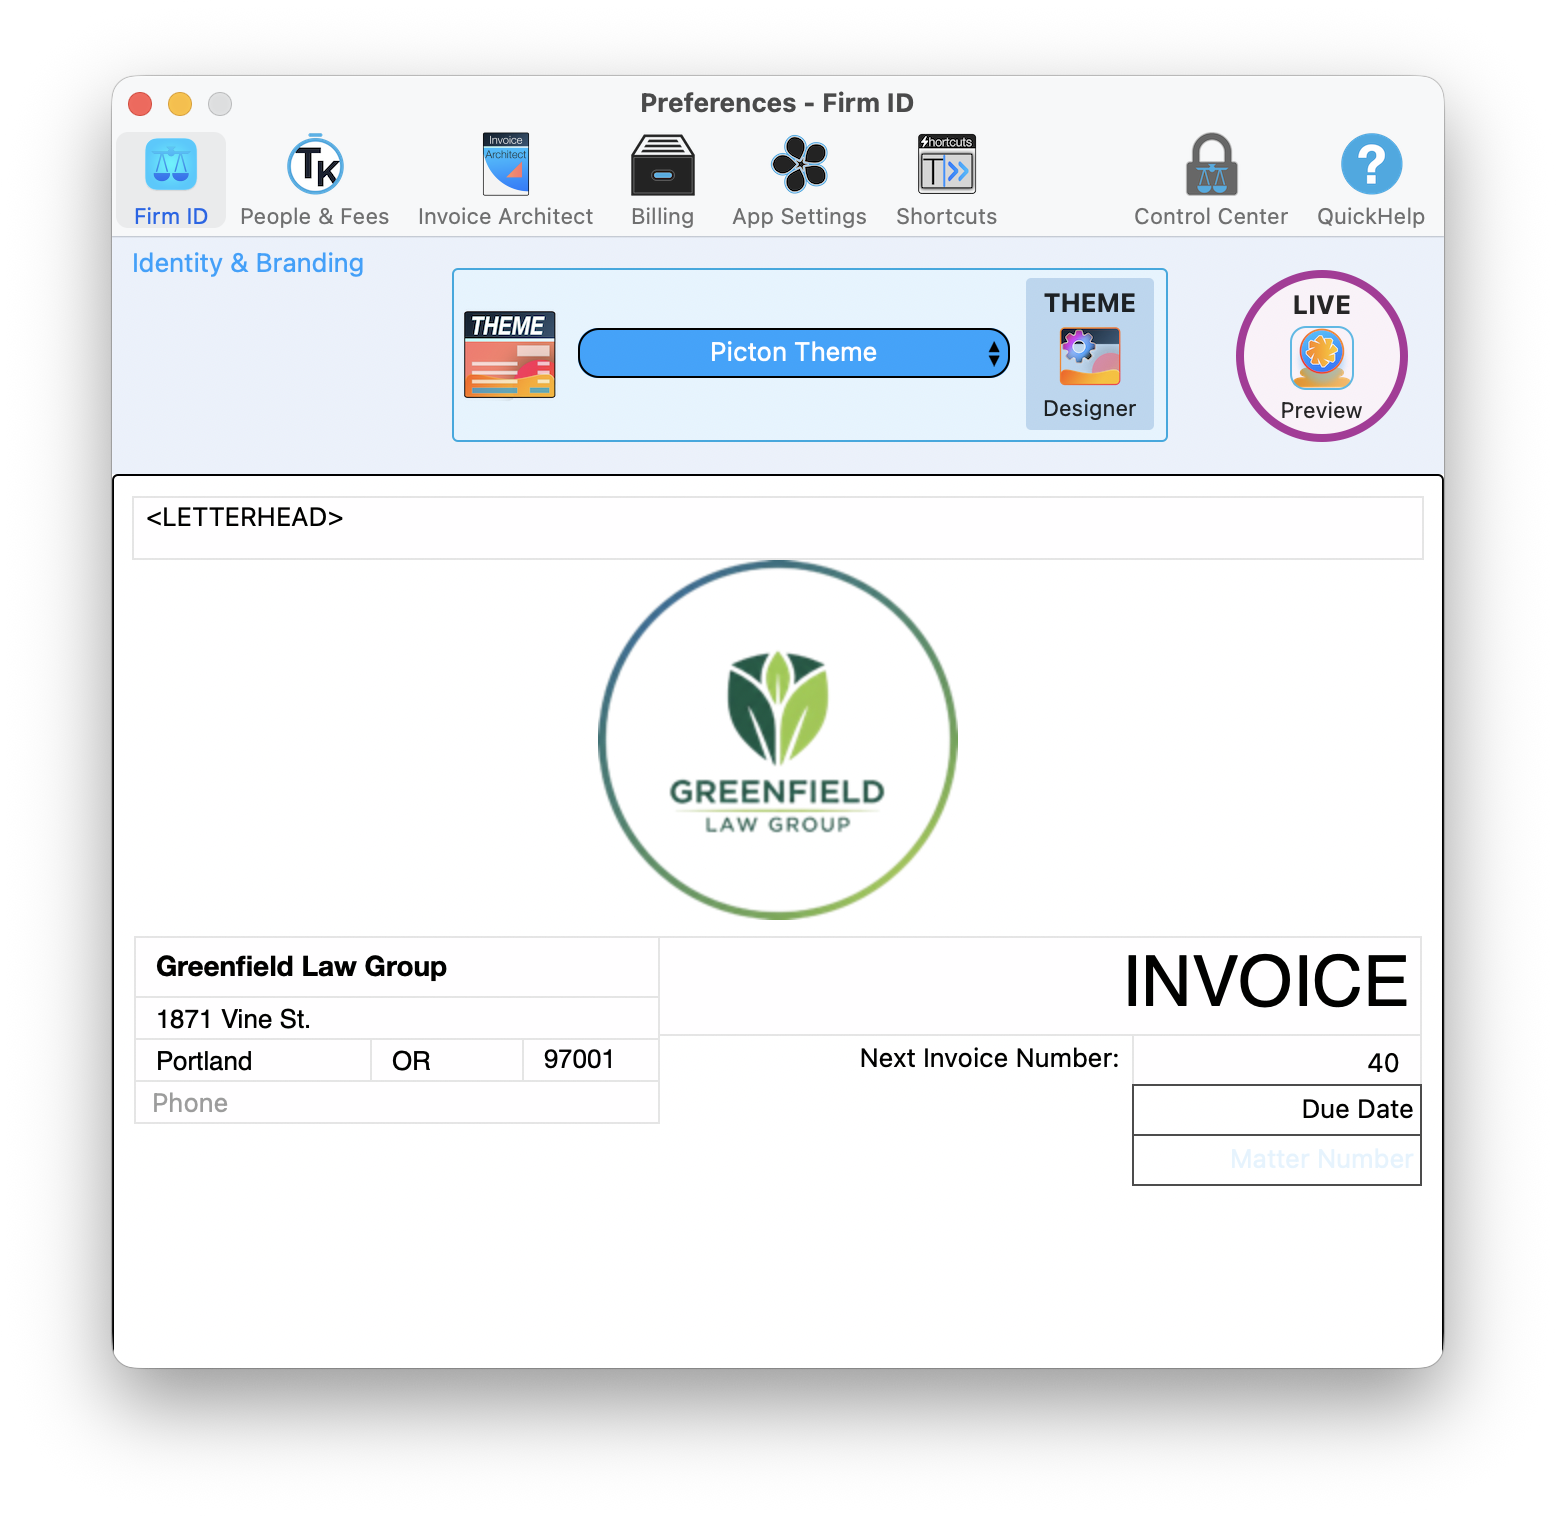
The Firm ID tab gives you quick access to theme selection and live invoice preview.
From Design to Draft: Creating Invoices
Once your theme is set, you are ready to generate invoices. TimeNet Law offers two paths: single-matter drafts for individual invoices, and batch drafts for billing multiple matters at once from the Billing Center.
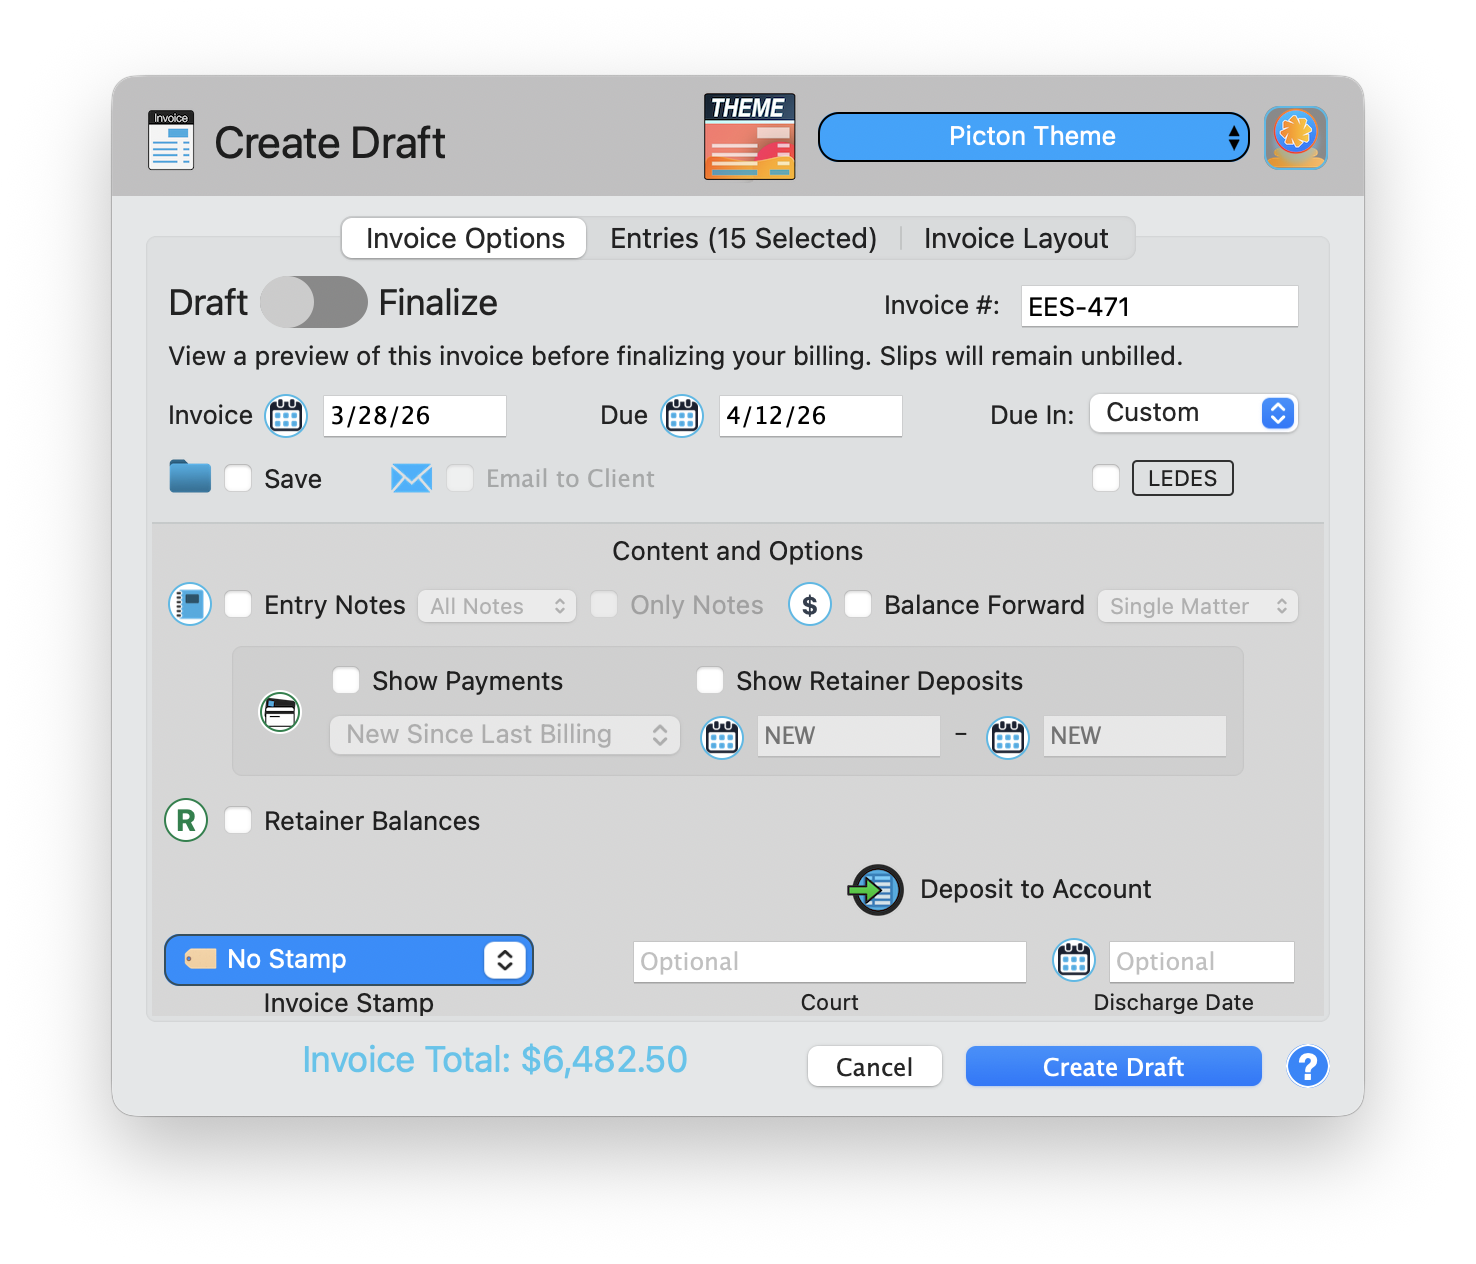
Single-Matter Invoice: Create Draft
When you select entries for one matter and choose Create Draft, a focused dialog appears. At the top, a theme selector (for example, "Picton Theme") lets you pick or preview your design. The dialog shows tabs for Invoice Options, Entries (with a count of selected entries), and Invoice Layout. Key options include:
- Draft/Finalize toggle: Start in Draft mode to review before finalizing
- Invoice number, date, and due date with customizable payment terms
- Save and Email checkboxes: Save to a folder and email to the client in one step
- LEDES export button for firms that need LEDES-format billing
- Content options: Entry Notes (All Notes or Only Notes), Balance Forward, Show Payments, Show Retainer Deposits, date range selector
- Retainer Balances, Deposit to Account, Invoice Stamp, Court, and Discharge Date fields
- Invoice Total displayed prominently at the bottom
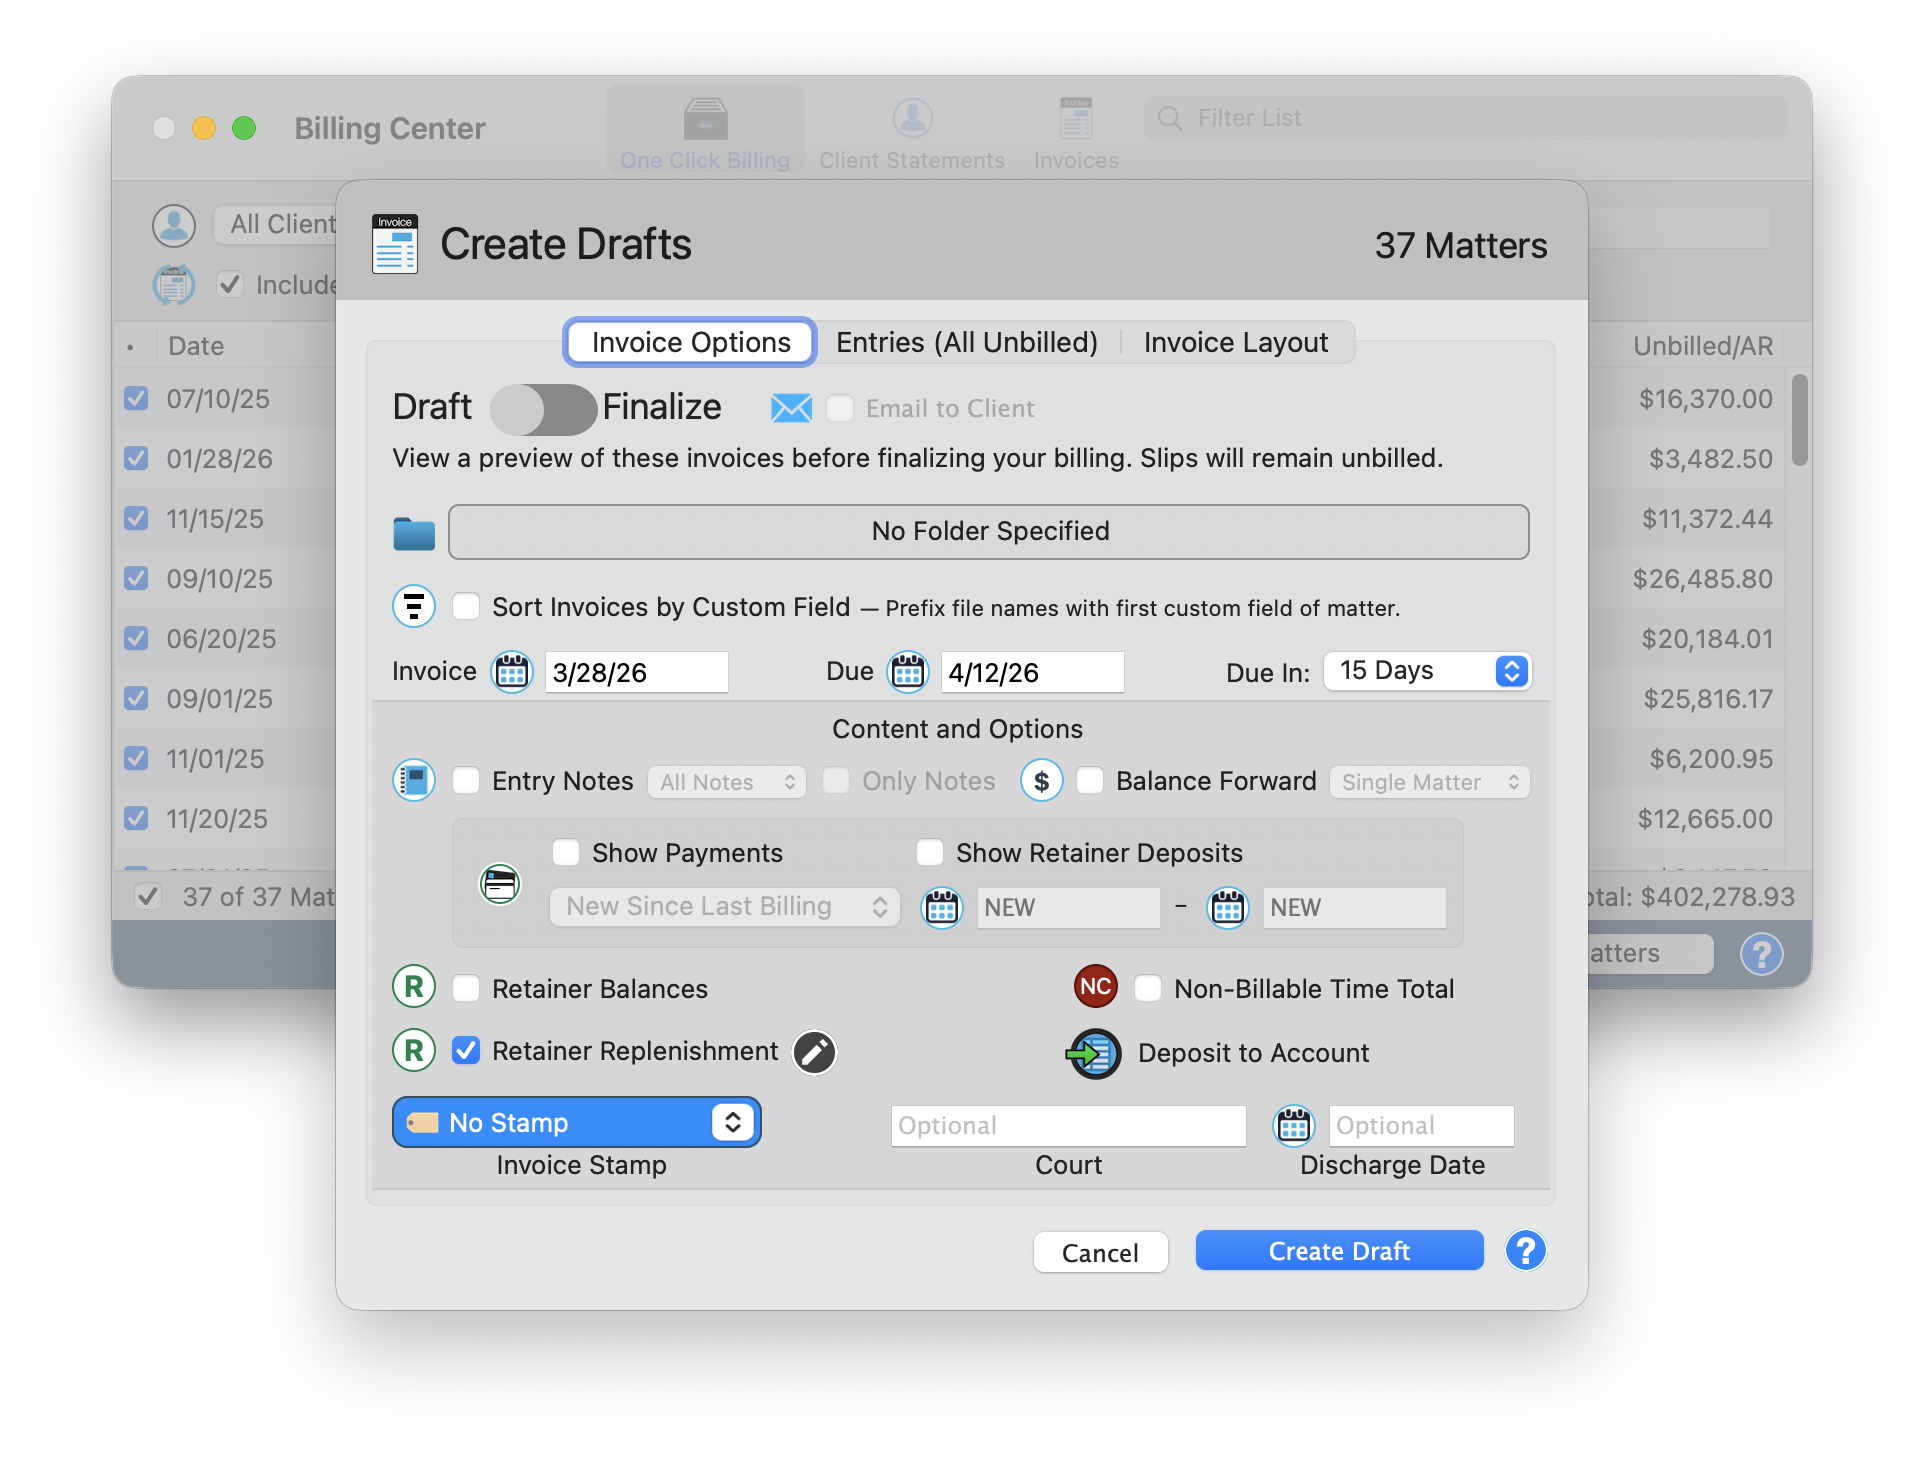
Batch Billing: Create Drafts
For billing multiple matters at once, open the Billing Center and select the matters you want to invoice. The Create Drafts dialog (note the plural) handles batch generation across all selected matters. The Billing Center behind the dialog shows the One Click Billing tab with your matter list, dates, Unbilled and AR amounts, and a combined total.
- Same core options as single-matter drafts: theme, Draft/Finalize toggle, Entry Notes, Balance Forward, Show Payments
- Batch-specific options: Sort Invoices by Custom Field, Retainer Replenishment (with an edit control), Non-Billable Time Total toggle
- Entries tab shows "All Unbilled" instead of a specific count, since you are billing all unbilled time across matters
- No individual invoice number in the dialog, since each matter gets its own sequential number automatically
Make Every Invoice Count
Your invoice is a reflection of your firm. Invoice Architect gives you the tools to make it a good one. Set it up once and every invoice you send will look sharp, professional, and on-brand.
Between 11 built-in themes, 14 letterhead patterns, 8 stamp color sets, and full control over fonts, columns, and labels, you can create an invoice that is unmistakably yours. And with live preview, you will know exactly how it looks before a single client sees it.
Keep exploring:
- Email Invoices to send your beautifully designed invoices directly from TimeNet Law
- Batch Billing to generate multiple invoices at once using your custom templates
- One-Click Invoice for fast invoicing that uses your Invoice Architect designs
Need Help Designing Your Invoice? Perry Can Help.
Screen share with Perry and he will walk you through creating a polished invoice template in minutes.