Networking Guide
TimeNet Law supports two different types of networking modes. The first step is deciding which mode will work best for you.
1. Cloud Mode
No file permissions to manage and automatic remote access.
Off-site backup of your database.
Enableds a virtual law office with almost no setup.
TimeNet Law is fully compatible with many free cloud syncing services, including:
Dropbox
iCloud Drive
Microsoft OneDrive
2. Local Network Mode
Use an existing in-office network or a simple shared folder.
File permission settings and remote access must be manually configured.
Once you've decided on a network mode (this can always be changed later), follow the instructions below.
How TimeNet Law Handles Multiple Users
For the full answer to "can our whole firm share one database on Dropbox," including how conflicts are handled and how many users this scales to, see Multi-User Sync on Dropbox and iCloud Drive.
A common question, and a common misconception about cloud-synced software: what happens when several people work at the same time? In most systems a shared folder means one database file that everyone overwrites, and the sync service resolves that by making conflicted copies. TimeNet Law is not built that way.
One entry file per attorney, in every matter
Each timekeeper writes to their own entry file inside the matter folder. Five lawyers can work the same matter at the same time and never touch the same file, so there is nothing for the sync service to put into conflict. This is the core of the design, and it has been in production for more than 20 years. TimeNet Law has supported Dropbox sync since Dropbox itself was brand new.
Conflict detection and repair, automatic and manual
TimeNet Law watches syncing as it happens and consolidates in the background. Open a matter that contains conflicted copies and it tells you, then offers a clear consolidation. It raises a warning if conflicts look widespread rather than isolated, or if it cannot repair the data deterministically on its own, because guessing with your billing records is not acceptable. Control Center's Event Vault also includes a manual Database Integrity Check, which can be scheduled as an automation to run weekly.
Encrypted backups on every Mac in the firm
The database is encrypted, so every backup is encrypted too. Backups run automatically, daily or weekly, your choice. They are written to each networked Mac's Library folder, which means every user's machine becomes a redundant copy of the firm's database. Backups can also go to a custom location, including Dropbox or iCloud Drive, for off-site retention.
iPhone and iPad use the same folder
The iOS app reads the same TimeNet Law Data folder your Macs use, over Dropbox or iCloud Drive. No server, no VPN, no separate hosting. It gets live refresh and the same conflict protection as the Mac app.
This is not a small-firm-only mode
Dozens of law firms use TimeNet Law with 10 or more users on Dropbox or iCloud Drive, and it even runs firms with over 50 users. Control Center handles user permissions and Event Vault keeps the audit trail.
"Our firm has been using TimeNet Law for 10 years. We started as a small boutique firm, but TimeNet Law has allowed us to grow to over 36 employees. With offices all over the world, it is critical that our data is available remotely, always in sync, and safely on our hard drives. TimeNet Law makes this all possible. I cannot recommend it enough."
Wes Garland, COO, Johnson, Marcou, Isaacs & Nix, LLC
What we will not claim
No software is conflict-proof, and cloud sync services have failure modes of their own: a stalled download, a half-synced folder, a Mac that has been offline for a week. TimeNet Law is built to detect those, repair what it can safely repair, and tell you plainly when it cannot. That is a different promise from "this never goes wrong," and it is the honest one.
Instructions for Cloud Mode
1. Prepare your first computer.
Be sure you are signed into whichever cloud service you're going to use on this computer first.
If you don't have a cloud account, you can create a free one on Dropbox.
If you've already entered any data into TimeNet Law, do this first step from the computer that shows your data in TimeNet Law.
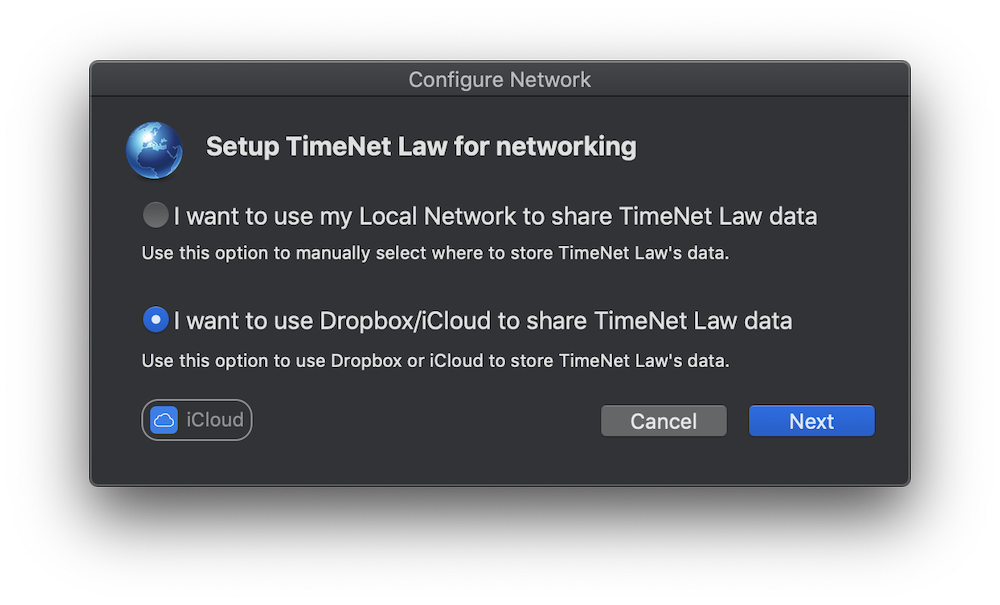
Open TimeNet Law and select File > Configure Network from the menubar.
Select the Dropbox/iCloud option, and click Next. NOTE: Even if you aren't using Dropbox or iCloud, select this option to use another cloud sync service.
2a. If you are using Dropbox, with no advanced custom path settings, click Finish.
TimeNet Law will copy your data onto Dropbox.
2b. To use a custom path, or to use another service such as iCloud Drive or Microsoft OneDrive:
Click "Choose Another Location" and select your cloud sync folder. Click Finish. TimeNet Law will move your data to this new location.
Before continuing to the next step, make sure your sync status says "Sync Complete" or "Up to Date" (usually in the menubar, under the Dropbox/OneDrive icon).
3. Make sure all other computers are signed into the same cloud service.
4. On all other computers, repeat this last step:
Download TimeNet Law and enter your license code into the software. Open TimeNet Law and select File > Configure Network. Choose the Dropbox/iCloud option, click Next, and then click Finish, or "Choose Another Location" and browse to the same cloud sync location that has the TimeNet Law Data folder.
You are now finished configuring TimeNet Law for cloud networking.
Instructions for Local Network Mode
1. Setup the computer that will store/share the TimeNet Law Database.
Instructions for Local Network Mode
1. Setup the computer that will store/share the TimeNet Law Database.
If you already have a properly configured shared folder on your network, skip to step 2.
- Create a folder on the computer that will be used as a Shared Folder.
- Turn on File Sharing and drag the folder you just created into the Shared Folders list ( > System Preferences > Sharing > File Sharing)
- Create a sharing user account for each user that will access TimeNet Law (System Preferences > Users & Groups > New User)
- Be sure all users that will use TimeNet Law are in the same group (System Preferences > Users & Groups > Make a Group and add all users to it)
This step is important - Set ACL permissions with Terminal (open Terminal and copy/paste the below command):
sudo chmod -R +a "GROUPNAME allow delete,chown,list,search,add_file,add_subdirectory,delete_child,file_inherit,directory_inherit" SHARED_FOLDER_PATH
Be sure to replace GROUPNAME with the name of the Group you are using, and SHARED_FOLDER_PATH to the location of the TimeNet Law Data folder. You can drag the Shared Folder into the Terminal window to automatically fill in the path.
You will be prompted for your Administrator password. Type it in and press return.
2. Configure TimeNet Law's networking settings on the first computer.
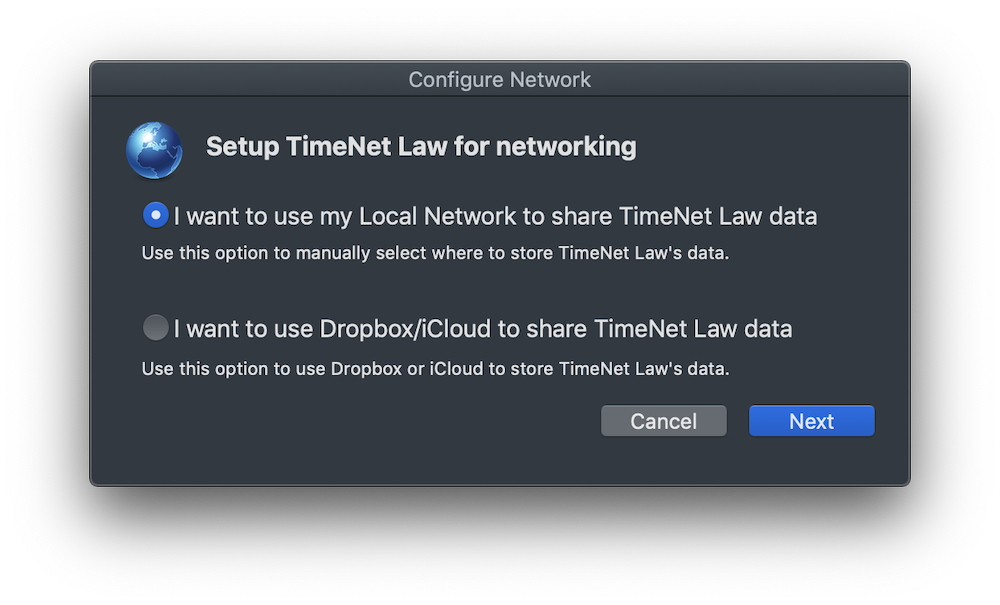
With TimeNet Law open, select File > Configure Network from the menubar. If you don’t see Configure Network, hold Option down on your keyboard and click the File menu again.
Select the Local Network option, and click Next.
Click Choose and navigate to your network/shared folder, and click Choose again. This is where the TimeNet Law Database will be stored. Then click Finish.
3. On all other computers, repeat this last step:
Download TimeNet Law and enter your license code into the software. Open TimeNet Law and select File > Configure Network. Choose the Local Network option and click Next, click Choose…, and select the TimeNet Law Data folder that was created inside your shared folder from step 3. Click Finish.